Power / Batteries & Chargers
User Manual for Denali 20V Brushless 12-Inch Chain Saw ACS4562B-00
Quick guide for the Denali 20V Brushless 12-Inch Chain Saw (ACS4562B-00). Includes assembly, chain tensioning, oiling, operation, safety, and maintenance instructions.
Quick answers from the manual
Quick answer
- The Denali 20V Brushless 12-Inch Chain Saw is a battery-powered tool for cutting wood. It requires assembly of the guide bar and chain, regular oiling, and proper chain tensioning before use. p. 12, 13, 17, 19
Key actions
- Assemble the guide bar and chain p. 13, 14, 15, 16
- Adjust chain tension p. 17, 18
- Fill the oil tank p. 19, 20
- Start the machine p. 27
First start
- Install battery, disengage chain brake, hold handles firmly, press lock-off button, then squeeze trigger. p. 21, 27
Problems and fixes
Motor does not run
Check battery charge, attachment, and chain brake.
p. 42
Chain does not rotate
Reassemble chain in correct direction.
p. 42Maintenance and reset
- Regularly clean the housing, saw chain, and guide bar. Sharpen the chain when necessary. p. 36, 38, 40
Technical specifications
| Parameter | Value | Meaning | Pages |
|---|---|---|---|
| Voltage | 20V | Rated voltage | p. 10 |
| Guide bar length | 12" | Guide bar length | p. 10 |
Where to find it in the PDF
- Safety Warnings p. 5, 6, 7, 8
- Assembly p. 13, 14, 15, 16
- Operation p. 22, 23, 24, 25
- Maintenance p. 36, 37, 38, 39
Table of contents
Manual images
Click an image to enlargeQuick guide from the manual
The Denali 20V Brushless 12-Inch Chain Saw is designed for cutting wood, including beams, planks, and tree trunks. Before first use, ensure all packaging is removed and the machine is inspected for damage. Always wear appropriate personal protective equipment (PPE), including eye protection, hearing protection, dust mask, and gloves. The machine requires assembly of the guide bar and chain, proper chain tensioning, and filling the oil tank before operation.
Machine Description
The chain saw features a front hand guard (with chain brake), front and rear handles, a trigger switch with a lock-off button, an oil tank, and a battery slot. A guide bar cover is included for storage.
Assembly
Installing the guide bar and saw chain:
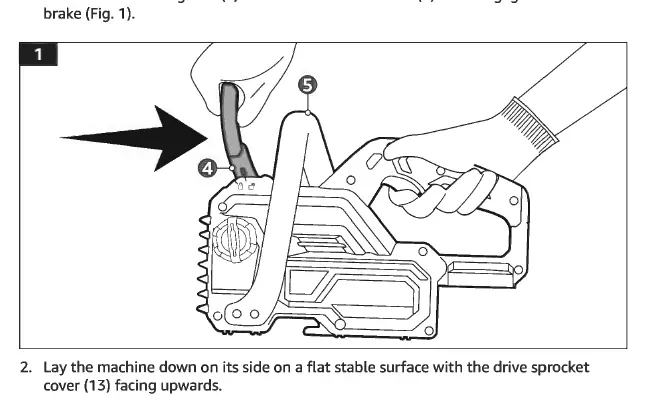
- Pull the front hand guard towards the front handle to disengage the chain brake.
- Lay the machine on its side.
- Turn the locking knob counter-clockwise to remove the drive sprocket cover.
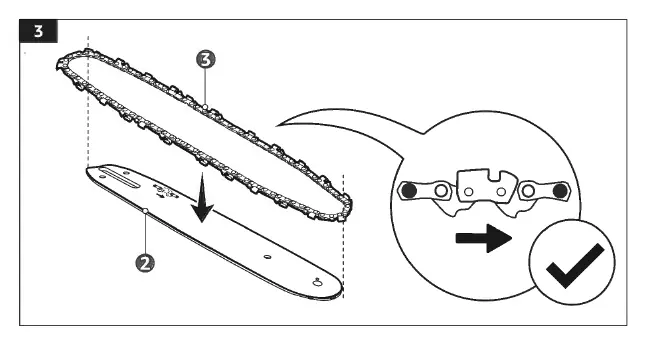
- Slide the saw chain into the slot around the guide bar, ensuring the direction matches the symbol on the guide bar.
- Place the guide bar and chain over the bolt and tabs, ensuring the chain fits around the drive sprocket and nose sprocket.
- Pull the guide bar to tighten the chain, then refit the drive sprocket cover and secure it with the locking knob.
Adjusting the chain tension:
- Loosen the locking knob slightly.
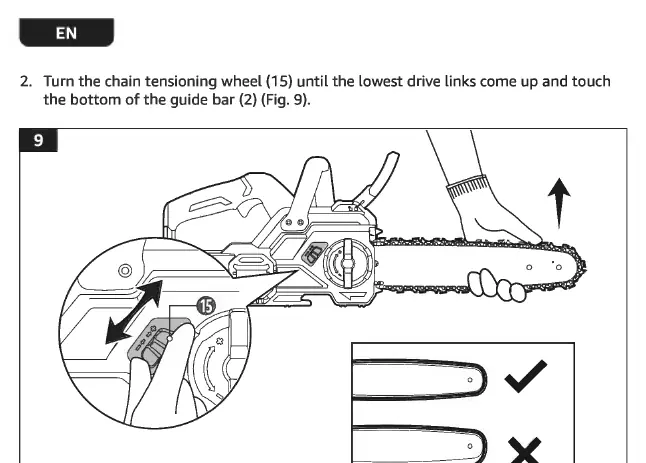
- Turn the chain tensioning wheel until the lowest drive links touch the bottom of the guide bar.
- The chain is correctly tensioned when it can be raised approximately 0.197" (5 mm) from the edge of the guide bar.
- Tighten the locking knob fully.
Operation
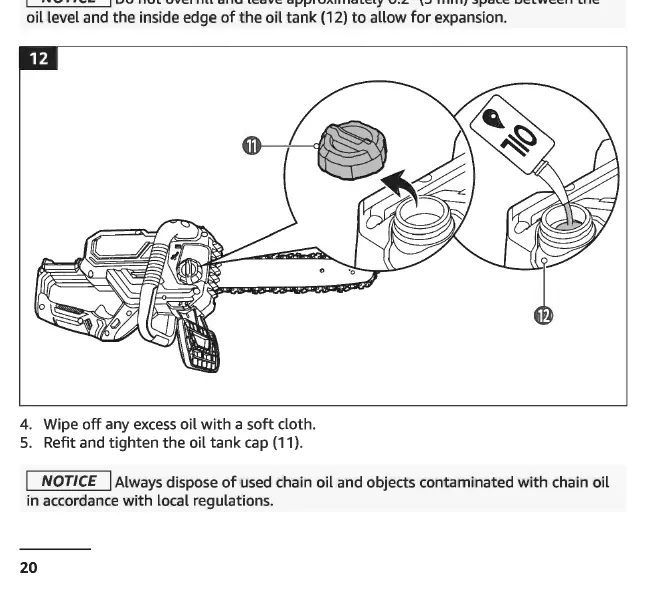
Filling the oil tank: The machine is not supplied with oil. Use biodegradable chain oil. Check the level before each use and refill if below the MIN mark. Do not overfill; leave about 0.2" (5 mm) space for expansion.
Starting/stopping:
- Slide the battery pack onto the machine.
- Disengage the chain brake.
- Hold the machine firmly with both hands.
- Press and hold the lock-off button, then squeeze the trigger switch to start.
- Release the trigger switch to stop.
Cleaning and Maintenance
Always remove the battery before cleaning or maintenance. Clean the housing with a damp cloth. Clean the saw chain and guide bar regularly. Lubricate the chain and sprockets. Sharpen the saw chain when wood chips become small and powdery. Check the depth gauge clearance (0.025" / 0.6 mm) after sharpening.
Troubleshooting
If the motor does not run, check the battery charge and connection. If the chain does not rotate, check the chain direction and tension. If the machine does not cut properly, check chain tension and sharpness, or refill the oil tank. If the chain brake cannot be engaged, remove debris from the front handle.
Practical help
Common problems
Motor does not run
Check if the battery is charged and properly attached. Ensure the lock-off button is pressed and the chain brake is disengaged.
Chain does not rotate
Check if the chain is installed in the correct direction and properly seated on the sprockets.
Machine does not cut properly
Check chain tension, sharpen the chain if dull, or refill the oil tank if empty.
Chain brake cannot be engaged
Remove debris from the front hand guard area.
Overheating/Smoking
Adjust chain tension (it may be over-tightened) and ensure sufficient lubrication.
Before use
- Wear full PPE (eye, ear, dust mask, gloves, non-skid shoes).
- Check battery charge level.
- Check oil level in the tank (refill if below MIN).
- Check chain tension.
- Perform a chain brake test.
- Inspect for loose screws or damaged parts.
Specs in practice
- Rated voltage
- 20V DC
- Guide bar length
- 12 inches (30 cm)
- Oil tank capacity
- 6.09 fl. oz (180 ml)
Images and diagrams
- Fig 1-7: Assembly of guide bar and chain.
- Fig 12: Filling the oil tank.
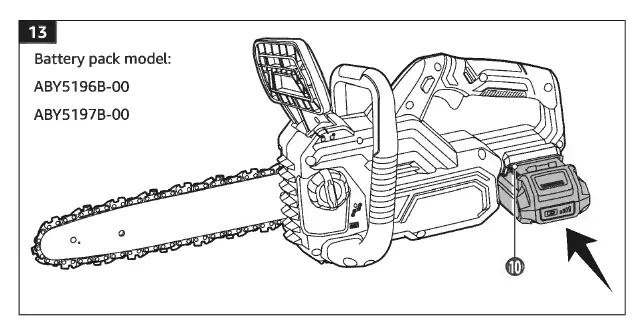
- Fig 13-14: Battery installation and removal.
- Fig 21-32: Cutting techniques (felling, bucking, limbing).
Model compatibility
- Use only specified guide bar: TriLink M1431245-1041.
- Use only specified saw chain: TriLink CL14345PB.
- Use only specified battery packs: ABY5196B-00, ABY5197B-00.

Manual page author
Emily Carter
User documentation editor
Prepares concise manual descriptions and highlights the most useful setup, operation, and maintenance information for readers.