Tools / Power Tools
User Manual for FERM RSM1022 20V Cordless Reciprocating Saw
Comprehensive user guide for the FERM RSM1022 20V Cordless Reciprocating Saw. Includes assembly, operation, maintenance, safety instructions, and technical specifications.
Quick answers from the manual
Quick answer
- The FERM RSM1022 is a 20V cordless reciprocating saw designed for cutting wood, plastic, and metal. It features variable speed control and a tool-free blade change system. p. 7, 8
Key actions
- Insert battery p. 7
- Change saw blade p. 8
- Start the machine p. 8
First start
- Charge the battery and install the blade before first use. p. 7, 8
Problems and fixes
Blade seizes
Switch off immediately, spread the gap with a tool, and pull out the blade.
p. 8Maintenance and reset
- Clean the machine casing regularly and keep ventilation openings free of dust. p. 9
Technical specifications
| Parameter | Value | Meaning | Pages |
|---|---|---|---|
| Voltage | 20V | Rated voltage | p. 7 |
| No load speed | 0-3000/min | Speed range | p. 7 |
| Weight | 1.7 kg | Tool weight | p. 7 |
Where to find it in the PDF
- Safety Instructions p. 4, 5, 6
- Assembly p. 7, 8
- Operation p. 8
- Maintenance p. 9
Table of contents
Manual images
Click an image to enlargeQuick guide from the manual
This manual provides essential instructions for the FERM RSM1022 20V Cordless Reciprocating Saw. Key safety requirements include wearing eye and ear protection, keeping bystanders at least 10m away, and ensuring the workpiece is securely clamped. Always remove the battery before performing any maintenance, adjustments, or changing accessories.
Description
The tool features a lock-off button, on/off switch, auxiliary handle, baseplate, chuck, and a clamping lever for tool-free blade changes.

Assembly
Battery
Insert the battery into the base of the machine until it clicks into place. To remove, press the battery unlock button and pull the battery out.
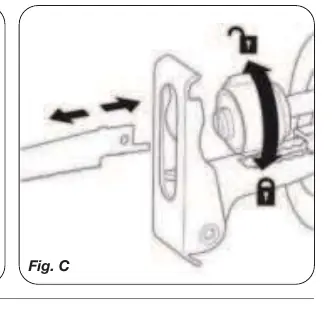
Saw Blade
Turn the clamping lever to the left and hold. Insert the saw blade into the chuck, ensuring the teeth point downwards. Release the lever and verify the blade is securely locked.
Operation
To start the machine, press and hold the lock-off button, then press the on/off switch. The speed is variable; the further the switch is pressed, the faster the blade moves.
Cutting Techniques
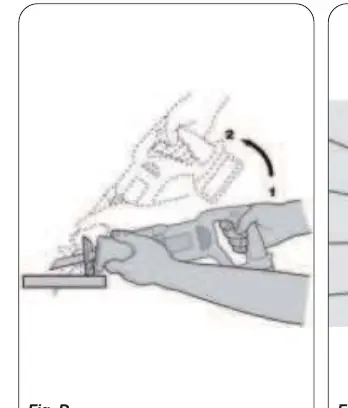
- Plunge cutting: Suitable only for soft materials like wood, aerated concrete, or gypsum plaster boards. Start at an angle and slowly move the saw to a vertical position.
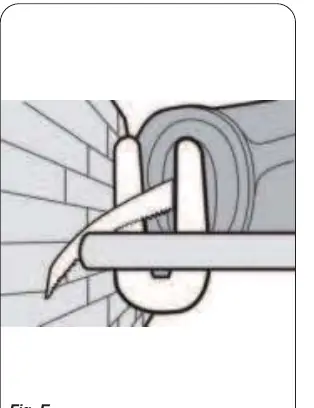
- Flush cutting: Use elastic bi-metal blades to cut objects near walls. Apply the blade directly to the wall and bend it slightly so the footplate rests against the wall.
Maintenance
Clean the machine casing regularly with a soft cloth, preferably after each use. Ensure ventilation openings are free of dust and dirt. Do not use solvents such as gasoline, alcohol, or ammonia, as these will damage synthetic components.
Practical help
Common problems
Blade seizes during operation
Switch off the machine immediately. Use a suitable tool to spread the gap and pull out the saw blade.
Machine does not start
Check if the battery is charged and properly inserted. Ensure the lock-off button is pressed before the on/off switch.
Excessive vibration
Check if the blade is sharp and undamaged. Use coolant or lubricant when sawing metal to reduce fluttering.
Before use
- Charge the battery fully before first use.
- Ensure the blade holder is free of debris.
- Check that the saw blade is sharp and undamaged.
- Secure the workpiece with clamps or a vice.
- Wear eye protection, ear protection, and a dust mask.
- Check the work area for hidden utility lines.
Specs in practice
- No load speed
- 0-3000/min; the speed of the blade movement, controlled by the trigger.
- Max. saw capacity wood
- 115mm; maximum thickness of wood that can be cut.
- Max. saw capacity steel
- 10mm; maximum thickness of steel that can be cut.
Images and diagrams
- Fig A: Overview of tool parts including lock-off button, switch, and chuck.
- Fig C: Blade replacement procedure using the clamping lever.
- Fig D: Plunge cutting technique.
- Fig E: Flush cutting technique against a wall.
- Fig F: Battery insertion and removal.
Model compatibility
- Compatible with FERM FX-POWER 20V batteries (CDA1167, CDA1168).
- Use charger CDA1169 or CDA1170 for these batteries.

Manual page author
David Miller
Documentation analyst
Organizes user manual content into clear summaries, with attention to model details, product context, and everyday usability.