Home Appliances / Small Kitchen Appliances
User Manual for Presto 22-inch Electric Griddle
Comprehensive user guide for the Presto 22-inch Electric Griddle. Includes instructions for handle assembly, safe operation, cleaning, maintenance, and a detailed cooking temperature timetable.
Quick answers from the manual
Quick answer
- The Presto 22-inch Electric Griddle features removable handles for storage and a Control Master heat control. It is designed for household use on a 120VAC outlet. Always hand wash the griddle and never immerse the heat control in water. p. 1, 2, 3
Key actions
- Assemble handles p. 2
- Clean the griddle p. 3
First start
- Remove packaging, wash the griddle, attach handles, insert heat control, and preheat for 5-10 minutes. p. 2
Show 4 more answers Show less
Problems and fixes
Discoloration on ceramic finish
Apply a paste of baking soda and water, let sit, and scour with a nylon mesh pad.
p. 3Maintenance and reset
- Hand wash only; do not use dishwasher. p. 3
Technical specifications
| Parameter | Value | Meaning | Pages |
|---|---|---|---|
| Voltage | 120VAC | Standard electrical outlet requirement. | p. 2 |
Where to find it in the PDF
- Safety and Features p. 1
- Assembly and Usage p. 2
- Cleaning and Cooking Guide p. 3
- Service and Warranty p. 4
Table of contents
Manual images
Click an image to enlargeQuick guide from the manual
This document provides essential instructions for the Presto 22-inch Electric Griddle. Key procedures include assembling the removable handles, operating the Control Master heat control, and maintaining the ceramic nonstick surface. Always ensure the handles are securely attached before use and never immerse the heat control in water.
Assembly and First Use
Before using the griddle for the first time, remove all packaging materials and wash the griddle (excluding the heat control) in warm, soapy water.
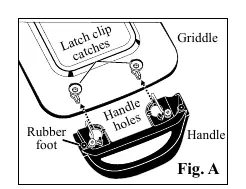
- Place the griddle on a flat surface with the cooking surface facing down.
- Position one handle over the griddle so the handle holes align with the latch clip catches.
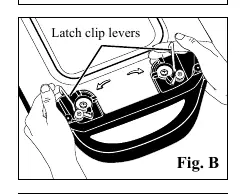
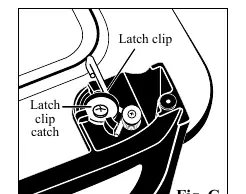
- Pull the latch clips back beyond the catches and push the handle down until it is firmly seated.
- Release the latch clips to lock the handle into place. Ensure both clips are under the edge of the catches.
- Repeat the process for the second handle.
How to Use
Placement: Place the assembled griddle on a dry, level, heat-resistant surface away from walls and cabinets. If using a heat-resistant protector like aluminum foil, ensure it does not extend under the rubber feet.
Operation:
- Slide the drip tray onto its tracks.
- Insert the Control Master heat control probe into the griddle until the pins are fully inserted.
- Connect the cord to a 120VAC electrical outlet.
- Set the heat control to the desired temperature. Preheat for 5 to 10 minutes until the indicator light turns off.
- Use nylon, plastic, wooden, or rubber utensils to avoid scratching the ceramic surface.
- When finished, turn the heat control to OFF, unplug from the wall, and then remove the heat control from the griddle.
Care and Cleaning
Important: Do not wash the griddle in the dishwasher, as this will damage the nonstick properties and cause discoloration. Do not immerse the Control Master heat control in water.
- Remove the heat control before cleaning.
- Wash the griddle in warm, soapy water.
- Clean the nonstick surface with a nylon mesh scouring pad or a damp cloth. Do not use steel wool or abrasive cleaners.
- If the ceramic finish darkens due to grease buildup, make a paste of baking soda and water, let it sit for several minutes, then scour with a nylon mesh pad.
Cooking Temperature Timetable
The manual provides a reference for cooking various foods:
- Bacon: 325°–350°F (5–8 minutes)
- Eggs, fried: 275°–300°F (3–5 minutes)
- Hamburgers (½ inch thick): 325°–375°F (8–12 minutes)
- Pancakes: 350°–400°F (2–3 minutes)
- Steak (1 inch thick, medium): 350°–400°F (10–12 minutes)
Manufacturer information
National Presto Industries, Inc.
Practical help
Common problems
Griddle moves on countertop
Ensure the appliance is on a level surface. If using a heat-resistant protector (like foil), do not place any portion of the foil under the rubber feet.
Food sticks to the surface
Avoid using no-stick cooking sprays, as they can make the surface tacky. Use nylon, plastic, wooden, or rubber utensils.
Ceramic finish is darkening
This is likely grease buildup. Sprinkle baking soda over the area, add water to make a paste, let sit for several minutes, and scour with a nylon mesh pad.
Before use
- Remove all packing material and shipping foam.
- Wash the griddle (excluding the heat control) in warm, soapy water.
- Attach handles by aligning holes over latch clip catches.
- Ensure latch clips are securely locked under the edge of the catches.
- Connect the heat control probe fully into the griddle.
Show more Show less
Specs in practice
- Control Master
- The detachable heat control unit. Never immerse this part in water or liquid.
Images and diagrams
- Handle Assembly: Shows how to align handle holes with latch clip catches.
- Latch Clips: Demonstrates pulling back the clips to lock or unlock the handles.
Model compatibility
- Not intended to be used as a warming tray, hot plate, or for heating other cookware.
- Use only genuine Presto replacement parts.

Manual page author
David Miller
Documentation analyst