Automotive / Engine Components
Installation Guide for PRL Motorsports Front Mount Intercooler (PRL-HA10-IC)
Comprehensive installation guide for the PRL Motorsports Front Mount Intercooler (PRL-HA10-IC) for 2021+ Acura TLX 2.0T. Includes step-by-step mounting, bumper beam trimming, and maintenance instructions.
Quick answers from the manual
Quick answer
- The PRL-HA10-IC is a front-mount intercooler for the 2021+ Acura TLX 2.0T. Installation involves removing the front bumper, factory intercooler, and trimming the bumper beam for clearance. No ECU tuning is required. p. 2, 13
Key actions
- Trim bumper beam p. 8, 9, 10
First start
- Start vehicle in neutral with emergency brake engaged, assess for issues, then test drive. p. 13
Maintenance and reset
- Visually inspect connections during routine maintenance like oil changes. p. 13
Technical specifications
| Parameter | Value | Meaning | Pages |
|---|---|---|---|
| Torque | 18 ft/lbs | For passenger side end tank bolts | p. 11 |
Where to find it in the PDF
- Installation Overview p. 2
- Component List p. 3
- Installation Steps p. 4, 12
Table of contents
Manual images
Click an image to enlargeImportant Information
This guide provides instructions for installing the PRL Motorsports Front Mount Intercooler on a 2021+ Acura TLX 2.0T. Note: This item does not require an ECU re-calibration. The unit is rated for 600HP. Installation takes approximately 3 hours.
Preparation
Before beginning, ensure you have the following tools: Ratchet, 6-12 inch extension, 10mm and 14mm sockets, 1/4 inch hex socket, torque wrench, needle nose pliers, Phillips and flat head screwdrivers, clip removal tool, combination square/measuring tape, permanent marker, angle grinder/cutting wheel, drill, and eye protection.
Safety First: Turn off the ignition, loosen the battery terminal, and disconnect the negative battery cable. Allow the vehicle to sit for at least 5 minutes to drain the charging system. Save any memory settings before disconnecting, as this may erase pre-programmed electronic memory.
Installation Steps
Bumper and Factory Intercooler Removal
- Remove the front bumper to access the factory intercooler.
- Remove the factory brackets holding the factory intercooler.
- Remove the (2) factory 10mm bolts per side of the factory intercooler. Keep these bolts for reuse.
- Remove the vertical support bracket located behind the factory intercooler by removing the (1) 10mm bolt and (1) 10mm nut. This bracket is removed permanently.
Bumper Beam Trimming
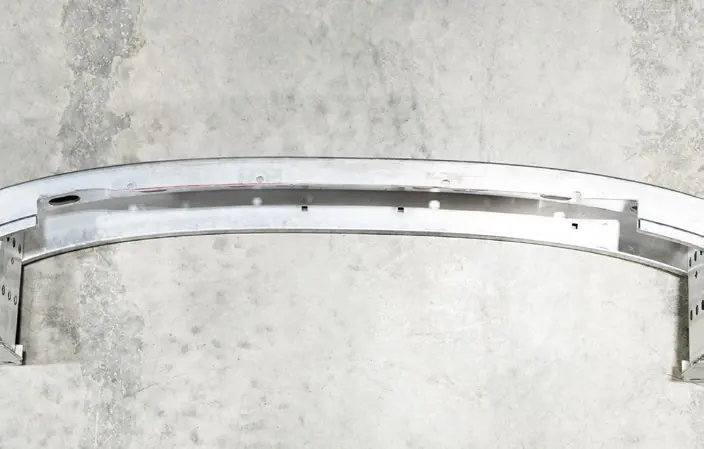
- Remove the bumper beam by removing the (5) 14mm and (1) 10mm factory bolts per side.
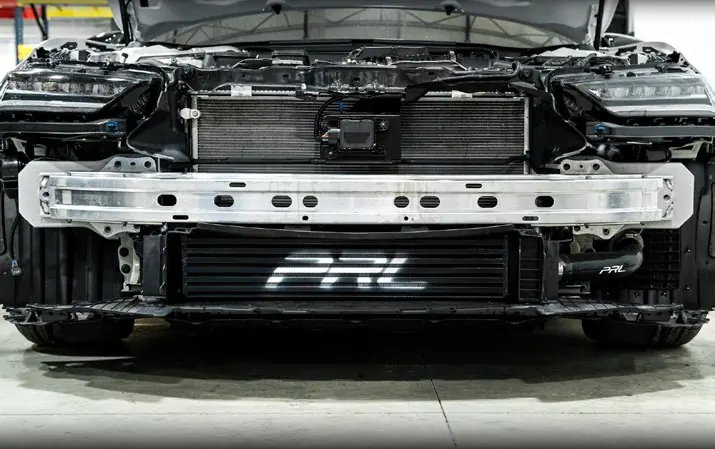
- Seat the PRL Intercooler into the factory mount location.
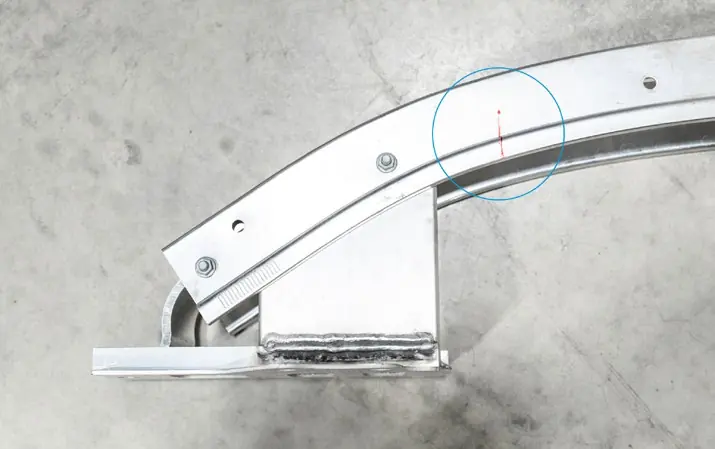
- With assistance, line up the bumper beam to its mounting location. Use a permanent marker to mark a line at each edge where the intercooler ends on the bumper beam.
- Using a combination square, measure 1-5/8 inches and mark a straight line and a dot at the end.
- Use a cutting wheel or angle grinder to cut an arched line across the bumper beam, underneath the factory holes. Do not cut fully through the holes.
Intercooler Installation
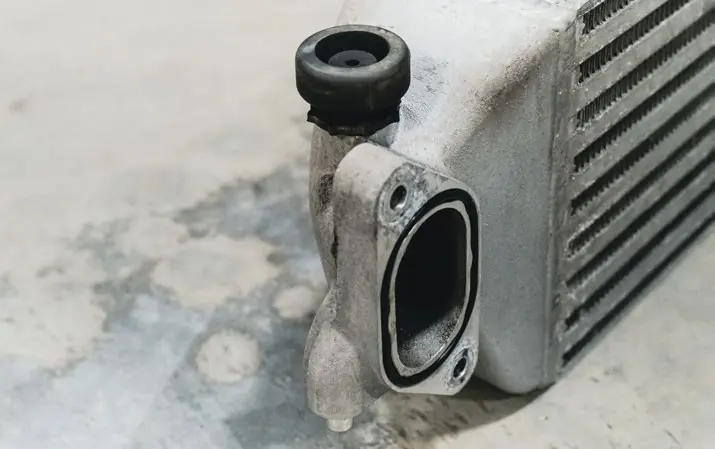
- Transfer the (2) rubber grommets from the factory intercooler to the PRL Intercooler.
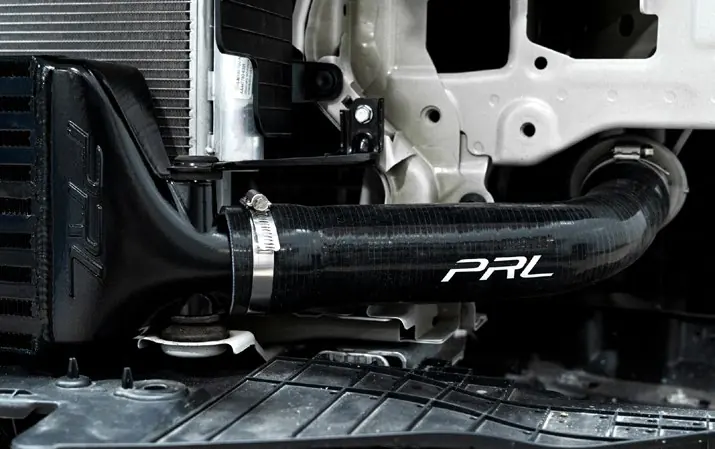
- Place the PRL silicone hose on the driver's side using the provided worm gear clamp.
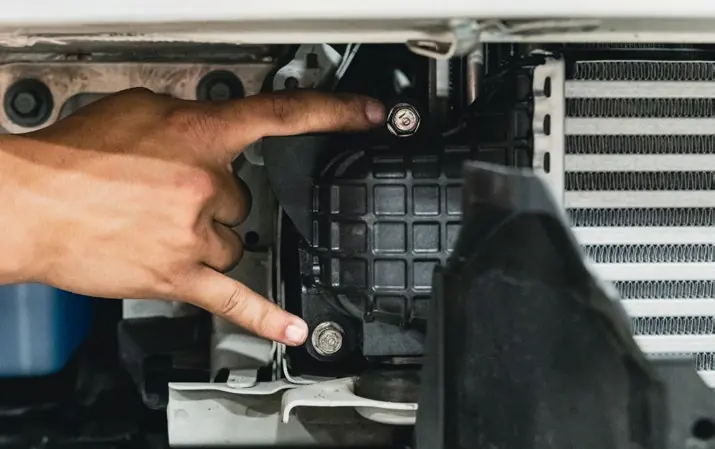
- Affix the factory bracket on top of the intercooler using the rubber grommet and the (1) 10mm bolt.
- Torque the (2) factory 12mm bolts on the passenger side of the end tank to the factory charge pipe to 18 ft/lbs.
- Align the PRL silicone hose with the factory charge pipe and tighten the provided worm gear clamps.
- Trim the plastic air guide to fit correctly, ensuring an air gap exists all around the intercooler.
- Reinstall the bumper beam and follow bumper removal steps in reverse.
Road Testing
- Start the vehicle in neutral with the emergency brake engaged.
- Assess for any issues and make adjustments if necessary.
- Test drive the vehicle to ensure everything is in working order.
Required Maintenance
Visually inspect the intercooler and connections during routine maintenance such as oil changes, tire rotations, and filter changes. Ensure connections have not come loose. Avoid driving through debris that could damage the fins or over objects that could puncture the unit.
Practical help
Common problems
Missing components
Verify all parts against the component list and contact PRL Customer Support if items are missing.
Bumper beam interference
Ensure the bumper beam is trimmed according to the measurements provided to maintain an air gap around the intercooler.
Before use
- Turn off ignition and disconnect negative battery terminal.
- Allow vehicle to sit for 5 minutes.
- Verify all parts from the component list are present.
- Ensure you have required tools: Ratchet, 10mm/14mm sockets, torque wrench, angle grinder, etc.
Specs in practice
- Compatibility
- 2021+ Acura TLX 2.0T.
- Power Rating
- Rated for 600HP.
Images and diagrams
- Component list diagram shows intercooler, O-ring, hose, and clamps.
- Bumper beam trimming diagrams show where to mark and cut for clearance.
Model compatibility
- Designed for 2021+ Acura TLX 2.0T.
- No ECU re-calibration required.

Manual page author
Michael Turner
Technical manual editor
Reviews PDF manuals for structure, safety notes, and practical product details so readers can find the right information quickly.