Automotive / Cooling Systems
Installation Guide for PRL Motorsports 2018+ Honda Accord 2.0T High Volume Intake System
Step-by-step installation guide for the PRL Motorsports High Volume Intake System for 2018+ Honda Accord 2.0T. Includes tools required, component list, installation steps, and maintenance instructions.
Quick answers from the manual
Quick answer
- This guide provides instructions for installing the PRL Motorsports High Volume Intake System on a 2018+ Honda Accord 2.0T. Installation takes approximately 1-1.5 hours and does not require a tune, though one is recommended for maximum performance. p. 2
Key actions
- Disconnect the negative battery cable before starting installation. p. 4
- Clean the air filter every 30,000 miles or when the screen is no longer visible. p. 23
First start
- Start the vehicle in neutral or park with the emergency brake engaged. Listen for air leaks or odd noises. p. 23
Problems and fixes
Check engine light (CEL) appears
If the vehicle is operating correctly, drive for a few miles and the code should clear.
p. 22Technical specifications
| Parameter | Value | Meaning | Pages |
|---|---|---|---|
| MAF housing bolts torque | 11.2 ft/lbs | Torque for securing MAF housing to adapter | p. 16 |
| Side cover bolts torque | 24 in/lb | Torque for securing side cover | p. 18 |
Where to find it in the PDF
- Before Installation p. 2
- Component List p. 3
- Installation p. 4, 5, 6, 7
- Additional Information p. 23
Table of contents
Manual images
Click an image to enlargeQuick guide from the manual
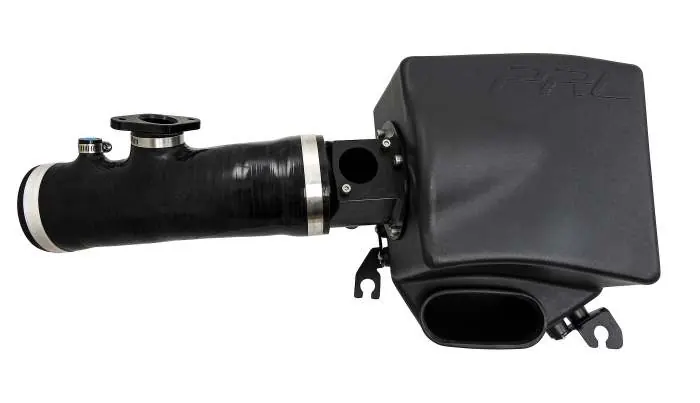
This installation guide covers the PRL Motorsports High Volume Intake System for the 2018+ Honda Accord 2.0T. The installation takes approximately 1 to 1.5 hours. While this system does not require a tune, a custom tune is recommended to maximize potential power and yield the best results. Please ensure all components from the parts list are present before beginning.
Tools required
- Ratchet
- Extension (8”-10” Swivel Head recommended)
- 10mm Socket
- 8mm Socket
- 10mm Wrench
- Flat-Head Screwdriver and Plastic Panel Tool
- Phillips-Head Screwdriver
- 3mm Hex-Key/ Allen Wrench
- 5mm Hex-Key/ Allen Wrench
Installation steps
Preparation: Turn off the ignition and disconnect the negative battery cable. Allow the vehicle to sit for 5 minutes to drain any remaining charge. Ensure the emergency brake is engaged.
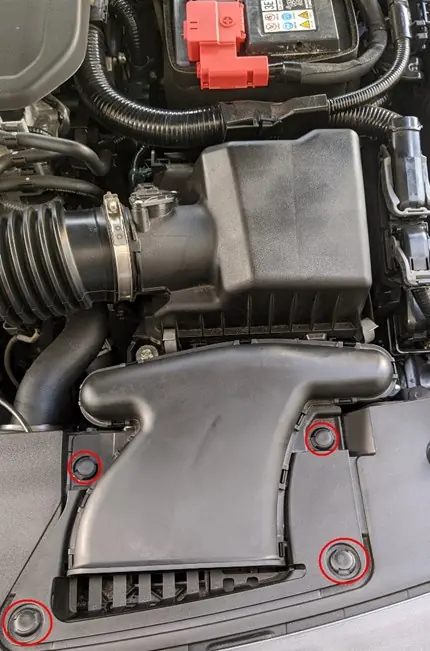

Removal: Remove the 4 plastic clips holding the intake duct to the plastic shroud. Loosen the clamps on the stock intake tube, remove the small hose clamp from the evap system, and remove the two bolts on the adapter section. Release the intake duct from the shroud and the rubber connection. Remove the MAF sensor from the factory airbox, taking care not to damage it. Remove the airbox lid, filter, and the front bolts with dampeners. It is recommended to remove the ECU for better access to the final side bolt.
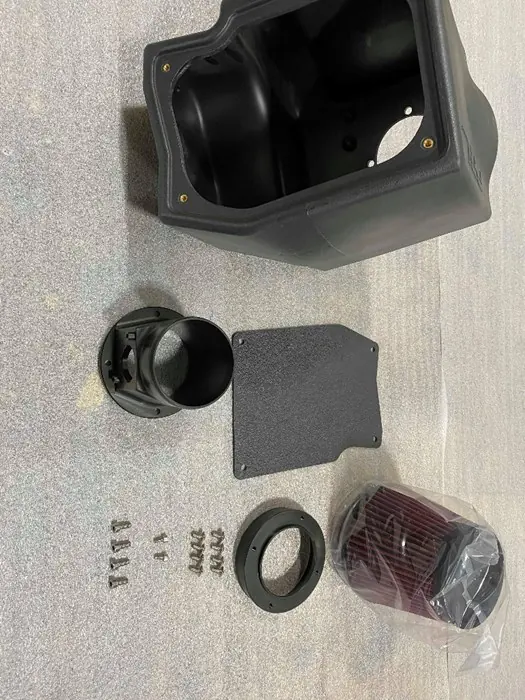
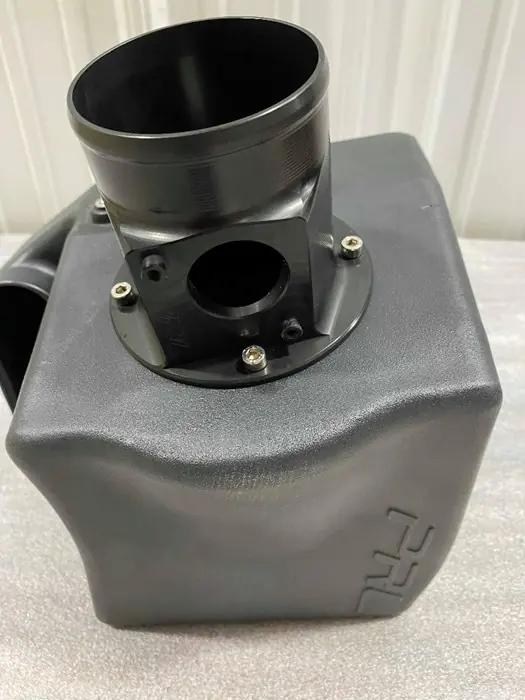
Assembly: Install the rubber grommet from the factory standoff into the bottom of the PRL airbox. Assemble the PRL airbox by inserting the machined MAF to filter adapter into the filter and tightening the hose clamp. Secure the MAF housing onto the adapter using the supplied M5x12mm bolts (torque to 11.2 ft/lbs). Secure the side cover using the supplied bolts (torque to 24 in/lb). Install the brackets onto the airbox using the factory rubber dampeners.
Final Installation: Place the MAF sensor into the PRL MAF housing and secure it with the supplied bolts. Install the PRL silicone hose in place of the factory hose, ensuring all clamps are installed before the hose. Connect the vacuum lines to the plastic evap adapter and tighten the clamps. Reinstall the factory rubber piece for the duct and the factory intake duct. Double-check all connections and bolts before starting the vehicle.
Maintenance and filter cleaning
Visually inspect the air filter at every oil change. Clean the filter element whenever the screen is no longer visible or every 30,000 miles, whichever comes first. Use the #2801 filter cleaning & recharge kit for maintenance.
Filter Recharging Process:
- Pre-Cleaning: Tap the filter or blow with air to remove excess dirt.
- Apply Cleaner: Spray the filter with the cleaner kit and allow it to soak for 15 minutes.
- Rinse: Rinse the filter with warm water, from the clean side to the dirty side.
- Drying: Allow the filter to air dry. Avoid heat to prevent shrinking the cotton.
- Apply Oil: Re-oil the filter using 1 spray per 2 square inches of filter. Do not over-oil.
Practical help
Common problems
Check engine light (CEL) after installation
If the vehicle is operating correctly, drive for a few miles to allow the code to clear.
Filter touching airbox walls
Ensure the filter is secured to the adapter with gaps around each side for optimal performance.
Before use
- Verify all components from the parts list are present
- Ensure the emergency brake is engaged
- Disconnect the negative battery cable
- Allow the vehicle to sit for 5 minutes to drain charge
Specs in practice
- MAF housing bolts torque
- 11.2 ft/lbs
- Side cover bolts torque
- 24 in/lb
Images and diagrams
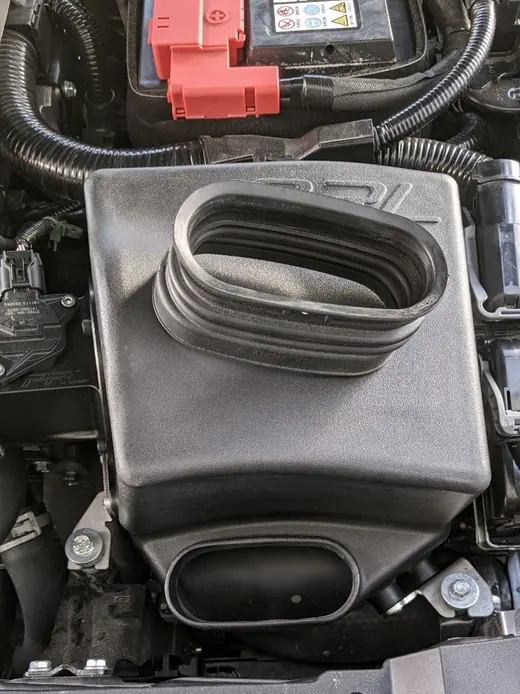
- The manual provides detailed photos for each step of the intake removal and installation process.
Model compatibility
- Designed for 2018+ Honda Accord 2.0T
- Not 50 state compliant
- Intended for offroad use only

Manual page author
Emily Carter
User documentation editor
Prepares concise manual descriptions and highlights the most useful setup, operation, and maintenance information for readers.