Automotive / Towing Accessories
Redarc 23A MIDI Fuse Kit FK23 Installation Guide
Installation guide for the Redarc 23A MIDI Fuse Kit (FK23). Includes kit contents, step-by-step lug and heatshrink assembly, fuse holder installation, and wiring diagrams for dual battery systems.
Quick answers from the manual
Quick answer
- The FK23 is a fuse kit designed for simple, neat fuse installation in dual battery systems, specifically optimized for the BCDC1212T start battery input connection. p. 2
Key actions
- Assemble the lug onto the cable using a crimping tool and heatshrink. p. 4
- Assemble the fuse holder in the order: Bolt, MIDI Fuse, Lug, Spring Washer, Nut. p. 4
Technical specifications
| Parameter | Value | Meaning | Pages |
|---|---|---|---|
| Fuse Rating | 23A | Current rating of the MIDI fuse | p. 2 |
| Cable Compatibility | 10mm² | Standard cable size for provided lugs | p. 2 |
Show 1 more answers Show less
Where to find it in the PDF
- Kit Contents p. 2
- Assembly Instructions p. 4
Table of contents
Manual images
Click an image to enlargeQuick guide from the manual
The FK23 is a fuse kit designed to provide a simple and neat fuse installation for dual battery systems. It is specifically optimized for the BCDC1212T start battery input connection.
Kit contents
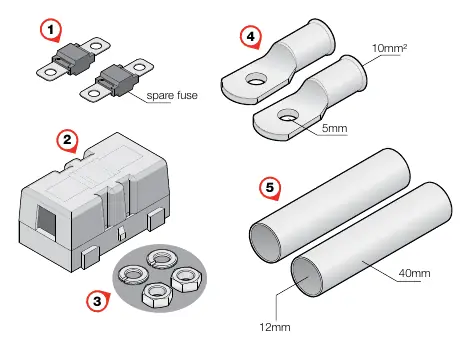
- 2x 23A MIDI Fuse
- 1x Fuse Holder
- 2x Nut and Spring Washer
- 2x Lug (intended for 10mm² cable)
- 2x Heatshrink
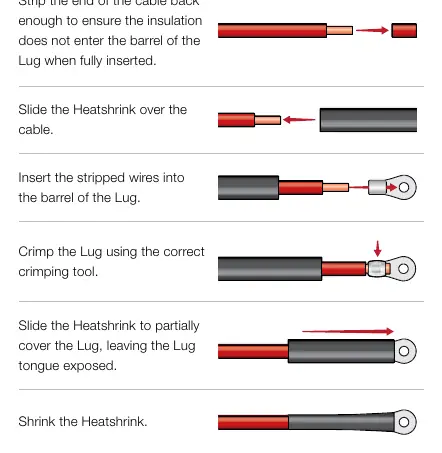
Lug and heatshrink assembly
- Strip the end of the cable back enough to ensure the insulation does not enter the barrel of the Lug when fully inserted.
- Slide the Heatshrink over the cable.
- Insert the stripped wires into the barrel of the Lug.
- Crimp the Lug using the correct crimping tool.
- Slide the Heatshrink to partially cover the Lug, leaving the Lug tongue exposed.
- Shrink the Heatshrink.
Note: If using a smaller cable gauge, insert with conductor foldback. If using a larger cable gauge, source a larger lug.
Fuse kit assembly
The order of installing the bolt in the Fuse Holder is as follows:
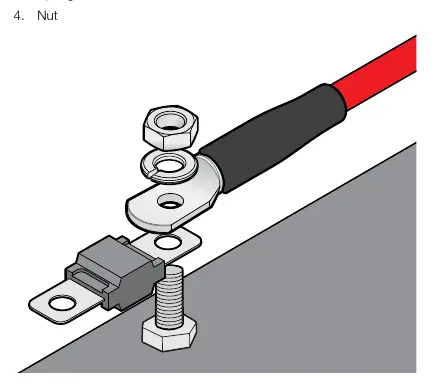
- MIDI Fuse
- Lug with Heatshrink and cable
- Spring Washer
- Nut
Installation
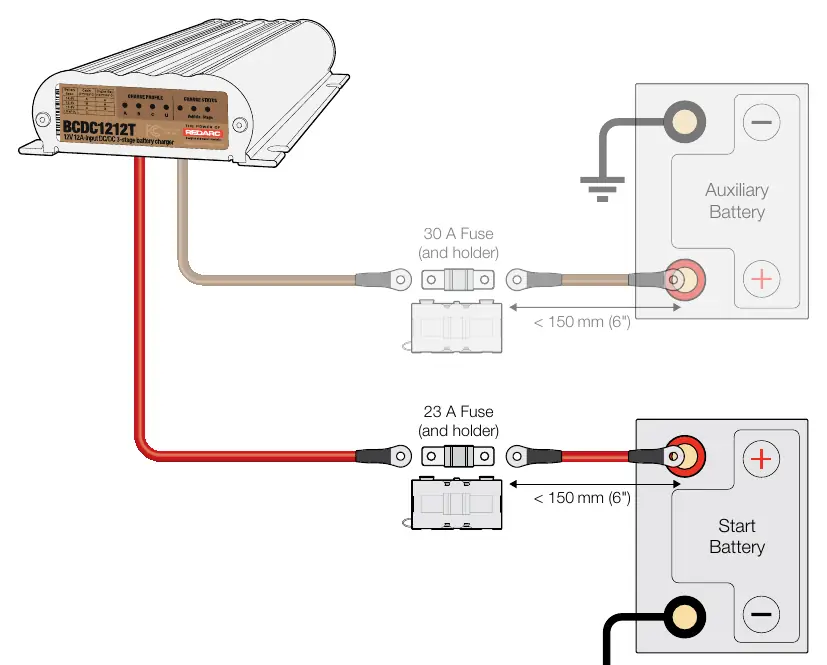
When installing the fuse kit, ensure the fuse is placed within 150mm (6") of the battery terminal. The kit is designed to facilitate the start battery input connection for the BCDC1212T charger.
Practical help
Common problems
Cable gauge does not match the provided lugs
If using a smaller cable gauge, insert with conductor foldback. If using a larger cable gauge, you must source a larger lug.
Before use
- Verify you have a 10mm² cable or appropriate alternative
- Ensure you have a suitable crimping tool
- Confirm the fuse rating (23A) is appropriate for your application
- Check that you have all kit components: 2 fuses, 1 holder, 2 nuts/washers, 2 lugs, 2 heatshrinks
Show more Show less
Specs in practice
- Installation distance
- Must be installed within 150mm (6") of the battery
Model compatibility
- Designed for dual battery systems
- Perfect for BCDC1212T start battery input connection

Manual page author
David Miller
Documentation analyst