Automotive / Electrical Accessories
Installation Guide for Redarc Tow-Pro Elite Wiring Kit on 22MY Ford Ranger
Installation guide for the Redarc Tow-Pro Elite wiring kit on 22MY Next-Gen Ford Ranger vehicles. Includes instructions for main unit mounting, remote head positioning for Bi-turbo and Standard models, and a drilling template.
Quick answers from the manual
Quick answer
- This guide details the installation of the Redarc Tow-Pro Elite wiring kit into a 22MY Next-Gen Ford Ranger, specifically focusing on main unit mounting and remote head positioning. p. 1, 2
Key actions
- Mount the main unit in the glove box using the supplied M6 nut and bolt after bending the bracket 90 degrees. p. 1
- Drill the remote head hole using a 3mm pilot drill followed by a 10mm final drill. p. 2
Problems and fixes
Clips difficult to remove on Bi-turbo gearshift trim
Ensure all three fixings are removed and be careful with the clips in the front corners.
p. 1Show 2 more answers Show less
Technical specifications
| Parameter | Value | Meaning | Pages |
|---|---|---|---|
| Pilot drill size | 3mm | Initial hole size for remote head | p. 2 |
| Final drill size | 10mm | Final hole size for remote head | p. 2 |
Where to find it in the PDF
- Main Unit and Remote Head Installation p. 1
- Drilling Template p. 2
Table of contents
Manual images
Click an image to enlargeQuick Guide
This document provides specific installation instructions for the Redarc Tow-Pro Elite wiring kit on 22MY Next-Gen Ford Ranger vehicles. It covers the differences in mounting the main unit and positioning the remote head. Please note that this guide covers only these specific differences; refer to the main Tow-Pro Ford Ranger wiring kit instruction manual for all other installation steps.
Main Unit Mounting
To mount the main unit:
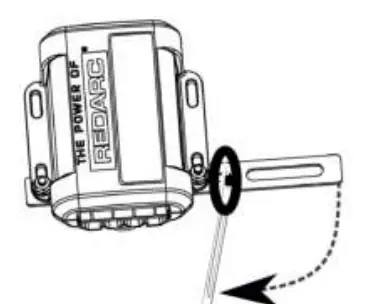
- Fit the Tow-Pro mounting bracket to the main unit.
- Bend the bracket down 90 degrees, close to the fitting.
- Mount the main unit to the left-hand side of the glove box using the supplied M6 nut and bolt in the indicated location.
Remote Head Positioning
The installation process for the remote head depends on the vehicle model:
- Bi-turbo model: Remove the gearshift trim. Note that the clips in the front corners can be difficult to release. Remove the three fixings exposed to lift the complete panel to fit the remote head.
- Standard model: The complete panel can be removed in a single piece.
Refer to the drilling template on the following page for the exact mounting location.
Drilling Template
When preparing the remote head location:
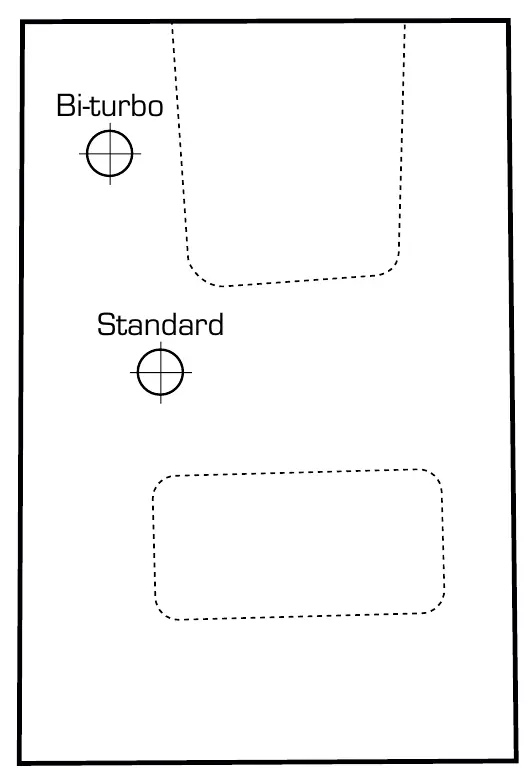
- Use the provided template to mark the position.
- Important: Check the scale of the template before starting (a 50mm reference is provided).
- Drill a 3mm pilot hole first.
- Finish with a 10mm hole.
Note: The template was produced from a Bi-Turbo model installation. Applications with manual transmission or other trim options may have slight differences.
Practical help
Common problems
Difficulty removing gearshift trim (Bi-turbo model)
The clips in the front corners can be difficult to release. Ensure all three fixings are removed before attempting to lift the panel.
Before use
- Verify vehicle model is 22MY Next-Gen Ford Ranger
- Ensure you have the main Tow-Pro Ford Ranger wiring kit instruction manual
- Check the drilling template scale (50mm reference) before cutting
- Identify if your vehicle is a Bi-turbo or Standard model
Show more Show less
Specs in practice
- M6 nut and bolt
- Hardware required for mounting the main unit
Images and diagrams
- The drilling template shows specific locations for Bi-turbo and Standard models.
- The gearshift trim diagram highlights the location of difficult clips in the front corners.
Model compatibility
- Template is based on a Bi-Turbo model installation.
- Manual transmission or other trim options may have slight differences in remote head mounting.

Manual page author
Emily Carter
User documentation editor