Lighting / Fixtures
Installation Guide for Resistex Hyperline Industrial Luminaire
Quick installation and setup guide for the Resistex Hyperline industrial luminaire. Includes wiring diagrams, power adjustment settings, and safety instructions.
Table of contents
Quick guide from the manual
This document provides essential installation and configuration instructions for the Resistex Hyperline industrial luminaire. Installation must be performed by a professional installer in compliance with local electrical standards. Always ensure the power is disconnected before working on the luminaire.
Safety notes
- Never work on the luminaire while it is under voltage.
- The installation must be performed by a professional installer.
- Observe all standards and regulations relating to electrical installations.
- The device is sensitive to electrostatic discharges (ESD); handle with appropriate precautions.
Installation
The installation process consists of 16 steps, involving mounting the fixture to the ceiling and securing the electrical connections. Ensure the luminaire is clicked securely into place as indicated in the diagrams.
Wiring and Connections
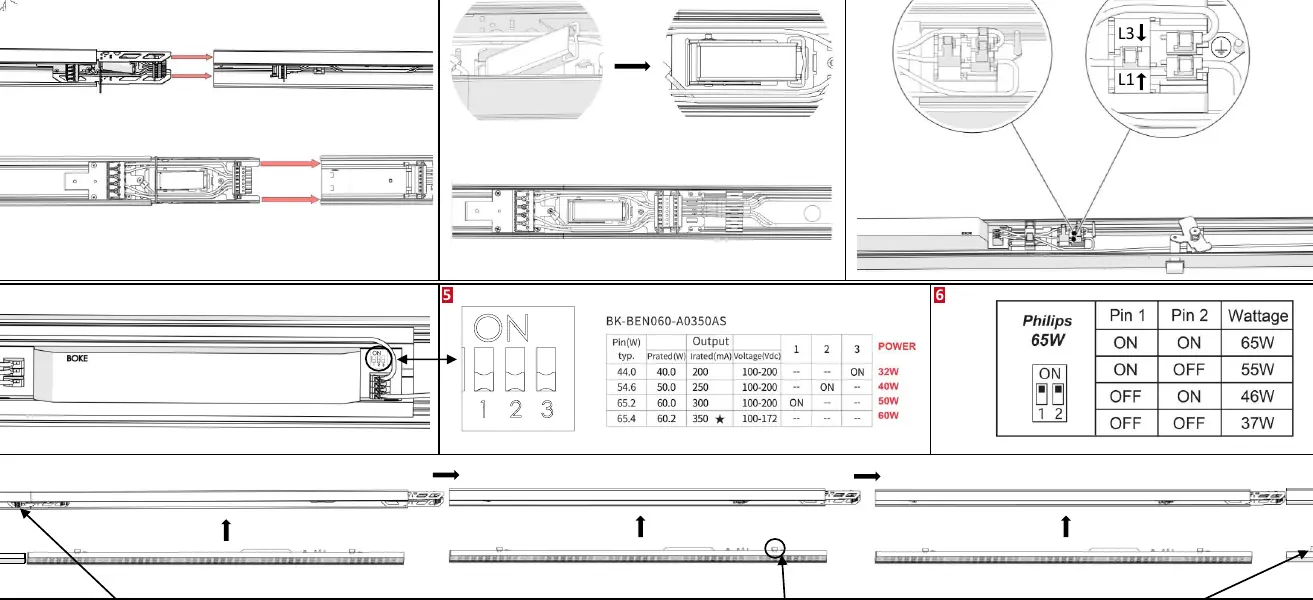
The luminaire requires proper connection to the electrical supply. The terminal block supports connections for L1, L2, L3, N, and Earth. Ensure the use of compatible cables, specifically HO5RN-F or U-1000 R2V types.
Power Adjustment
The luminaire features DIP switches that allow for wattage adjustment. Refer to the configuration table to set the desired output (65W, 55W, 46W, or 37W) by toggling Pin 1 and Pin 2 on the driver.
Maintenance
Do not use chemicals or abrasive products to clean the fixture. Keep these instructions for future dismantling or maintenance. For additional information, visit the manufacturer's website at www.resistex-sa.com.
Official resources from the manual
Practical help
Common problems
Luminaire does not turn on
Verify that the power supply is connected correctly to the L1, L2, L3, N, and Earth terminals and that the circuit is active.
Incorrect light output
Check the DIP switch settings on the driver to ensure they match the desired wattage (65W, 55W, 46W, or 37W).
Before use
- Ensure the power is disconnected before starting installation.
- Verify that the installer is a professional.
- Check that the cable type is compatible (HO5RN-F or U-1000 R2V).
- Confirm the desired wattage setting via DIP switches before final mounting.
Specs in practice
- DIP Switch Settings
- Used to adjust the output wattage of the luminaire (65W, 55W, 46W, 37W) by toggling pins 1 and 2.
Images and diagrams
- Steps 1-16 illustrate the physical mounting and clicking mechanism of the luminaire.
- Wiring diagram shows connections for L1, L2, L3, N, and Earth.
- DIP switch table shows how to configure wattage.
Model compatibility
- Compatible with HO5RN-F and U-1000 R2V cables.

Manual page author
David Miller
Documentation analyst
Organizes user manual content into clear summaries, with attention to model details, product context, and everyday usability.