Music / Pedalboard Accessories
User Manual for RockBoard MOD V2 Patchbay
Quick guide for the RockBoard MOD V2 All-in-One Patchbay. Learn how to install, mount, and connect your effects setup with this comprehensive user manual.
Table of contents
Manual images
Click an image to enlargeQuick Guide from the Manual
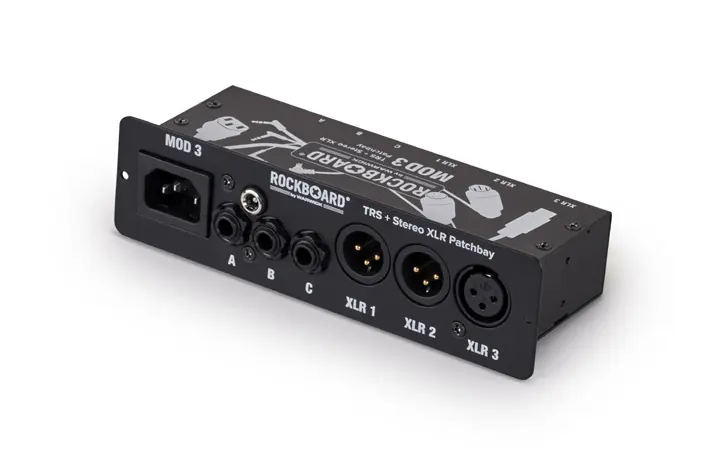
The RockBoard MOD V2 All-in-One Patchbays are designed to organize connections to and from your effects setup. They act as a central access point, routing connections from underneath your pedalboard to the front. Please note that these units do not require power and do not distribute power; they are purely routing tools.
Device Overview
There are three versions of the MOD V2 available, each offering different connection types:
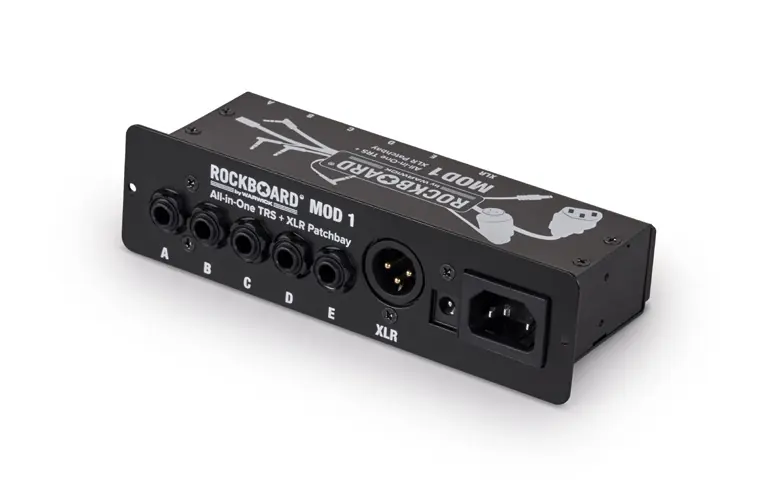
- MOD 1 V2: Features TRS and XLR connections.
- MOD 2 V2: Features TRS, MIDI, and USB connections.
- MOD 3 V2: Features TRS and Stereo XLR connections.
Installation on RockBoard Pedalboards
The MOD V2 can be mounted in the dedicated MOD slot available on most RockBoard pedalboards (except DUO 2.0 and 2.1). Follow these steps:
- Remove the rubber frame from the pedalboard's MOD slot.
- Turn the pedalboard upside down.
- Use a TX10 screwdriver to screw the self-tapping mounting screws into the pre-drilled holes. The screws will cut their own threads; this may be hard-going for the first few rotations.
- Once the tips of the screws stick out, remove the screws.
- Load the MOD unit from the front into the slot and screw in the mounting screws until the front plate sits flush.
- Secure the unit with the counter nut on the back. If access is difficult, remove the additional support brace.
Installation on Non-RockBoard Pedalboards
For pedalboards without a dedicated slot, you can mount the unit directly to the board surface:
- Detach the front plate using a PH2 Phillips head screwdriver.
- Apply self-adhesive hook tape to the underside of the MOD housing.
- Apply self-adhesive loop tape to the desired position on your pedalboard.
- Attach the MOD unit to the pedalboard using the hook & loop fasteners.
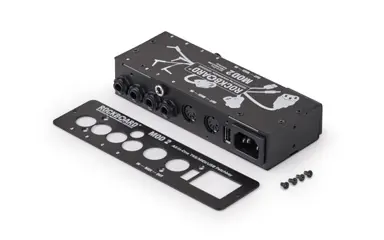
Detaching the Front Plate
If you need to mount the unit on top or underneath a board, you must detach the front plate so it fits flush. Simply remove the screws indicated on the unit using a PH2 Phillips head screwdriver. The mounting nuts of the jack sockets do not need to be removed.
Safety and Environmental Specifications
Follow these guidelines to ensure safe operation:
- Do not use the equipment near water.
- Do not apply excessive force to switches or controls.
- Avoid direct sunlight, strong magnetic fields, dusty environments, vibration, shock, and heat sources.
- Power: Only use a 3-pin (grounded) power cord. Do not use a 2-pin (non-grounded) cord.
- Operating Temperature: 0° to 50° C.
- Relative Humidity: Max 80%, non-condensing.
- Altitude: Max 2000 m (6500 ft.).
Practical help
Common problems
Mounting screws are very hard to turn.
The screws are self-tapping and must cut their own threads into the pedalboard material. This is normal for the first few rotations.
Difficulty reaching screws from behind to attach the counter nut.
Remove the additional support brace on the pedalboard to create more space.
Power cord compatibility.
Only use a 3-pin (grounded) power cord. Never use a 2-pin (non-grounded) cord as it is not safe.
Before use
- Identify your specific MOD V2 version (1, 2, or 3).
- Ensure you have a TX10 screwdriver for installation on RockBoard pedalboards.
- Ensure you have a PH2 Phillips head screwdriver if detaching the front plate.
- Check if your pedalboard has a dedicated MOD slot (not compatible with DUO 2.0/2.1).
- Verify you have a 3-pin grounded power cord.
Specs in practice
- Operating Temperature
- 0° to 50° C
- Relative Humidity
- Max 80%, non-condensing
Images and diagrams
- The manual includes example setup diagrams showing how to route cables from the pedalboard to the MOD unit and then to external power supplies, amps, and other gear.
Model compatibility
- MOD slot is available on all RockBoard pedalboards except DUO 2.0 and 2.1.
- The MOD units are passive routing tools and do not require or distribute power.

Manual page author
David Miller
Documentation analyst
Organizes user manual content into clear summaries, with attention to model details, product context, and everyday usability.