Plumbing / Toilets Urinals
Sanela SLW 01NK/01NKX Automatic Toilet Flushing Unit User Guide
Quick guide for the Sanela SLW 01NK/01NKX automatic toilet flushing unit, covering installation, parameter settings, water flow adjustment, and maintenance.
Table of contents
Manual images
Jump to the sectionQuick guide from the manual
This document provides installation and operational instructions for the Sanela SLW 01NK and SLW 01NKX automatic toilet flushing units. These units are designed for pressured water systems and require a 24 V DC power supply. Proper installation and adherence to safety instructions are essential for correct operation.
Installation
Before installation, ensure you have read the attached safety instructions. The unit must be installed in a wall-mounted configuration. Ensure the water pressure is between 0.1 and 0.6 MPa and that the sieve dimension is ≤ 90 µm. The power supply must be constant and not connected behind a light switch.
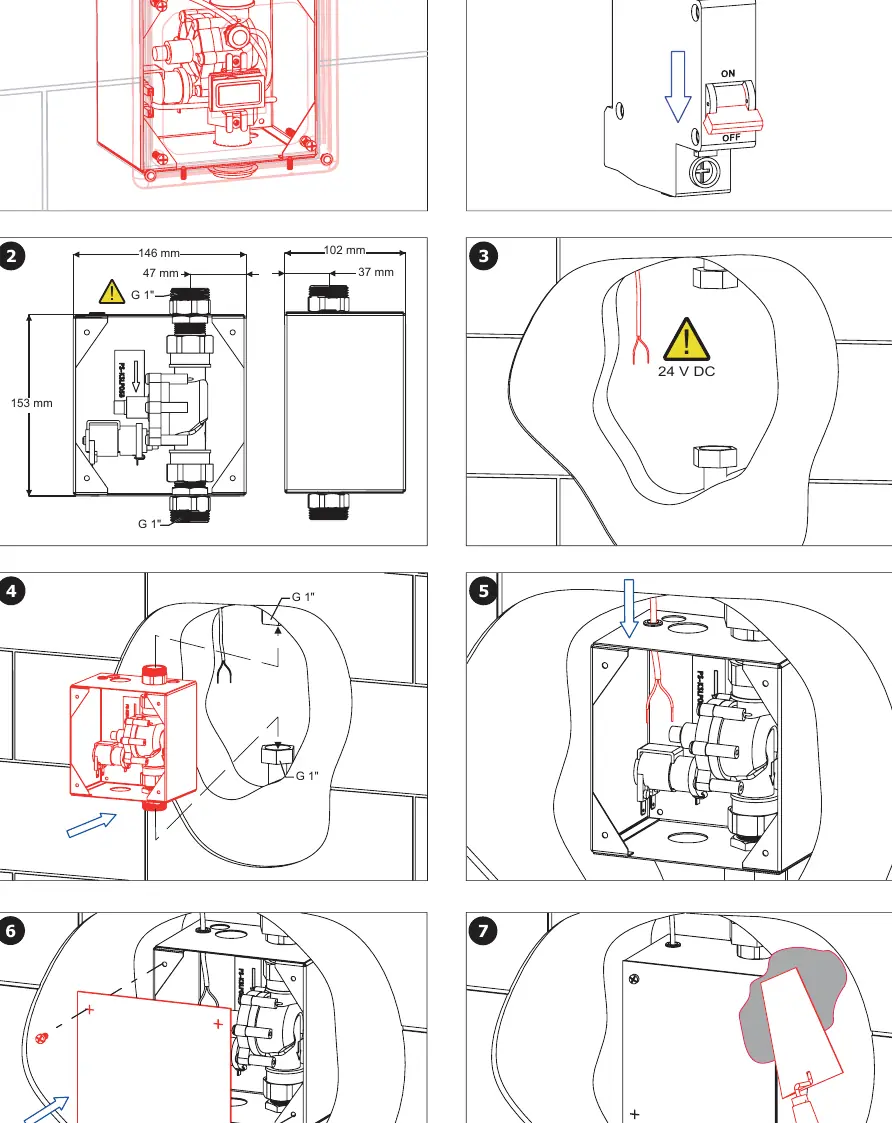
- Turn off the power supply.
- Prepare the wall recess according to the dimensions provided (146 mm x 153 mm).
- Connect the 24 V DC power supply cables (brown = positive, white = negative).
- Install the flushing unit into the wall recess.
- Secure the cover plate.
Operation and Settings
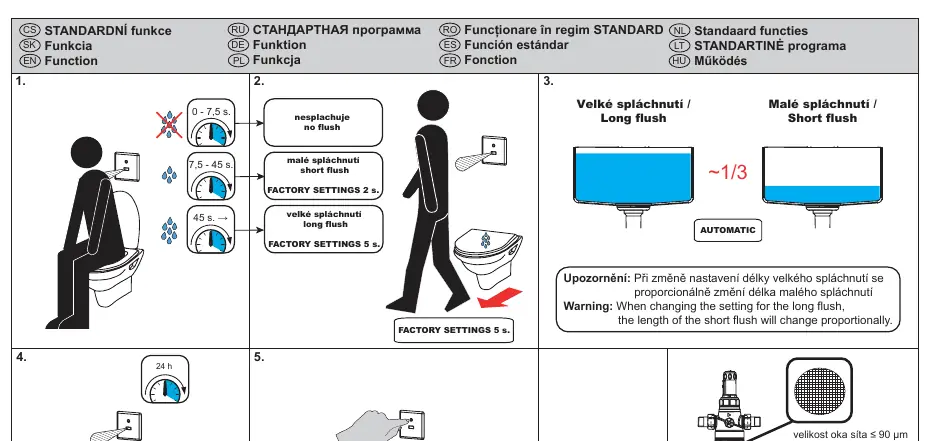
The unit operates automatically based on radar detection. The detection range is 0.3 - 0.7 m. The flushing duration can be adjusted using the SANELA Control application or the SLD 03 remote control. Factory settings for the long flush are 5 seconds, and for the short flush, 2 seconds. Note that changing the long flush duration will proportionally change the short flush duration.
Water Flow Adjustment
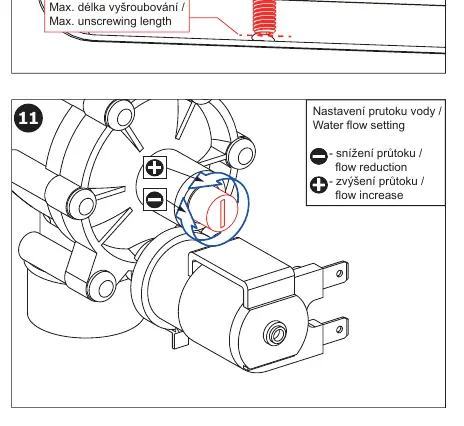
The water flow can be adjusted manually. Locate the adjustment screw on the valve and turn it to increase or decrease the flow as needed.
Maintenance
Regular maintenance is recommended. Ensure the unit remains under constant voltage for proper function. For technical support or troubleshooting, contact your installation company or visit www.sanela.cz/podpora.
Official resources from the manual
Manufacturer information
SANELA spol. s r. o.
Practical help
Common problems
Unit does not flush
Check if the power supply is connected and active; ensure the unit is not connected behind a light switch.
Incorrect flushing duration
Adjust the settings using the SANELA Control app or SLD 03 remote control.
Water flow too high or low
Manually adjust the flow using the adjustment screw on the valve.
Before use
- Verify water pressure is between 0.1 and 0.6 MPa.
- Ensure the sieve dimension is ≤ 90 µm.
- Confirm 24 V DC power supply is available.
- Read all attached safety instructions before starting installation.
Specs in practice
- Detection range
- The distance (0.3 - 0.7 m) at which the radar sensor detects the user.
- Water pressure
- Operating range of 0.1 - 0.6 MPa is required for proper valve function.
- Power supply
- Must be 24 V DC and constant; do not connect to a switched light circuit.
Images and diagrams
- Page 3 shows the step-by-step physical installation into the wall.
- Page 4 details the water flow adjustment screw and electrical wiring connections.
- Page 5 illustrates the detection range and the importance of constant power.
Model compatibility
- Compatible with SLD 03 remote control for settings.
- Requires 24 V DC power supply.
- Designed for pressured water systems.

Manual page author
Michael Turner
Technical manual editor
Reviews PDF manuals for structure, safety notes, and practical product details so readers can find the right information quickly.