Lighting / Fixtures
User Manual for Saxby Lighting Nimbus CCT LED Light
Quick guide for the Saxby Lighting Nimbus CCT LED light (models 99566, 99767). Includes installation steps, wiring instructions, CCT color temperature settings, and safety requirements.
Table of contents
Manual images
Click an image to enlargeQuick guide from the manual
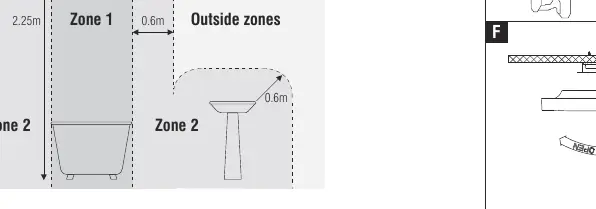
The Saxby Lighting Nimbus CCT is a Class 1 LED ceiling light that requires professional installation by a qualified electrician. It features adjustable color temperature (CCT) and is IP44 rated, making it suitable for bathroom Zone 2 and outside zones. This product is not dimmable and contains non-replaceable light sources.
Safety and Warnings
- Electrical Safety: This is a Class 1 product and must be connected to earth. Always isolate the power supply at the fuse board before starting any work.
- Installation: Must be fitted by a competent and qualified electrician in accordance with IEE Wiring Regulations and current Building Regulations.
- Bathroom Use: If installed in a room with a bath or shower, a 30mA RCD must be used.
- Damage: If the shade becomes cracked or damaged, it must be replaced immediately. Do not use the fitting without the shade.
- Disposal: Waste electrical products should not be disposed of with household waste.
Installation
- Ensure the power is isolated.
- Remove the existing fitting and note the position of wires.
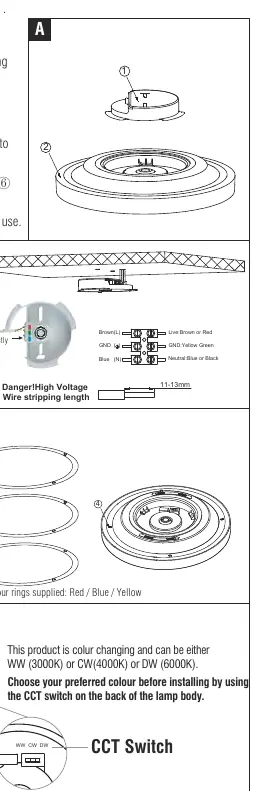
- Use the metal plate as a template to mark and drill fixing holes.
- Ensure the ceiling can support the weight of the product.
- Take care to avoid drilling into concealed pipes or mains cables.
- Fix the metal plate to the ceiling using the supplied screws.
- Select the desired color temperature using the CCT switch on the back of the lamp body.
- Attach the lamp body to the metal plate.
- Fit the chosen color ring (Red, Blue, or Yellow) by aligning the convex parts with the grooves on the lamp body.
- Replace the fuse or circuit breaker and switch on the power.
Wiring
Pull the mains wire through the hole and connect to the terminal block inside the quick-fit connection case:
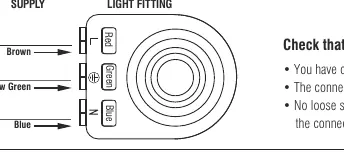
- Brown: Live (Switched Live)
- Yellow/Green: Earth
- Blue: Neutral
Ensure connections are tight and no loose strands are left out of the connection block.
CCT Color Settings
The light features color-changing technology. Before installing, use the CCT switch on the back of the lamp body to select your preferred color temperature:
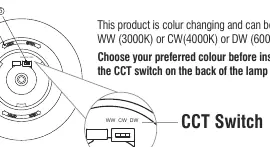
- WW: 3000K (Warm White)
- CW: 4000K (Cool White)
- DW: 6000K (Daylight White)
Maintenance
- Clean with a soft dry cloth only. Do not use solvents or abrasive cleaners.
- The shade can be removed and washed in warm water or wiped with a damp cloth.
- Always switch off the power supply before cleaning.
Technical Data
- Supply Voltage: 220-240 V, 50 Hz
- Bulb Type: 99566 (12W LED module), 99767 (24W LED module)
- IP Rating: IP44
- IK Rating: IK08
- Dimming: Not suitable for dimming
Practical help
Common problems
Light does not turn on
Check that the power is switched on at the fuse board, ensure all wiring connections are tight, and verify that no loose strands are outside the connection block.
Shade is cracked
The shade must be replaced immediately. Do not operate the light fitting without the shade in place.
Dimmer switch not working
This product is not suitable for dimming. Ensure it is connected to a standard on/off switch.
Before use
- Ensure power is isolated at the fuse board.
- Verify the ceiling is capable of holding the weight of the product.
- Check for concealed pipes or mains cables before drilling.
- Confirm a 30mA RCD is fitted if installing in a bathroom.
- Select the desired CCT color temperature before final installation.
Images and diagrams
- Wiring diagram: Shows correct connection of Brown (Live), Yellow-Green (Earth), and Blue (Neutral) wires.
- Bathroom Zone diagram: Illustrates where the light can be safely installed (Zone 2 and outside zones).
- Installation steps: Shows the sequence of removing the metal plate, drilling, wiring, and attaching the lamp body.
Model compatibility
- Not suitable for dimming.
- Suitable for bathroom Zone 2 and outside zones.
- Requires 30mA RCD for bathroom installations.

Manual page author
Michael Turner
Technical manual editor
Reviews PDF manuals for structure, safety notes, and practical product details so readers can find the right information quickly.