Lighting / LED Strips
Saxby Lighting Flexline 12V 5M Kit CCT User Manual
Quick guide for the Saxby Lighting Flexline 12V 5M Kit CCT. Includes installation steps, cutting instructions, remote control pairing, and safety guidelines.
Table of contents
Manual images
Click an image to enlargeQuick guide from the manual
This product is a self-contained 12V LED strip kit designed for indoor use only. It requires installation by a competent and qualified electrician. The system operates at Safety Extra Low Voltage (SELV) and must be powered using the supplied LED driver. The strip is dimmable and color-temperature adjustable (CCT) via the included remote control.
Product description and kit contents
The kit includes:
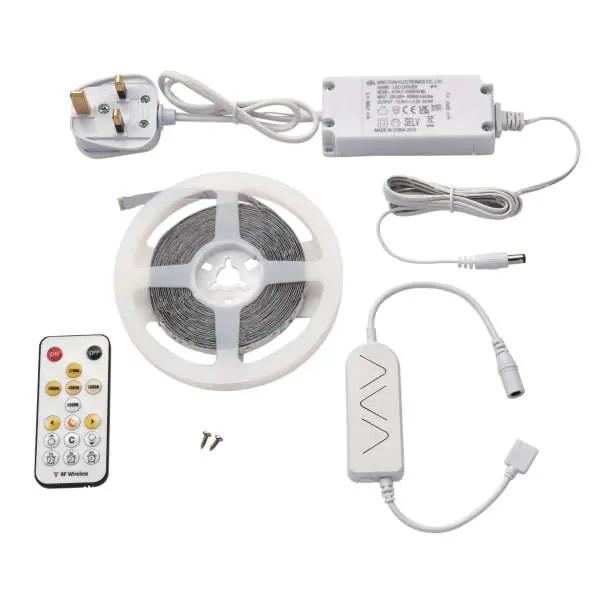
- 1 x In-line 24W driver with UK 3-pin plug (0.5m mains & 1.5m LV cable)
- 1 x 5000mm LED strip
- 1 x Remote control
- 1 x Receiver
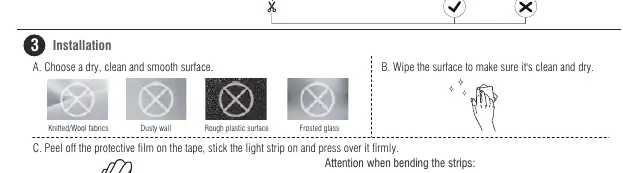
Installation
Preparation:
- Plan the layout to ensure cables reach the power supply and the remote receiver is positioned to receive signals (max 15m distance).
- Ensure the surface is dry, clean, and smooth (e.g., avoid knitted/wool fabrics, dusty walls, or rough surfaces).
- Peel off the protective film on the tape, stick the light strip, and press firmly.
Electrical Connection:
- Position the plug, remote sensor, and driver near the indoor mains outlet.
- Connect the color temperature controller connector to the connector on the Flexline strip, ensuring it is inserted correctly (arrow to arrow).
- Do not connect the light fittings directly to the mains without the LED driver.
Cutting the LED strip
The Flexline strip can be shortened to a minimum of 100mm or multiples of 100mm.
- Look for the line on the strip with four copper pads and a scissors symbol.
- Cut using a sharp pair of scissors.
- Warning: Do not cut anywhere else on the strip, as this will cause it to stop working. Once cut, strips can only be rejoined by soldering.
Remote control and pairing
If the light strip turns on automatically or flashes, you may need to pair the remote.
- Pair Remote: Hold the "3000K" and "5000K" buttons at the same time for 3 seconds. The light will flash 3 times to confirm success.
- Unpair Remote: Hold the "Off" button until the light flashes 3 times.
- Battery: Use a 3V lithium CR2025 battery. Ensure correct polarity.
Safety and maintenance
- Cleaning: Always switch off the power supply before cleaning. Use a soft dry cloth. Do not use solvents or abrasive cleaners.
- Safety: The power supply is double insulated and does not require an earth connection. The LED strip is Class III and must not be earthed.
- Disposal: Do not dispose of with household waste; recycle at appropriate facilities.
Practical help
Common problems
Light strip turns on automatically or flashes
Pair the remote control by holding the '3000K' and '5000K' buttons simultaneously for 3 seconds.
Strip not working after cutting
Ensure you cut only at the marked 100mm intervals (indicated by four copper pads and a scissors symbol). Cutting elsewhere will damage the circuit.
Before use
- Ensure a qualified electrician is available for installation.
- Verify all kit parts are present (driver, strip, remote, receiver).
- Check that the mounting surface is dry, clean, and smooth.
- Plan the layout to ensure cables reach the power supply.
- Ensure the remote receiver is positioned without obstructions.
Images and diagrams
- Arrow to Arrow: Ensure the connectors are aligned correctly (arrow to arrow) when connecting the strip to the controller.
Model compatibility
- Indoor use only.
- The kit is self-contained and cannot be extended.

Manual page author
Emily Carter
User documentation editor
Prepares concise manual descriptions and highlights the most useful setup, operation, and maintenance information for readers.