Power / Wireless Chargers
Scanstrut ROKK Wireless Edge 10W Wireless Charger
Quick guide for the Scanstrut ROKK Wireless Edge 10W charger. Includes installation steps, wiring instructions, LED status indicators, and safety guidelines.
Table of contents
Manual images
Click an image to enlargeQuick guide from the manual
The ROKK Wireless Edge 10W is a waterproof wireless charger designed for Qi-compatible devices. It requires a 12V or 24V DC power source and must be installed by a qualified electrician. Before installation, ensure the mounting surface is flat, non-porous, and that the area behind the mounting location is clear of wires, fuel, or other hazardous objects.
Technical specifications
- Input voltage range: 10-30V DC (12/24V system)
- Input current max: 2A
- Output power: 10W (9.1V, 1.1A)
- Standby current draw: < 0.1W
- Waterproof rating: IPX6 (front and back)
- Certifications: Qi, CE, FCC, ROHS, UNECE R10 E24, C-Tick, UKCA
Installation
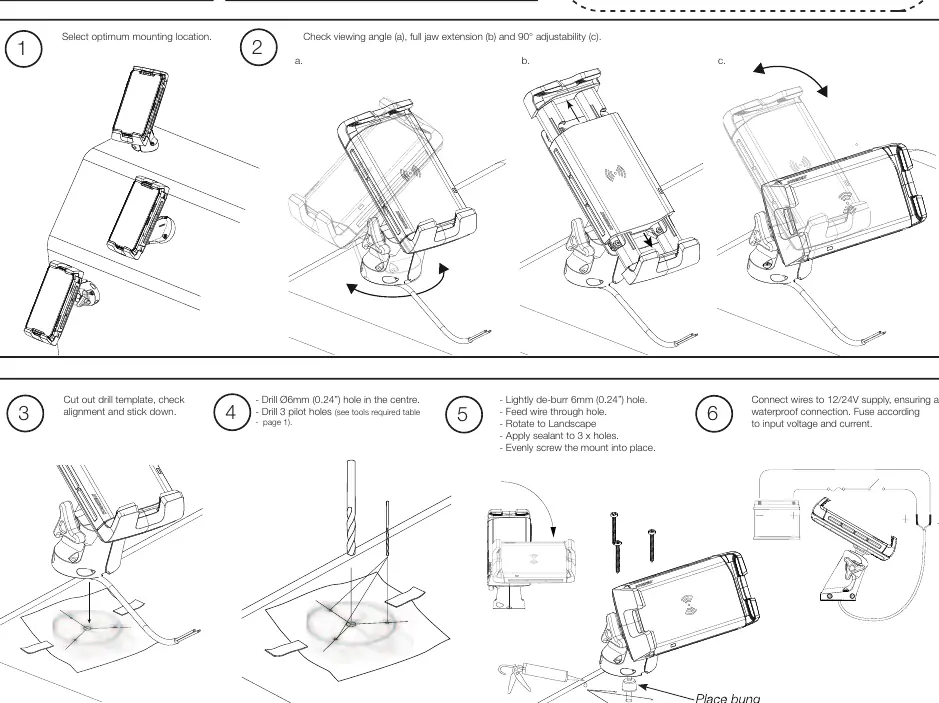
- Select location: Choose an optimum mounting location, checking the viewing angle, jaw extension, and 90-degree adjustability.
- Prepare template: Cut out the provided drill template, check alignment, and stick it down.
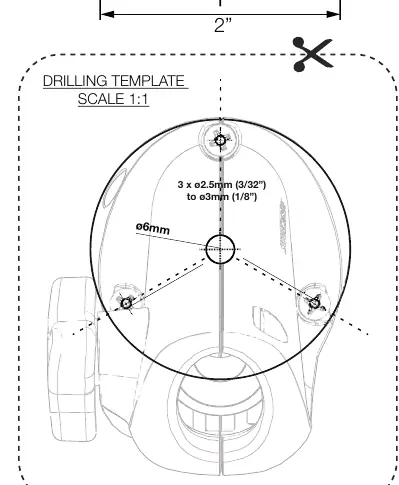
- Drill holes: Drill a 6mm (0.24") hole in the center. Drill 3 pilot holes according to the material type (2.5mm for soft material like plywood; 3mm for hard material like fiberglass/acrylic).
- Mounting: Lightly de-burr the 6mm hole. Feed the wire through the hole. Apply sealant to the 3 holes and evenly screw the mount into place.
Wiring
Connect the wires to a 12/24V supply, ensuring a waterproof connection. An appropriate fuse or circuit breaker must be used between the battery/power source and the product. Check for correct polarity before switching the power on. If extending the cable, use a minimum wire gauge of 18AWG (0.82mm2) to ensure a consistent 10V supply.
Usage
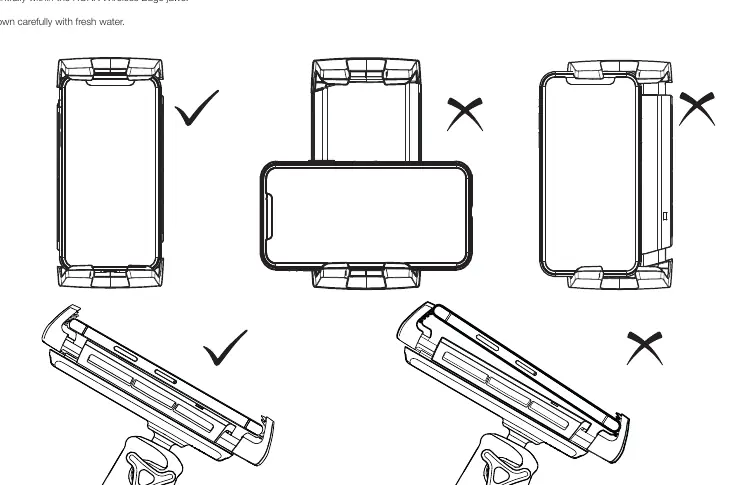
Place your device centrally within the ROKK Wireless Edge jaws. The charger works through non-metallic phone cases up to 3mm thick. If the product is mounted outside, ensure it is located safely above the waterline to avoid submersion.
Smart LED light guide
- Solid red: Product has power and is ready to charge.
- Solid green: Product is charging.
- Flashing red: Foreign object detected (metallic object on top) or thermal cutout (temperature too high/low). Wait for the product to return to operating temperature.
- Flashing green/red: Input current is too low.
Maintenance and safety
Wash the unit carefully with fresh water. Do not attempt to repair or alter the product, as it contains no user-serviceable components. The product is not approved for use in hazardous or flammable atmospheres (e.g., engine rooms). In extreme usage environments (very high/low ambient temperature or direct prolonged sunlight), the product may temporarily shut down as a safety feature.
Practical help
Common problems
Flashing red LED
Indicates foreign object detection (remove metallic objects) or thermal cutout (wait for the device to return to operating temperature).
Flashing green/red LED
Input current is too low. Check your power supply and wiring connections.
Device not charging
Ensure the device is placed centrally within the jaws and that the phone case is non-metallic and under 3mm thick.
Before use
- Verify power source is 12V or 24V DC.
- Ensure an appropriate fuse or circuit breaker is installed.
- Check that the mounting surface is flat and non-porous.
- Ensure the area behind the mounting location is clear of wires and fuel.
- Verify the phone case is non-metallic and under 3mm thick.
Images and diagrams
- Drilling template: Use to mark the center hole and 3 pilot holes.
- Wiring schematic: Shows connection to 12/24V battery with required fuse.
Model compatibility
- Compatible with Qi-enabled devices only.
- Works through non-metallic phone cases up to 3mm thick.
- Not for use in hazardous or flammable atmospheres.

Manual page author
David Miller
Documentation analyst
Organizes user manual content into clear summaries, with attention to model details, product context, and everyday usability.