Home Appliances / Range Hoods
User Manual for Schweigen CL Series Rangehood
Comprehensive user manual for Schweigen CL Series rangehoods, including models CL8912S, CL8915S, CL7372S, and CL7375S. This guide covers installation, operation, cleaning, maintenance, and troubleshooting.
Table of contents
Manual images
Click an image to enlargeQuick Guide
This rangehood is designed for undercover alfresco areas. Important: Inspect the product for damage upon receipt and report within 48 hours. Do not install if damaged. The minimum installation height from the BBQ surface to the rangehood is 1200mm. Always ensure the rangehood is installed by a qualified technician.
Description
The rangehood consists of the main body, flue, baffles (grease filters), lights, and remote control. The system requires an Isodrive motor (sold separately or as part of the kit) for operation.
Operation
The rangehood features a touch button control panel and a remote control. Functions include:
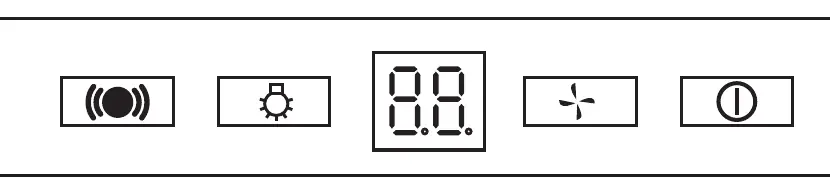
- On/Off: Press the button to turn on. Press a second time for a 10-minute auto-shut-off timer. Press a third time to turn off.
- Speed Control: 5-speed touch control.
- Lights: Dedicated button to turn lights on/off.
- Remote Control: Includes power, speed adjustment, auto-speed toggle, light control, and a 10-minute timer.
Cleaning & Maintenance
Regular maintenance is essential for safety and performance.
- Baffles (Filters): Clean every 3-6 weeks or after 40 hours of use. For induction cooktops, clean at least every 10 days. Wash by hand in hot water with detergent or in a dishwasher on a short, low-temperature program. Ensure they are completely dry before re-installation.
- Exterior: Clean with a soft cloth, water, and neutral liquid soap. Do not use abrasive products, chemical solvents, or alcohol.
- Replacing Lights: Switch off and disconnect power. Remove filters, turn the light anti-clockwise to remove, and insert a new light by lining up the pins.
Installation
Installation must be performed by a qualified technician.
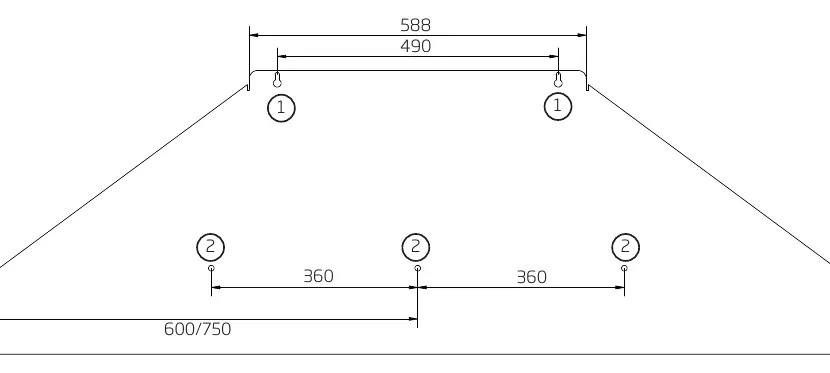

- Wall Mounting: Use the primary and secondary mounting points to fix the rangehood securely. Ensure the holes are level before installation.
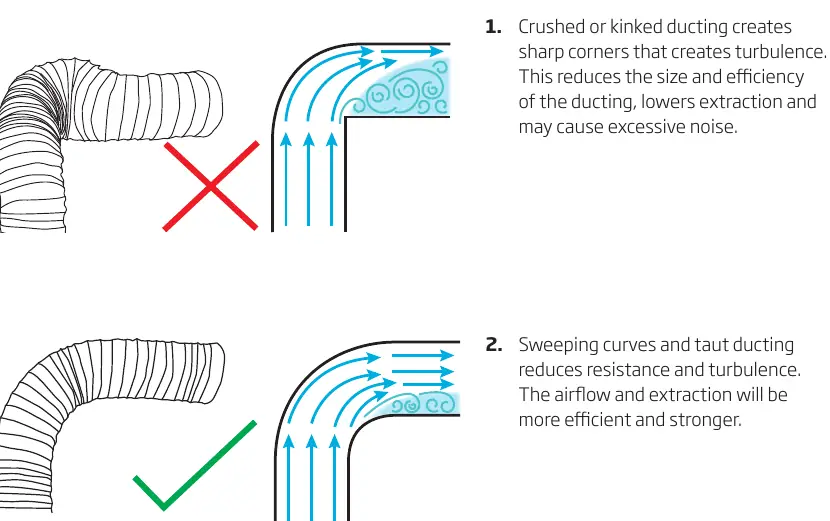
- Ducting: Do not crush or kink ducting. Use sweeping curves to reduce turbulence and noise.
- Isodrive Motor: Refer to the specific Isodrive motor installation guide for details on motor setup, whether roof-mounted or wall-mounted.
Troubleshooting
Before contacting service, ensure the unit is plugged in and powered. If the rangehood does not work, check the power supply and motor switch. If extraction is weak, check for obstructions in the ducting and ensure filters are clean. Never attempt to repair the appliance yourself.
Specifications
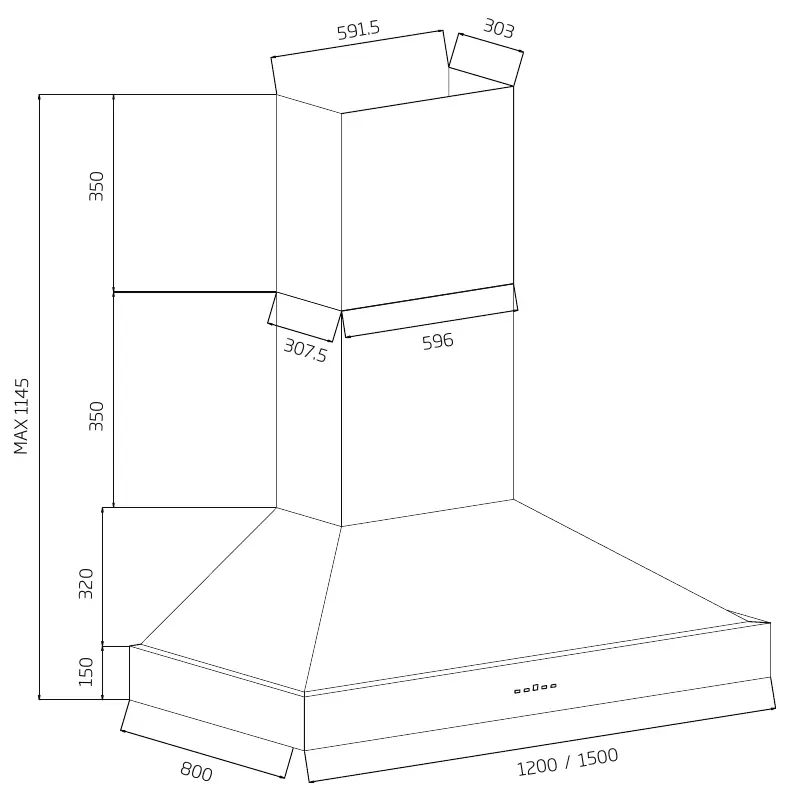
The rangehood operates on 220-240V 50Hz. Lighting consists of 4 x 3W LED lamps (ILCOS Code: DRR-3-H-GU10-51/55). Dimensions vary by model; refer to the specific dimension diagrams for CL8912S/CL8915S and CL7372S/CL7375S.
Practical help
Common problems
Rangehood does not work
Check electrical connection (220-240V), ensure the plug is grounded, and verify the motor switch is on.
Light does not work
Check if the light switch is on, ensure the light is firmly in position, and check if the bulb is faulty.
Weak air extraction
Clean the grease filters, check for obstructions in the ducting, and ensure the correct ducting diameter is installed.
Loud noise
Ensure ducting is installed taut without kinks or crushed sections.
Before use
- Inspect product for damage upon receipt.
- Ensure installation is in an undercover alfresco area.
- Verify electrical supply matches the rating label.
- Remove all plastic protection from the rangehood and filters.
- Ensure filters are installed correctly.
Specs in practice
- Feeding Voltage
- 220-240V 50Hz
- Minimum Installation Height
- 1200mm from BBQ surface
Images and diagrams
- Touch Panel: Shows remote sensor, light, speed, and power buttons.
- Wall Mounting: Illustrates primary and secondary mounting points.
- Ducting: Compares correct (sweeping curves) vs incorrect (kinked) installation.
- Light Replacement: Step-by-step removal and insertion of the light bulb.
Model compatibility
- Designed for outdoor/alfresco use (must be undercover).
- Requires Isodrive motor system (sold separately or as part of the kit).
- Not for commercial use.

Manual page author
David Miller
Documentation analyst
Organizes user manual content into clear summaries, with attention to model details, product context, and everyday usability.