Home Appliances / Range Hoods
Installation Manual for Belling Cookcentre 100T Chimney Cooker Hood
Quick installation guide for the Belling Cookcentre 100T chimney cooker hood. Includes mounting steps, safety distances, ducting configurations, and filter maintenance instructions.
Table of contents
Manual images
Click an image to enlargeImportant Installation Information
Before beginning the installation, ensure you have read the safety information provided in the user manual. Always wear protective gloves during the installation process to prevent injury from sharp edges. Ensure the wall where the hood is to be mounted is capable of supporting the weight of the unit.
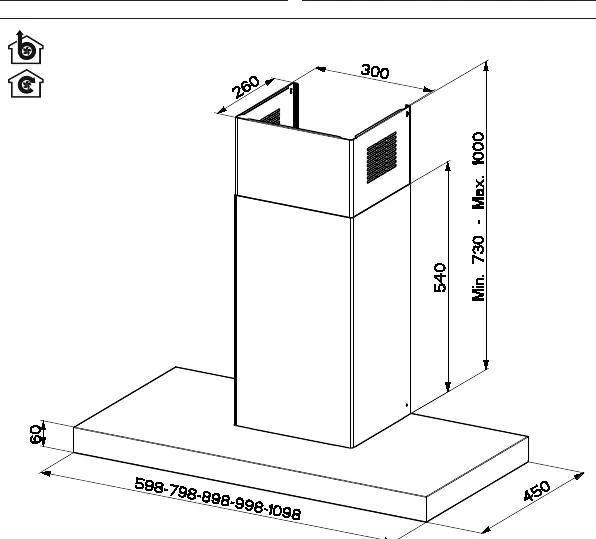
Safety Distances:
- Minimum distance from an electric hob: 500mm.
- Minimum distance from a gas hob: 650mm.
Installation Preparation
Identify the installation type required for your kitchen setup:
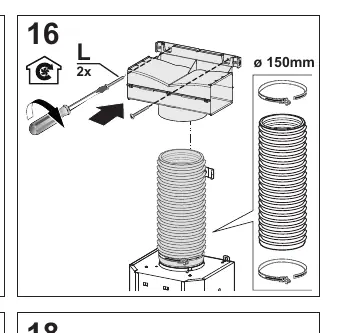
- Ducted Mode: The hood vents air outside. Requires ducting (120mm or 150mm diameter) and appropriate clamps.
- Recirculation Mode: The hood filters air and returns it to the room. Requires the installation of the charcoal filter (W) and the air deflector (O2).
Mounting the Hood
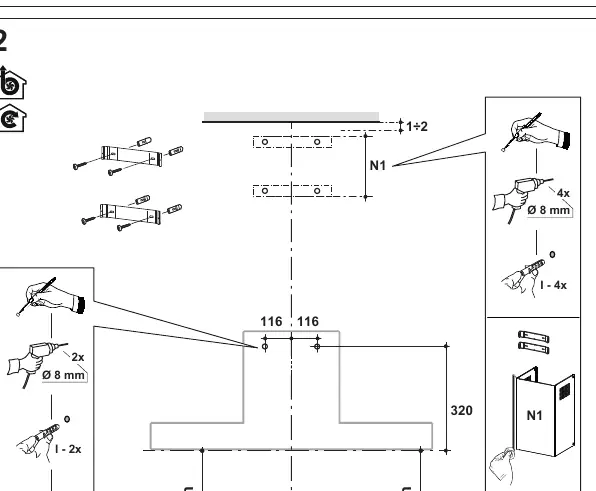
- Mark the position for the mounting bracket on the wall, ensuring it is centered above the hob.
- Drill the holes as marked and insert the wall plugs.
- Secure the mounting bracket (N1) to the wall using the provided screws.
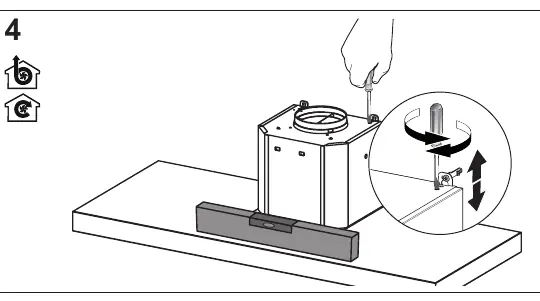
- Lift the hood body and hook it onto the mounting bracket.
- Use a spirit level to ensure the hood is perfectly horizontal.
- Secure the hood body to the wall using the provided screws (L) and wall plugs (I).
Ducting and Chimney Installation
If using ducted mode, connect the ducting pipe to the hood outlet and secure it with clamps. Ensure the ducting is as straight as possible to maintain airflow efficiency. Install the chimney sections (N1 and N2) by sliding them over the hood body and securing them to the mounting bracket with the provided screws (A and B).
Maintenance
Regular maintenance is required to ensure optimal performance:

- Grease Filter (Z): Regularly remove and clean the grease filter. It can typically be unlatched by hand.
- Charcoal Filter (W): If using recirculation mode, the charcoal filter must be replaced periodically according to usage.
Manufacturer information
Belling
Practical help
Common problems
Hood is not level
Use a spirit level during the mounting phase (Step 4) to adjust the position before fully tightening the wall screws.
Insufficient suction
Check that the ducting diameter matches the outlet (120mm or 150mm) and that the pipe is not kinked or restricted.
Before use
- Verify the wall can support the weight of the hood.
- Check safety distances: minimum 500mm for electric hobs, 650mm for gas hobs.
- Wear protective gloves during installation.
- Determine if the installation is Ducted or Recirculation mode.
- Ensure all necessary screws and brackets (A, B, I, L, M) are present.
Images and diagrams
- Page 2: Parts identification list.
- Page 3: Ducting vs Recirculation configuration diagrams.
- Page 5: Drilling template and mounting bracket positioning.
- Page 9: Recirculation mode specific assembly (O2 part).
Model compatibility
- Recirculation mode requires specific additional parts (O2 and W).
- Ducting diameter must be either 120mm or 150mm.

Manual page author
Michael Turner
Technical manual editor
Reviews PDF manuals for structure, safety notes, and practical product details so readers can find the right information quickly.