Tools / Measuring Tools
Sealey STS103 Digital Torque Screwdriver User Manual
Quick guide for the Sealey STS103 Digital Torque Screwdriver. Learn how to install batteries, set torque values, switch between Peak and Track modes, and maintain your tool.
Table of contents
Manual images
Click an image to enlargeQuick guide from the manual
To begin using your Sealey STS103 Digital Torque Screwdriver, you must first install the batteries. Unscrew the two screws at the end cap (location B), insert two AAA batteries ensuring correct polarity, and re-tighten the screws. Press the power button to turn the tool on. The device defaults to 'Peak' mode. To program a specific torque value, hold the '+' button for 3 seconds until 'Set' appears on the screen, then use the buttons to adjust the value.
Product description
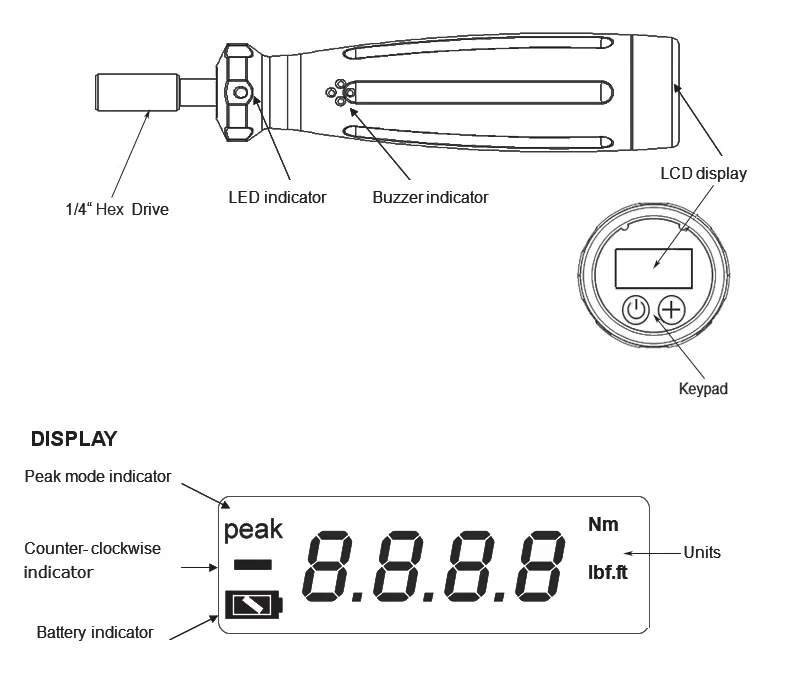
The Sealey STS103 is a digital torque screwdriver designed for automotive, workshop, and factory use. It features an LCD readout with LED, audible alarm, and vibration feedback to indicate when target torque levels are achieved. It supports both clockwise and anticlockwise operation and allows for unit selection between Nm and lb.ft.
Preparation
Battery Installation:
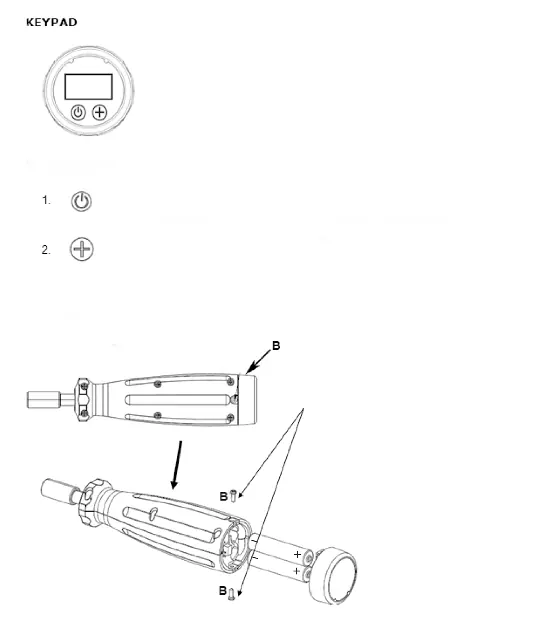
- Remove the batteries from their packaging.
- Unscrew the two screws at location 'B' on the handle.
- Carefully remove the end cap.
- Insert two AAA batteries, ensuring the polarity is correct.
- Replace the end cap and re-tighten the screws.
Operation
Turning the tool on/off: Press the power button to turn the tool on. The buzzer will sound, and the display will show all readouts before settling to '0000'. The tool turns off automatically after 2 minutes of inactivity.
Modes:
- Peak Mode (Default): The maximum value reached is saved and shown on the display for approximately 2 seconds.
- Track Mode: Displays the real-time torque reached during operation.
- Switching Modes: Press the power button, then within 3 seconds, press the '+' button to toggle between modes.
Programming Torque:
- Hold the '+' button for 3 seconds to enter setting mode.
- Release when 'Set' appears.
- Use the buttons to increase or decrease the target torque value.
- The screwdriver will memorize the torque after 3 seconds of inactivity.
- Note: If a value exceeding 100% (5Nm) is selected, the display will zero and the setting will not be entered.
Unit Selection: With the unit on, press and hold the power button for 5 seconds to switch between Nm and lb.ft.
Maintenance
- Do not apply force when the power is turned off.
- Do not expose the unit to strong magnetic fields, corrosive agents, excessive heat, or humidity.
- Clean only with a damp cloth; do not use proprietary cleaners or solvents.
- If the tool will be out of use for a period, remove the batteries.
- Store in a cool, dry location away from direct sunlight and children.
Official resources from the manual
Manufacturer information
Sealey Group
Practical help
Common problems
Inaccurate readings
Check the battery charge level. If the battery indicator is empty, replace the batteries to guarantee accuracy.
Tool turns off unexpectedly
The tool has an automatic shut-off feature that activates after 2 minutes of inactivity.
Cannot set target torque
If you attempt to select a value greater than 100% of the maximum torque (5Nm), the display will zero and the setting will not be saved.
Before use
- Ensure batteries are installed with the correct polarity.
- Verify the tool is not damaged or faulty before use.
- Ensure the floor is not slippery and wear non-slip shoes.
- Check that the tool is in good condition.
Images and diagrams
- Fig 1: Illustrates the screwdriver components including the 1/4" Hex drive, LED indicator, buzzer, LCD display, and keypad, along with display indicators.
- Fig 2: Shows the battery installation process, specifically the location of the two screws (B) that must be removed to access the battery compartment.
Model compatibility
- Suitable for automotive, workshop, and factory use.

Manual page author
Emily Carter
User documentation editor
Prepares concise manual descriptions and highlights the most useful setup, operation, and maintenance information for readers.