Documents / Warranty Safety
Sealey STS104 Digital Torque Screwdriver User Guide
Quick start guide for the Sealey STS104 0-20Nm digital torque screwdriver, covering battery installation, operation modes, torque programming, and maintenance.
Table of contents
Quick guide from the manual
The Sealey STS104 is a digital torque screwdriver designed for automotive and workshop use. It features a 1/4" hex drive, a 0-20Nm range, and provides both audible and visual (LED/vibration) feedback when target torque is reached. Always ensure the tool is powered on before applying force to avoid damage.
Preparation
- Battery Installation: Remove the battery cover on the side of the tool, insert 2 x AAA batteries (supplied), and replace the cover.
- Powering On/Off: Press the power button to turn the unit on. The display will show 0000 after a brief initialization. Press the button again to turn it off.
- Backlight and LED: Press the backlight button to toggle the LCD light. Press and hold the same button for 2 seconds to toggle the front LED lamp.
Operation
- Measurement Modes: Use the M/U button to switch between TRACK (real-time torque) and PEAK (records maximum torque reached) modes.
- Unit Selection: In measure status, press and hold the M/U button for 2 seconds to cycle between N.m, lbf-ft, and lbf-in.
- Programming Pre-set Torque: Press and hold the SET button for 2 seconds to enter setting mode. Use the M/U button to increase or the ZERO/LIGHT button to decrease the target value. Press SET again to memorize and exit.
- Direction: The tool supports both clockwise and anti-clockwise operation. A minus (-) sign appears on the display when applying force in an anti-clockwise direction.
Maintenance
- Cleaning: Always turn off the tool before cleaning. Use only a damp cloth. Never use liquid, aerosol, or organic solvent cleaners.
- Storage: Store in a dry, safe place away from dust, sand, humidity, and heat sources. Remove batteries if the tool will not be used for a long period.
- Recalibration: Periodic recalibration is required to maintain accuracy. The default interval is 12 months or 5,000 cycles, whichever comes first. Recalibration is mandatory after any repair, overload, or impact. Contact a UKAS accredited laboratory for this service.
Manufacturer information
Sealey Group
Practical help
Common problems
Pre-set torque value jumps back to zero
This indicates the value exceeded 125% of the maximum capacity (20Nm). Reset the mode and enter a valid value.
Display shows no value after programming
The pre-set failed. Re-read the programming procedure and ensure the value is within the 0-20Nm range.
Tool does not turn on
Check battery installation and ensure batteries are not depleted or mixed types.
Before use
- Ensure batteries are correctly installed.
- Turn the tool on before applying any force.
- Verify the desired measurement unit (N.m, lbf-ft, or lbf-in).
- Select the appropriate mode (TRACK or PEAK).
- Check that the tool is not damaged before use.
Specs in practice
- Range: 0-20Nm
- The operational torque capacity of the tool.
- Drive: 1/4" Hex
- The size and type of bits compatible with the tool.
Images and diagrams
- Fig 1: Shows the four main buttons: Power, M/U (Mode/Units), SET (Backlight/Setting), and ZERO/LIGHT.
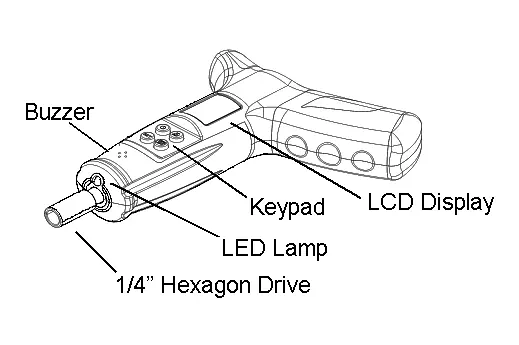
- Fig 2: Illustrates the tool components including the buzzer, keypad, LCD display, LED lamp, and 1/4" hex drive.
- Fig 4: Demonstrates changing the ratchet direction.
Model compatibility
- Do not use on live electrical circuits.
- Use only with 1/4" hex drive bits.
- Not suitable for use in dusty, sandy, or humid environments.

Manual page author
Michael Turner
Technical manual editor
Reviews PDF manuals for structure, safety notes, and practical product details so readers can find the right information quickly.