Tools / Power Tools
User Manual for Sealey 1100W Angle Grinder SG125EU.V2
Quick guide for the Sealey 1100W Angle Grinder (SG125EU.V2). Includes assembly instructions, disc mounting procedures, safety warnings, and maintenance tips.
Table of contents
Manual images
Click an image to enlargeQuick Guide
This manual provides essential safety and operational instructions for the Sealey 1100W Angle Grinder. Always ensure the tool is unplugged before performing any assembly, accessory changes, or maintenance. Wear appropriate personal protective equipment (PPE) including eye protection, gloves, and a dust mask during operation.
Safety Instructions
Electrical Safety: Ensure the voltage rating matches your power supply. Regularly inspect cables and plugs for damage. Use an RCD (Residual Current Device) if operating in damp locations.
General Safety: Keep the work area clean and well-lit. Keep children and bystanders away. Do not operate in explosive atmospheres or near flammable materials.
Kickback Prevention: Maintain a firm grip and use the auxiliary handle. Avoid corners and sharp edges where the accessory might snag. Never attach saw chain woodcarving blades or toothed saw blades.
Assembly
Guard Assembly: The guard must be securely attached and positioned to provide maximum protection. Loosen the locking device to rotate the guard to the required angle, then re-tighten.
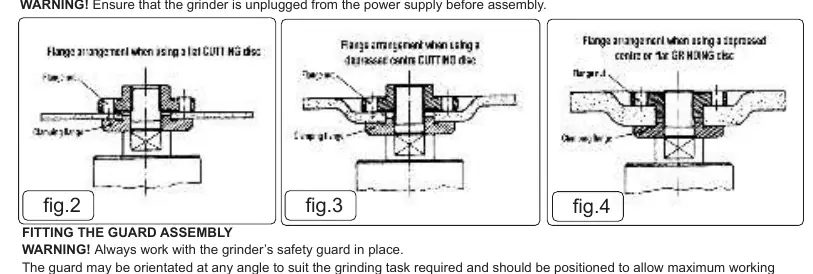
Attaching Discs: Ensure the grinder is unplugged. Place the clamping flange on the spindle with the raised ring facing upwards. Place the disc over the spindle. Use the spindle lock button to hold the spindle while tightening the retaining flange nut with the supplied pin wrench. Ensure the flange nut orientation matches the disc type (see figures in the manual).
Handle: Screw the side handle into the left, right, or top position on the grinder head for better control.
Operation
Preparation: Ensure the disc is correctly mounted and the guard is secure. Plug the tool into the power supply.
Switching On/Off: The switch is designed to prevent accidental starting. Slide the switch forward and press down to turn on. Press the rear of the switch to turn off; it will spring back to the OFF position.
Grinding: Do not switch the grinder on while the disc is in contact with the workpiece. Allow the disc to reach full speed before starting. Grind flat surfaces at an angle of 10° to 20°.
Maintenance
Cleaning: Keep the tool clean. Use a soft brush or dry cloth. Do not use caustic agents. If necessary, use clean, dry compressed air to blow through ventilation holes. Never let water contact the tool.
Inspection: Regularly check that all fixing screws are tight. If the tool requires repair, contact an authorized service centre.
Specifications
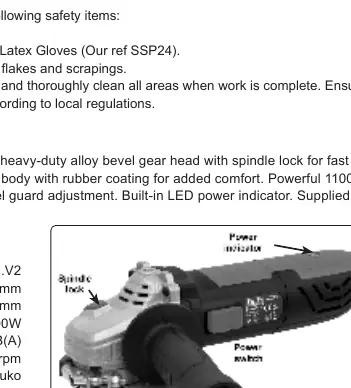
- Model No: SG125EU.V2
- Disc Size: 125mm
- Motor Power: 1100W
- No-Load Speed: 12000rpm
- Spindle Size: M14 x 2mm
- Power Supply: 230V
- Cable Length: 2m
- Weight: 1.8kg
Manufacturer information
Sealey Group
Practical help
Common problems
Kickback
Maintain a firm grip, use the auxiliary handle, and avoid bouncing or snagging the accessory on corners or sharp edges.
Disc binding
Switch off the tool immediately and hold it motionless until the wheel comes to a complete stop before investigating the cause.
Excessive vibration
Check that the disc is mounted correctly and that the tool is properly maintained. Ensure the disc speed rating is equal to or higher than the grinder's rating.
Before use
- Check that the power supply voltage matches the appliance rating.
- Inspect power supply leads, plugs, and connections for wear or damage.
- Ensure the safety guard is securely attached and positioned correctly.
- Verify that the disc is free of fissures or cracks.
- Wear appropriate PPE: eye protection, ear defenders, dust mask, and gloves.
- Ensure the switch is in the OFF position before plugging in.
Specs in practice
- 125mm Disc Size
- The maximum diameter of the grinding or cutting disc compatible with this tool.
- 1100W Motor Power
- The power consumption of the motor, indicating heavy-duty capability.
- 12000rpm No-Load Speed
- The rotational speed of the spindle when no resistance is applied.
- M14 x 2mm Spindle
- The standard thread size for mounting accessories.
Images and diagrams
- Figure 1: Shows the spindle lock button used to hold the spindle while changing discs.
- Figures 2, 3, 4: Illustrate the correct orientation of the clamping flange and retaining nut for different disc types.
Model compatibility
- Use only recommended wheel types; do not use cut-off wheels for grinding.
- Do not use accessories that require liquid coolants.
- Ensure the accessory rated speed is at least equal to the maximum speed of the grinder.

Manual page author
Emily Carter
User documentation editor
Prepares concise manual descriptions and highlights the most useful setup, operation, and maintenance information for readers.