Tools / Automotive Tools
User Manual for Sealey RE2280.V2 Telescopic Spring Compressor
Quick guide for the Sealey RE2280.V2 1250KG Telescopic Spring Compressor. Includes safety warnings, operating instructions, maintenance tips, and specifications.
Table of contents
Manual images
Click an image to enlargeImportant Information
This manual provides instructions for the Sealey RE2280.V2 Telescopic Spring Compressor. Important: Do not use air tools with this device, as it will invalidate the warranty. Always stop compressing the spring before the coil windings touch. Ensure the spring compressor is adjusted to a length of approximately 200mm before starting.
Safety Warnings
- Always wear approved safety eye protection.
- Do not operate the compressor if parts are damaged or missing.
- Do not force the compressor to perform tasks it was not designed for.
- Keep hands and body clear of the spring during operation.
- Ensure the work area is clean, uncluttered, and well-lit.
- Maintain correct balance and footing; wear non-slip shoes.
- Remove loose jewellery and tie back long hair.
Specifications
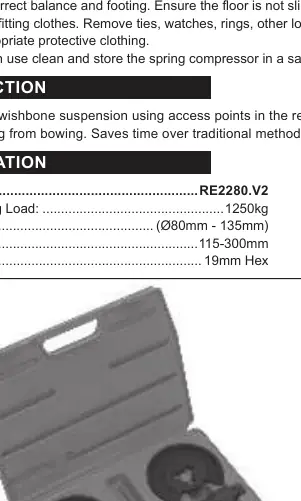
- Model No: RE2280.V2
- Maximum Spring Load: 1250kg
- Size/Suitability: 80mm - 135mm (outer diameter)
- Jaw Opening: 115mm - 300mm
- Drive: 19mm Hex
Operation
- Ensure the coil spring is free from dirt and grease.
- Jack up the vehicle and ensure it is safely supported.
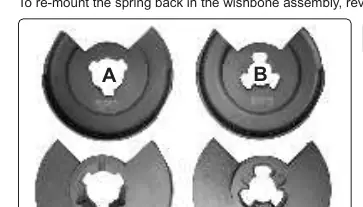
- Insert jaw (FIG.2-A) into the lower spring windings.
- Insert jaw (FIG.2-B) into the upper spring windings, ensuring windings sit between the inner and outer rims of the jaw.
- Insert the main body of the compressor into the spring from below with the hexagonal drive nut facing downwards.
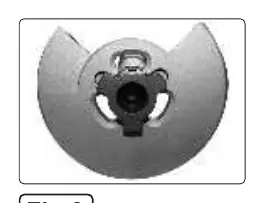
- Guide the compressor through the lower jaw and up into the upper jaw. Once passed through, turn the body approximately 50 degrees to locate it in the locking grooves (FIG.3).
- Use a 19mm hex socket to turn the drive nut until the jaws are firmly in contact with the spring.
- Verify the spring is correctly placed and aligned before continuing compression.
- Remove the spring and compressor assembly once sufficient compression is attained.
- To re-mount the spring, reverse the compression procedure.
Maintenance
- Before each use, inspect the compressor for damage or wear.
- If the unit is suspect, do not use it; contact your Sealey stockist for repair kits and spare parts.
- Grease the compressor spindle at least every six months using graphite grease.
- Keep the compressor clean and store in a safe, dry, childproof location.
Manufacturer information
Sealey Group
Practical help
Common problems
Compressor not locking into position
Ensure the compressor body is turned approximately 50 degrees after passing through the upper jaw to locate it in the locking grooves.
Air wrench usage
Do not use an air wrench; it will invalidate the warranty.
Spring bowing during compression
Ensure the spring windings sit securely between the inner and outer rims of the jaw.
Before use
- Check for damaged or worn parts
- Measure spring outer diameter
- Select correct jaw set
- Ensure work area is clean and well-lit
- Wear safety eye protection
Specs in practice
- Maximum Spring Load
- 1250kg
- Size/Suitability
- 80mm - 135mm spring diameter
Images and diagrams
- Fig 1: Overview of the telescopic spring compressor
- Fig 2: Identification of jaws A and B
- Fig 3: Locking mechanism for the compressor body
Model compatibility
- Designed for wishbone suspension using access points in the rear suspension arm.

Manual page author
David Miller
Documentation analyst
Organizes user manual content into clear summaries, with attention to model details, product context, and everyday usability.