Tools / Lifting Tools
Sealey 2180LE Trolley Jack User Manual
Quick guide for the Sealey 2180LE Trolley Jack. Includes safety instructions, assembly, operation, maintenance, and troubleshooting steps.
Quick answers from the manual
Quick answer
- The Sealey 2180LE is a 2-tonne trolley jack. It must be purged of air before first use and operated on level, solid ground. Always use axle stands to support the vehicle. p. 1, 2
Key actions
- Purge air from hydraulic system p. 2
- Lower the vehicle p. 2
First start
- Purge hydraulic unit p. 2
Show 4 more answers Show less
Problems and fixes
Jack will not lift
Check for overload, low oil, or air in system.
p. 3Maintenance and reset
- Check oil level p. 2
Technical specifications
| Parameter | Value | Meaning | Pages |
|---|---|---|---|
| Capacity | 2 Tonne | Maximum lifting capacity | p. 1 |
Where to find it in the PDF
- Safety and General Info p. 1
- Assembly and Operation p. 2
- Troubleshooting p. 3
Table of contents
Manual images
Click an image to enlargeQuick guide from the manual
The Sealey 2180LE is a 2-tonne low entry trolley jack. Before using the jack for the first time, it is essential to purge the hydraulic system of air. Always operate the jack on level, solid ground and use axle stands to support the vehicle load; the jack is a lifting device only and must not be used to support the load for extended periods.
Safety
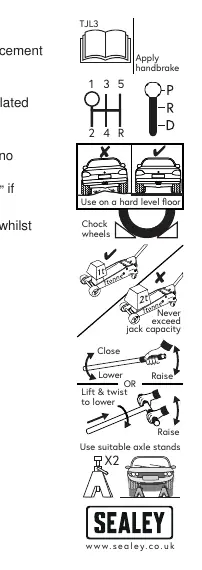
- Always use the jack on level, solid ground (concrete is preferred). Avoid tarmacadam as the jack may sink.
- Ensure the vehicle handbrake is engaged, the engine is off, and the transmission is in gear or 'PARK'.
- Use axle stands to support the vehicle once lifted.
- Never exceed the rated jack capacity.
- Keep the working area clean and free from unrelated materials.
Assembly
To assemble the jack for use:
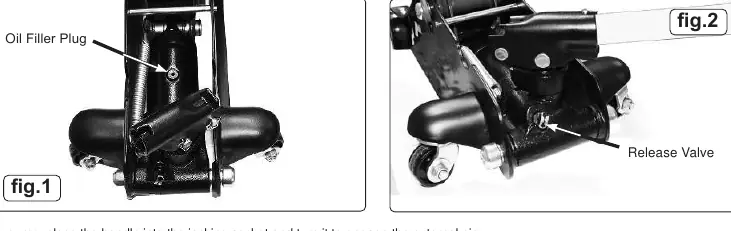
- Handle installation: Place the handle into the jacking socket and turn it to engage the external pin.
- Release valve operation: Engage the open end of the handle with the release valve nut as shown in the manual diagrams.
Operation
Before first use
Purge the hydraulic unit to eliminate air:
- Place the handle onto the release valve and turn anti-clockwise to open.
- Place the handle into the jacking socket and pump for 30 to 40 seconds.
- Close the release valve by turning the nut clockwise.
- Apply a few drops of hydraulic jack oil to the pump piston and pump the handle several times to lubricate.
Raising and lowering
- Raising: Close the release valve. Place the handle in the socket and pump until the saddle reaches the vehicle lifting point. Ensure the lifting point is centrally located on the saddle.
- Lowering: Ensure no persons or obstacles are beneath the vehicle. Place the handle onto the release valve nut and turn anti-clockwise very slowly. The lowering speed is controlled by how much you turn the handle.
Maintenance
- Lubrication: Keep the jack clean and lubricate all moving parts regularly.
- Oil level: Check the oil level annually. Fully lower the jack, open the hinged cover, and remove the oil filler plug. The level should be just below the bottom of the plug. Use only high-quality hydraulic jack oil.
- Repairs: Maintenance or repair of the hydraulic system must only be performed by a qualified person.
Manufacturer information
Sealey Group
Practical help
Common problems
Jack will not lift the load
Check for overload, low oil level, or air in the system. Ensure the release valve is fully closed.
Jack feels spongy
This usually indicates air in the system. Open the release valve and pump the handle several times to purge air, then close and retry.
Jack will not hold load
Check if the release valve is partially open or if there is dirt on the valve seats. Inspect for faulty seals.
Before use
- Ensure the jack is on level, solid ground.
- Engage the vehicle handbrake and put the transmission in gear or park.
- Purge the hydraulic unit of air before the first use.
- Check for broken, cracked, or loose parts before every use.
- Ensure the vehicle is properly chocked.
Show more Show less
Specs in practice
- Hydraulic Oil
- Use only high-quality hydraulic jack oil. Do not use brake fluid.
Images and diagrams
- Fig 1: Shows the location of the oil filler plug.
- Fig 2: Shows the release valve and how to engage the handle.
Model compatibility
- Use only genuine Sealey parts.
- Always use axle stands to support the vehicle load.

Manual page author
Michael Turner
Technical manual editor