Power / EV Chargers
User Guide for Dépow 22kW Portable EV Charger
Quick guide for the Dépow 22kW Portable EV Charger. Includes setup instructions, Wi-Fi configuration, LED status indicators, error codes, and technical specifications.
Quick answers from the manual
Quick answer
- To start charging, connect the CEE plug to the power source, set your desired current and delay time using the control box buttons, and then connect the Type 2 plug to your vehicle. p. 3
Key actions
- Adjust charging current p. 3
- Set delayed charging p. 3
First start
- Connect the CEE plug, configure settings on the control box, then connect the vehicle. p. 3
Show 5 more answers Show less
Problems and fixes
System Error (0)
Power off and contact customer support.
p. 4
Leakage Current Detected (1)
Power off and check the vehicle and charger.
p. 4Error codes
| Code | Meaning | Action | Pages |
|---|---|---|---|
| 0 | System Error | Power off and contact customer support | p. 4 |
| 1 | Leakage Current Detected | Power off and check the vehicle and charger | p. 4 |
| 2 | Overcurrent Protection | Power off and check the vehicle | p. 4 |
| 3 | Overvoltage/Undervoltage Protection | Power off and check the distribution grid | p. 4 |
| 4 | Ground (PE) Protection | Power off and check the distribution grid; follow instructions to enter No-Grounding Mode | p. 4 |
| 5 | Relay Sticking | Power off, connect power plug first then type 2 plug | p. 4 |
| 6 | CP Fault | Power off and reconnect | p. 4 |
| 7 | Overtemperature | The program will auto-reduce or manually set a low current | p. 4 |
Maintenance and reset
- Reset to factory settings via the App settings menu. p. 11
Technical specifications
| Parameter | Value | Meaning | Pages |
|---|---|---|---|
| Voltage | 230-400V AC | Operating voltage range | p. 5 |
| Power | Max 22kW | Maximum power output | p. 5 |
| Current | 6A-32A | Adjustable charging current | p. 5 |
| IP Rating | IP66 / IP54 | Ingress protection for control box and plug | p. 5 |
Where to find it in the PDF
- Quick Start p. 3
- Operating Instructions p. 3
- Error Codes p. 4
- Technical Specifications p. 5
- Wi-Fi Setup p. 7
Table of contents
Manual images
Click an image to enlargeQuick Start Guide
Follow these steps to begin charging your electric vehicle:

- Connect the 32A CEE plug to the power source.
- Set the desired current and charge starting time using the control box buttons.
- Connect the Type 2 plug to the vehicle's charging port.
Notice: Settings cannot be modified once the Type 2 connector is plugged into the vehicle.
Operating Instructions
The control box features two main buttons (A and Clock icon) to manage charging settings:
- Adjust Current: Press button A to cycle through 6A, 10A, 13A, 16A, 20A, 24A, and 32A.
- Set Delayed Charging: Press the Clock button to set a delay between 0.5h and 8h.
- No-Grounding Mode: Press A and Clock buttons simultaneously for 0.5s in Standby Mode. Repeat to restore grounding.
- Wi-Fi Configuration: Press A for 5s in Standby Mode. The Wi-Fi icon will blink.
- Pause/Resume Charging: Press A and Clock buttons simultaneously for 5s while charging.
If the charger remains inactive in standby for over 5 minutes, it will enter sleep mode. Click the button or plug in the Type 2 connector to reactivate.
LED Screen Information
The LED screen displays real-time charging data, including:
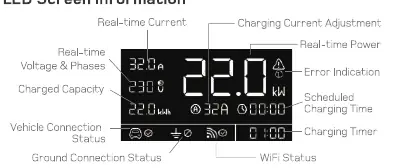
- Real-time current and voltage/phases.
- Charged capacity (kWh).
- Real-time power (kW).
- Scheduled charging time and charging timer.
- Status indicators for vehicle connection, ground connection, and Wi-Fi.
Wi-Fi Setup and App Introduction
To use advanced features, connect the charger to the "Tuya Smart" app:
- Ensure your mobile device is connected to a 2.4GHz Wi-Fi network and Bluetooth is enabled.
- Download the "Tuya Smart" app from the Google Play Store or Apple App Store.
- Follow the in-app instructions to add the device.
- The charger can be linked to one account; it can be shared with family members via the app.
Troubleshooting and Error Codes
If an error occurs, the LED screen will display an error indication. Common solutions include:
- System Error (0): Power off and contact customer support.
- Leakage Current (1): Power off and check the vehicle and charger.
- Overcurrent (2): Power off and check the vehicle.
- Over/Undervoltage (3): Power off and check the distribution grid.
- Ground Protection (4): Power off and check the distribution grid or enter No-Grounding Mode.
- Relay Sticking (5): Power off, connect power plug first, then Type 2 plug.
- CP Fault (6): Power off and reconnect.
- Overtemperature (7): The program will auto-reduce current or you can manually set a lower current.
Technical Specifications
- Voltage: 230-400V AC
- Max Power: 22kW (at 400V/32A)
- Current: 6A/10A/13A/16A/20A/24A/32A
- RCD: Type-B AC 30mA + DC 6mA
- Operating Temperature: -25°C to +50°C
- IP Rating: IP66 (Control box), IP54 (Type 2 plug)
Safety Precautions
- For use with electric vehicles only.
- Do not open the enclosure.
- Do not use if the unit is damaged.
- No user-serviceable parts inside.
- Connect only to properly grounded outlets or grids.
Practical help
Common problems
Wi-Fi connection failure
Ensure 2.4GHz network is used, Bluetooth is on, and the charger is within signal range. If using 5GHz, switch to 2.4GHz or a personal hotspot.
Overtemperature error (7)
The charger will automatically reduce current. You can also manually set a lower charging current.
Ground Protection error (4)
Check the distribution grid. You may need to enable No-Grounding Mode if the grid grounding is insufficient.
Before use
- Ensure the power outlet is properly grounded.
- Check the unit for any physical damage.
- Ensure your mobile device is on a 2.4GHz Wi-Fi network for initial setup.
- Verify the charging current is appropriate for your vehicle and circuit.
Show more Show less
Images and diagrams
- The LED screen shows real-time current, voltage, power, and status icons for vehicle, ground, and Wi-Fi connection.
- The control box buttons allow for current adjustment and delayed charging setup.
Model compatibility
- Designed for electric vehicles only.
- Requires 2.4GHz Wi-Fi for app connectivity.

Manual page author
Emily Carter
User documentation editor