Power / EV Chargers
User Manual for Shopify MNVR 3-8 Cam 1080N Dash Cam
Quick setup and configuration guide for the Shopify MNVR 3-8 Cam 1080N dash cam. Includes 4G/WIFI network configuration, APN settings for US carriers, and troubleshooting steps.
Quick answers from the manual
Quick answer
- This manual provides instructions for connecting the MNVR 3-8 Cam 1080N to WIFI and 3G/4G/LTE networks, as well as troubleshooting steps for 4G connectivity. p. 1, 2
Key actions
- Login to the Main MNVR Menu using Username: Admin and Password: 2020. p. 1
- Configure WIFI by navigating to ADVANCE -> NETWORK -> WIFI -> Enable, then select the SSID and enter the password. p. 2
- Configure 3G/4G/LTE by navigating to 3G/4G -> Switch: Enable -> Mode: Manual -> Input APN -> Access Number: *99# -> Save. p. 2
- Check network and CMSV connection status by pressing the 'Info' button on the remote. p. 2
First start
- Login to the Main MNVR Menu using the default credentials: Username: Admin, Password: 2020. p. 1
Show 2 more answers Show less
Problems and fixes
4G not online
Ensure the SIM card is active on a data-only plan, verify the APN settings (ATT: broadband or nxtgenphone; T-Mobile: 3gnet or fast.t-mobile), and ensure the 4G antenna is receiving a signal.
p. 1, 2Where to find it in the PDF
- Connection diagram, 4G troubleshooting, and login credentials p. 1
- WIFI and 3G/4G/LTE setup instructions and APN list p. 2
Table of contents
Manual images
Click an image to enlargeQuick Start and Login
To access the main menu of the MNVR system, use the following default credentials:
- Username: Admin
- Password: 2020
After completing network setups, you can press the Info button on your remote to check the network and CMSV connection status on the screen.
Hardware Overview
The device features multiple ports and slots for connectivity and storage:
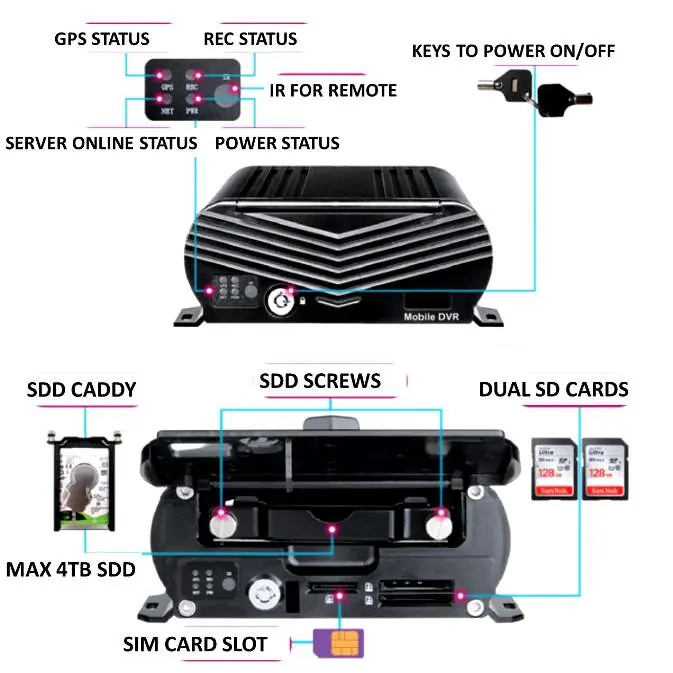
- Connectivity: Ports for GPS antenna, 3G/4G/LTE antenna, WIFI antenna, AV inputs (AV1-AV8), USB, HDMI, and VGA.
- Storage: Dual SD card slots and a dedicated SDD caddy for storage.
- SIM: SIM card slot for cellular connectivity.
- Power: DC 8-36V power input.
WIFI Setup
To connect the device to a WIFI network:
- Navigate to ADVANCE in the main menu.
- Select NETWORK.
- Select WIFI.
- Set WIFI to Enable to trigger an automatic search for available SSIDs.
- Select your WIFI SSID from the list.
- Input the password and connect.
3G/4G/LTE Setup
To configure cellular data connectivity:
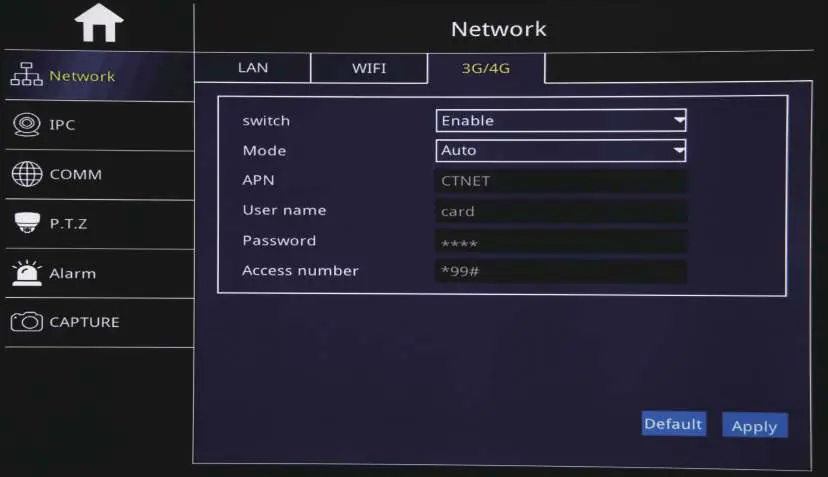
- Navigate to the 3G/4G tab in the Network menu.
- Set Switch to Enable.
- Set Mode to Manual.
- Enter the correct APN based on your carrier (see below).
- Set Access Number to *99#.
- Save your changes.
Carrier APN Settings:
- AT&T: broadband or nxtgenphone
- T-Mobile: 3gnet or fast.t-mobile
Troubleshooting
If the 4G connection is not online, check the following:
- Ensure the SIM card is active and set up on a data-only plan.
- Verify that the correct APN is entered in the menu settings.
- Check that the 4G antenna is properly connected and receiving a signal.
If the 4G connection remains offline, you may contact support by emailing [email protected] with a picture of your LCD screen taken after pressing the Info button on your remote.
Practical help
Common problems
4G connection is not online
Verify SIM card is active/data-only, check APN settings, and ensure 4G antenna is connected.
Incorrect APN settings
For AT&T use 'broadband' or 'nxtgenphone'. For T-Mobile use '3gnet' or 'fast.t-mobile'.
Before use
- Insert SD cards into the dual SD card slots.
- Insert SIM card into the SIM card slot.
- Connect GPS, 3G/4G, and WIFI antennas.
- Connect power wire to vehicle power source (DC 8-36V).
- Connect monitor via VGA or HDMI.
Show more Show less
Specs in practice
- Access Number
- Set to *99# for 4G connection.
Images and diagrams
- Hardware ports include AV inputs, USB, HDMI, VGA, and power input.
- SD card and SIM card slots are located on the device chassis.
Model compatibility
- Supports AT&T and T-Mobile networks with specific APN configurations.

Manual page author
Michael Turner
Technical manual editor