Electronics / Headphones Earbuds
User Manual for Simolio SM-828D1/SM-828D2 Wireless TV Earphones
Quick guide for Simolio SM-828D1/SM-828D2 wireless TV earphones. Includes setup instructions for optical, RCA, and AUX connections, troubleshooting, and customization settings.
Quick answers from the manual
Quick answer
- The Simolio SM-828D1/SM-828D2 is a wireless TV hearing assistance system. Connect it to your TV via Optical, RCA, or 3.5mm AUX cable, charge the headset, and adjust tone/balance settings for clear audio. p. 2, 3
Key actions
- Connect the transmitter to your TV using Optical, RCA, or 3.5mm cable. p. 7, 8, 9, 10
- Charge the earphone for 3 hours before first use. p. 7, 10
First start
- Charge the earphone for 3 hours. p. 7
- Connect audio cables and set TV audio output to PCM. p. 8
Show 1 more answers Show less
Where to find it in the PDF
- Product Diagram p. 4
- Setup and Connections p. 6, 7, 8, 9
Table of contents
Manual images
Click an image to enlargeQuick guide from the manual
The Simolio SM-828D1/SM-828D2 is a wireless TV hearing assistance system. Before first use, charge the earphone for 3 hours. Ensure the transmitter is placed at least 4 feet away from WiFi routers or other interference sources. For the best audio experience, set your TV audio output to PCM format.
Overview and Features
This system uses 2.4GHz FHSS technology for wireless audio transmission up to 100 feet. Key features include:
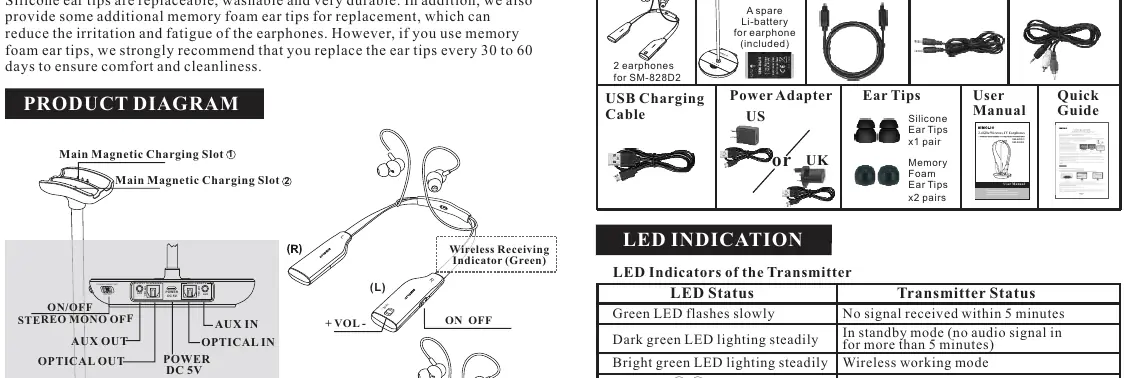
- Voice Highlighting and Noise Cancelling: Reduces background noise to make TV dialogues clearer.
- Balance and Tone Control: Allows adjustment of left/right volume and frequency (Treble/Normal/Bass).
- By-pass Feature: Enables simultaneous use of the wireless earphone and a soundbar/audio system.
- Multiple Charging Solutions: Magnetic charging stand, USB charging, and a spare battery compartment.
- Auto Power Off: Saves power by turning off after 10 minutes of no signal.
Setup and Connections
The transmitter is compatible with Optical, RCA, and 3.5mm AUX audio outputs. Only one connection type is required.
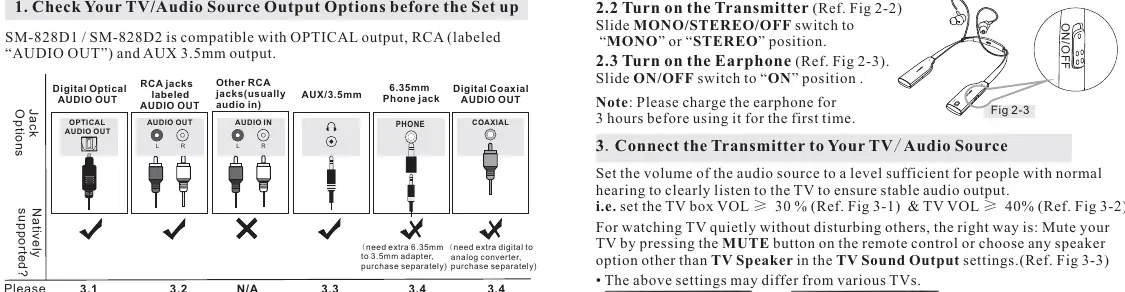
Digital Optical Connection
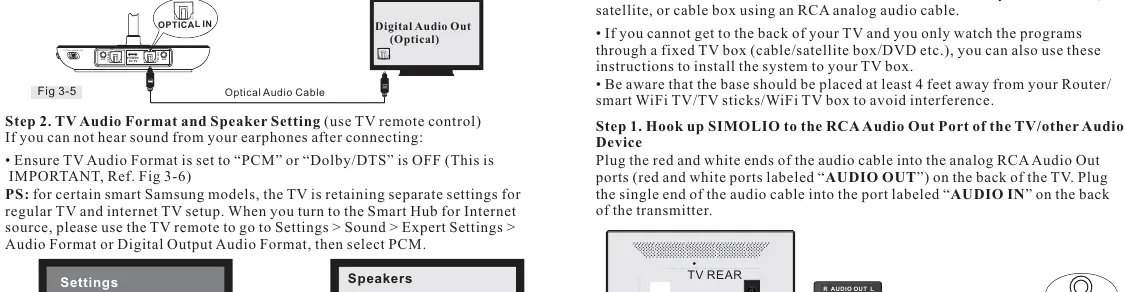
- Remove protective caps from the optical cable.
- Connect one end to the TV's "Digital Audio Out (Optical)" port.
- Connect the other end to the transmitter's "OPTICAL IN" port.
- Set TV audio format to "PCM" or ensure "Dolby/DTS" is OFF.
RCA Analog Connection
- Connect the red and white ends of the RCA cable to the TV's "AUDIO OUT" ports.
- Connect the single end to the transmitter's "AUDIO IN" port.
- Ensure TV speaker setting is set to "External Speakers".
3.5mm/AUX Analog Connection
- Connect the 3.5mm cable to the TV's "Audio Out" or headphone port.
- Connect the other end to the transmitter's "AUDIO IN" port.
- Ensure TV speaker setting is set to "Headset".
Customization
- Balance Control: Rotate the BAL dial on the earphone to adjust left/right volume balance.
- Tone Control: Use the TONE switch on the transmitter to select Treble, Normal, or Bass.
- Mono/Stereo: Switch to MONO for clearer dialogues or STEREO for music.
Charging
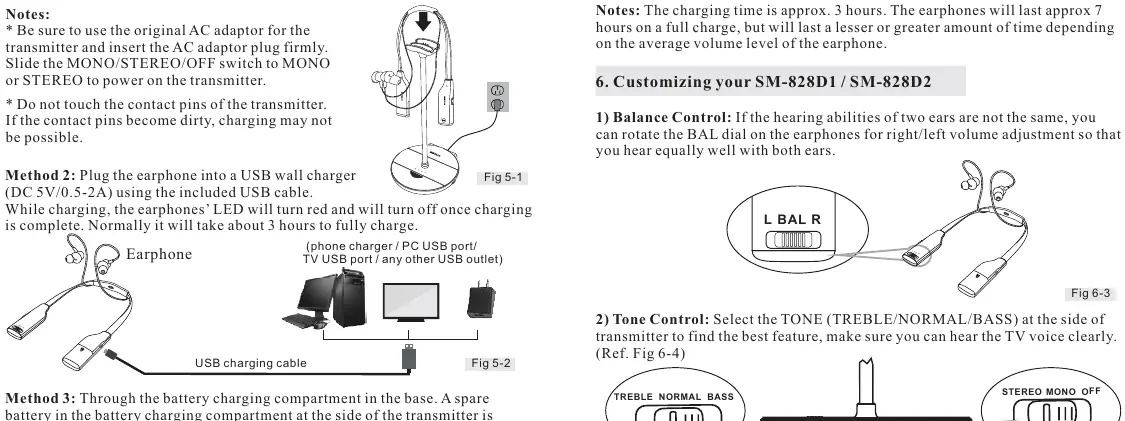
- Magnetic Stand: Place the earphone on the stand; the red LED indicates charging.
- USB Charging: Use the included USB cable to connect to a compatible USB charger.
- Spare Battery: A spare battery is kept in the transmitter's charging compartment.
Troubleshooting
- No Sound: Check all cable connections, ensure the transmitter is powered on, and verify the TV audio output is set to PCM.
- Sound Cuts In/Out: Move the transmitter away from WiFi routers or other electronic interference.
- Earphone Not Charging: Ensure the transmitter is powered on and the contact pins are clean.
Practical help
Common problems
No sound received
Check cable connections, ensure TV audio output is set to PCM, and verify the transmitter is powered on.
Sound cuts in and out
Move the transmitter at least 4 feet away from WiFi routers, TV sticks, or other sources of electromagnetic interference.
Earphone not charging
Ensure the transmitter is switched on, check that contact pins are clean, and try a different USB power source.
Voice heard only in one ear
Adjust the balance control dial on the earphone or switch the transmitter to MONO mode.
Before use
- Charge the earphone for 3 hours before the first use.
- Ensure the transmitter is placed at least 4 feet away from WiFi routers.
- Set TV audio output format to PCM.
- Verify your TV has Optical, RCA, or 3.5mm audio output ports.
- Ensure the transmitter is connected to a power source.
Show more Show less
Specs in practice
- Transmission mode
- 2.4GHz FHSS (Frequency-Hopping Spread Spectrum) for wireless audio.
- Working time
- Approximately 7 hours on a full charge.
- Charging time
- Approximately 3 hours.
Images and diagrams
- Transmitter ports: DC 5V power, Optical In/Out, AUX In/Out.
- Charging: Magnetic stand and USB charging cable options.
- Controls: TONE (Treble/Normal/Bass) and MONO/STEREO switches on the transmitter.
Model compatibility
- Compatible with TVs/devices having Optical, RCA, or 3.5mm audio out.
- Not compatible with AV Receiver RCA ports; use 6.35mm phone jack with an adapter.

Manual page author
David Miller
Documentation analyst