Industrial / Control Panels
Installation Guide for SJE Rhombus Control Panel Accessories
Quick installation guide for SJE Rhombus control panel accessories. Includes step-by-step instructions for Riser Mounting and Simplex/Duplex kits, along with drilling templates for mounting posts.
Table of contents
Manual images
Click an image to enlargeQuick Installation Guide
This document provides installation instructions for SJE Rhombus control panel accessories, specifically the Riser Mounting Kit and the Simplex/Duplex Kit. It also includes a drilling template for the mounting post.
Riser Mounting Kit Installation
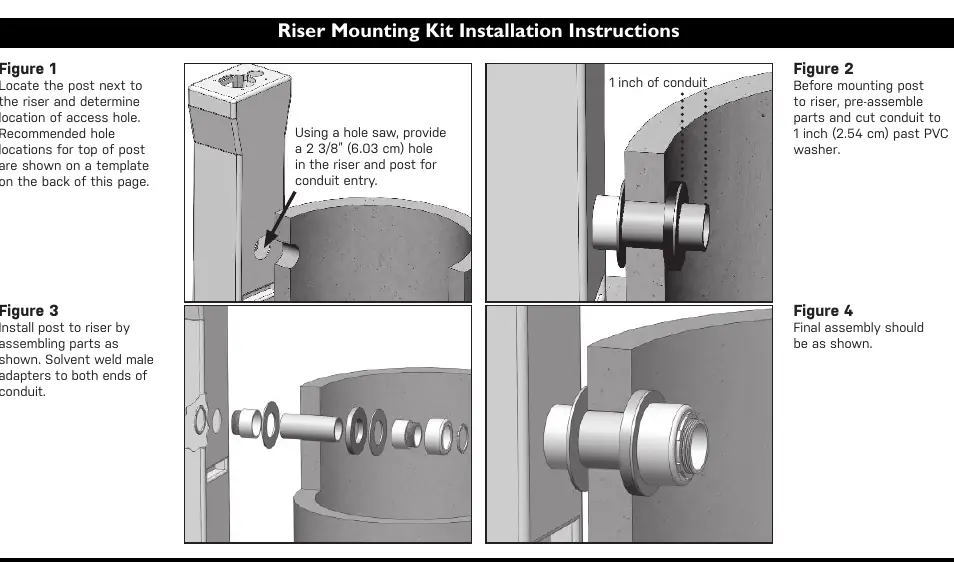
- Locate and Drill: Position the post next to the riser and determine the access hole location. Use a hole saw to create a 2 3/8" (6.03 cm) hole in both the riser and the post for conduit entry.
- Pre-assembly: Before mounting the post to the riser, pre-assemble the parts and cut the conduit so it extends 1 inch (2.54 cm) past the PVC washer.
- Final Assembly: Install the post to the riser by assembling the parts as shown in the diagrams. Solvent weld the male adapters to both ends of the conduit.
Simplex/Duplex Kit Installation

- Mounting: Mount the enclosure to the post by assembling the parts as shown. Refer to the template on the back of the manual for recommended hole locations.
- Sealing: Ensure the final assembly is secure. If all positions in the cord seal are not used, plug the open positions with the provided PVC plugs. Tighten the nut on the cord seal to prevent gas and moisture from entering the panel.
- Capacity Limit: The maximum enclosure size for the panel mounting post is 14 x 12 x 6.
Panel Mounting Post Template
The manual includes a full-scale template on page 2 for drilling the mounting post. When using the template:
- Align the edge of the template with the back wall on the top of the panel mounting post.
- Align the edge of the template with the back wall on the bottom of the enclosure.
- Use a hole saw to drill the large holes as indicated.
- The template provides specific hole sizes for various hubs, including 3/4", 2.0", and 2-1/2" hubs.
Safety and Maintenance
Notice: Products returned for service must be cleaned, sanitized, or decontaminated as necessary prior to shipment to ensure that employees are not exposed to health hazards. All applicable laws and regulations must be followed.
Practical help
Common problems
Moisture or gas entering the panel
Ensure the cord seal nut is tightened and all unused cord seal positions are plugged with the provided PVC plugs.
Conduit fitting issues
Ensure the conduit is cut to extend exactly 1 inch (2.54 cm) past the PVC washer before final assembly.
Before use
- Verify the enclosure size does not exceed 14 x 12 x 6.
- Ensure you have a hole saw for drilling the mounting post.
- Check that you have all necessary PVC plugs for unused cord seal positions.
- Confirm the riser and post alignment before drilling.
Specs in practice
- Conduit Hole Size
- 2 3/8" (6.03 cm) hole required for conduit entry.
- Max Enclosure Size
- 14 x 12 x 6 is the maximum allowed size for the panel mounting post.
Images and diagrams
- The template on page 2 provides precise hole locations for 3/4", 2.0", and 2-1/2" hubs.
- The template includes markings for 9/32" holes for panel mounting.
Model compatibility
- Designed for SJE Rhombus control panel accessories.
- Requires solvent welding for conduit adapters.

Manual page author
Michael Turner
Technical manual editor
Reviews PDF manuals for structure, safety notes, and practical product details so readers can find the right information quickly.