Home Appliances / Refrigerators
User Manual for Stirling 158L Bar Fridge STR-H158W
Comprehensive user manual for the Stirling 158L Bar Fridge (STR-H158W). Includes installation instructions, safety guidelines, thermostat settings, defrosting procedures, maintenance tips, and troubleshooting.
Table of contents
Manual images
Click an image to enlargeQuick guide from the manual
Before using your Stirling 158L Bar Fridge, please note these critical steps to ensure proper operation and longevity:
- Wait before plugging in: After moving or installing the fridge, let it stand upright for at least 4 hours before plugging it into the power supply. This allows refrigerant gases to settle.
- Initial cooling: When starting up for the first time, set the thermostat to the coldest setting (5) and allow it to cool for at least 4 hours before adding perishable food.
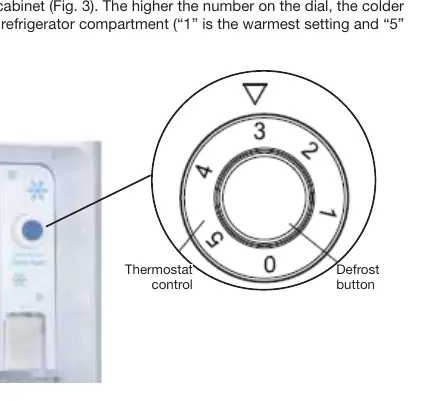
- Thermostat control: The dial is located on the upper right side. Setting 1 is the warmest, and 5 is the coldest. A middle setting (3-4) is recommended for general use.
- Defrosting: The chiller compartment requires manual defrosting if frost exceeds 5mm. Use the defrost button to stop cooling, and never use sharp tools to scrape ice.
Installation
Proper installation is essential for efficiency and safety:
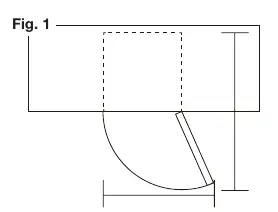
- Clearances: Ensure at least 10cm of clear space at the back and sides of the unit to allow for proper air circulation and cooling of the compressor.
- Levelling: The fridge must be installed on a level surface. Adjust the levelling feet at the base if the unit is not stable or if the door seal is not aligning correctly.
- Electrical connection: Plug the unit into a dedicated, properly earthed wall outlet. Do not use extension cords or adaptors.
Operation and Food Storage
To maintain cooling efficiency:
- Do not overload the fridge.
- Keep enough space around items for cold airflow.
- Do not place items directly against the back wall.
- Let hot food cool to room temperature before storing.
- Do not store bottled beverages or carbonated liquids in the chiller compartment, as they may shatter or explode.
Maintenance and Cleaning
Always disconnect the power supply before cleaning or maintenance:
- Cleaning: Use a solution of lukewarm water and baking soda (approx. 2 tablespoons per litre) with a soft cloth. Avoid abrasive detergents, solvents, or steam cleaners.
- Lamp replacement: If the interior lamp fails, remove the lamp cover, unscrew the old bulb (anticlockwise), and replace it with a new 10W bulb of the same type.
Troubleshooting
If you encounter issues, check the following before calling support:
- Fridge not operating: Check if it is plugged in, if there is power at the socket, or if the circuit breaker has tripped.
- Excessive noise or vibrations: Ensure the fridge is level and not touching the wall or other objects.
- Door not closing: Check if the fridge is level and ensure the gasket is clean and not damaged.
- Moisture buildup: This is often normal in hot and humid weather; keep the door closed as much as possible.
Practical help
Common problems
Fridge does not operate
Check power connection, circuit breaker, and ensure the temperature control is not set to 0.
Excessive noise or vibrations
Ensure the fridge is level using the feet and is not touching walls or other objects.
Door will not close properly
Check if the fridge is level and inspect the door gasket for dirt or damage.
Compressor runs continuously
Check if the door is closed properly, the gasket is intact, or if the room temperature is unusually high.
Before use
- Remove all packaging materials from inside and outside.
- Check that all parts (shelves, crisper) are present.
- Clean the interior with a baking soda solution.
- Place the unit on a level surface with 10cm clearance on all sides.
- Let the unit stand upright for 4 hours before plugging in.
- Set thermostat to 5 and run for 4 hours before adding food.
Specs in practice
- Climate Class T
- Designed for ambient temperatures between 16°C and 43°C.
- Refrigerant R600a
- Flammable refrigerant; handle with care and do not damage the circuit.
Images and diagrams
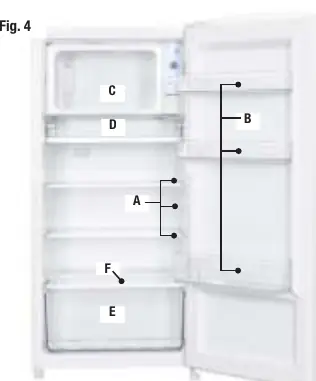
- The thermostat control is located on the upper right side of the interior.
- The chiller compartment is at the top, with a drip tray underneath.
- Levelling feet are located at the base of the cabinet.
Model compatibility
- Indoor domestic use only.
- Not suitable for industrial or commercial use.
- Do not use electrical appliances inside the fridge.

Manual page author
Emily Carter
User documentation editor
Prepares concise manual descriptions and highlights the most useful setup, operation, and maintenance information for readers.