Home Appliances / Refrigerators
User Manual for Stirling 183L Upright Freezer STR-H183W
Quick guide for the Stirling 183L Upright Freezer (STR-H183W). Includes installation steps, temperature settings, maintenance, defrosting, and troubleshooting tips.
Quick answers from the manual
Quick answer
- The Stirling 183L Upright Freezer (STR-H183W) is a domestic freezer. Key setup steps include letting it stand for 4 hours before plugging in, ensuring proper ventilation, and setting the temperature control. p. 1, 10
Key actions
- Defrosting p. 16
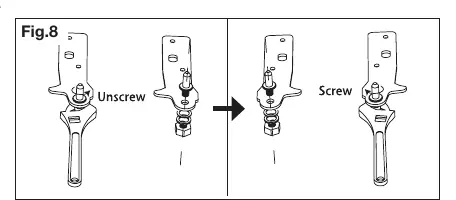
- Reversing door swing p. 18, 19
First start
- Let stand for 4 hours p. 10
- Cool down p. 10
Problems and fixes
Appliance does not work
Check power, fuse, and circuit breaker.
p. 14Maintenance and reset
- Defrosting p. 16
Technical specifications
| Parameter | Value | Meaning | Pages |
|---|---|---|---|
| Power | 220-240V~, 50Hz, 0.78A | Electrical requirements | p. 20 |
Where to find it in the PDF
- Product Overview p. 8
- Installation p. 10
- Troubleshooting p. 14, 15
Table of contents
Manual images
Click an image to enlargeQuick guide from the manual
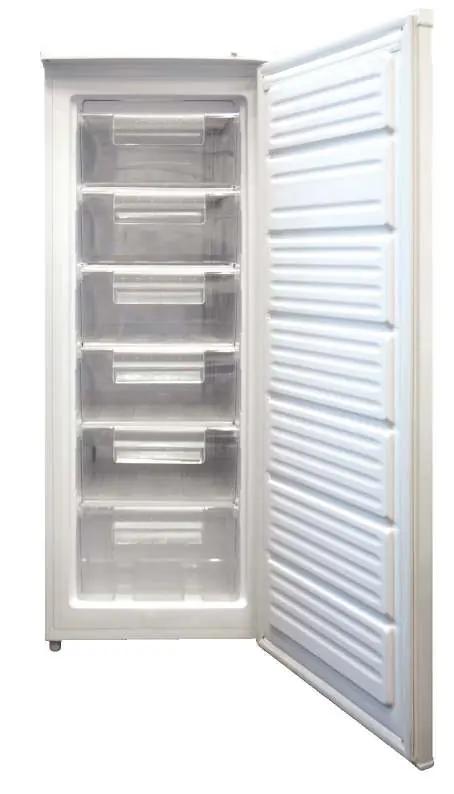
This Stirling 183L Upright Freezer is designed for indoor domestic use. Before using the appliance for the first time, ensure it has been left to stand upright for at least 4 hours to allow refrigerant gases to settle. When starting up, set the temperature control to the MAX setting and allow the unit to cool for at least 2 hours before adding food.
Installation
Proper installation is critical for efficient operation:
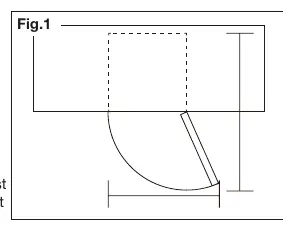
- Clearances: Ensure air can circulate freely. Allow at least 12cm of clear space at the back and 5cm at the sides.
- Overhanging units: If positioned below an overhanging wall unit, maintain a minimum distance of 10cm from the top of the cabinet.
- Levelling: The unit must be level to ensure proper door and magnetic seal alignment. Adjust the levelling feet at the base as needed.
- Electrical: Plug into a dedicated, properly earthed 220-240V, 50Hz outlet. Do not use extension cords or adaptors.
Temperature control
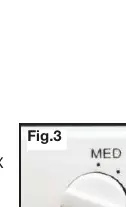
The temperature control is located at the top of the freezer frame. The MIN mark is the warmest setting, MED is for normal use, and MAX is the coldest setting. Adjust the control based on your needs after the initial 24-hour cooling period.
Freezing and storing food
- Fresh food: Do not push food together; leave space for air circulation. Do not place packages directly against the back wall.
- Large quantities: When adding large amounts of fresh food, it will take approximately 24 hours to freeze to a solid state.
- Storage: Always use freezer-proof packaging and label food with dates. Do not refreeze food once it has been defrosted.
Maintenance and cleaning
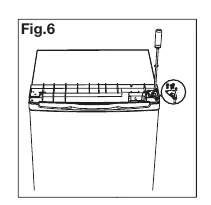
- Defrosting: Defrost the freezer when frost on the walls reaches 3-4mm thickness. Turn the control to MIN, unplug the unit, and remove food. Use a plastic scraper to remove ice; never use sharp or metallic tools.
- Cleaning: Clean the interior with a solution of 2 tablespoons of baking soda to 1 litre of water. Ensure the unit is unplugged before cleaning.
- Condenser: Clean the condenser at the back of the appliance once a year with a soft brush or vacuum attachment.
Troubleshooting
If you experience issues, check the following:
- Appliance does not work: Check the power plug, fuse, and circuit breaker.
- Food not frozen enough: Check the temperature setting, ensure the door is not opened too frequently, and verify the unit is not near a heat source.
- Unusual noises: Ensure the unit is level and not touching walls or other objects.
- Excessive frost: Check that the door seal is clean and the door is not left open.
Practical help
Common problems
Appliance does not work
Check that the mains plug is securely plugged in, the power is switched on, and the fuse or circuit breaker has not tripped.
Food is not frozen enough
Reset the temperature to a colder setting, ensure the door is not opened unnecessarily, and check that the unit is not located near a heat source.
Unusual noises
Ensure the appliance is level by adjusting the feet and that it is not touching the wall or other objects.
Heavy build-up of frost on door seal
The seal may not be air-tight. Carefully warm the leaking sections with a hair dryer on a cool setting and shape the seal by hand.
Before use
- Check for damage upon unpacking.
- Let the unit stand upright for at least 4 hours before plugging in.
- Clean the interior with a baking soda solution.
- Ensure proper ventilation clearances (12cm back, 5cm sides).
- Cool down on MAX setting for at least 2 hours before adding food.
Specs in practice
- Climate class T
- Designed to operate in ambient temperatures between 16°C and 43°C.
Images and diagrams
- Temperature control is located at the top of the freezer frame.
- Levelling feet are located at the base of the cabinet.
Model compatibility
- Indoor domestic use only.
- Not suitable for industrial or commercial use.

Manual page author
David Miller
Documentation analyst
Organizes user manual content into clear summaries, with attention to model details, product context, and everyday usability.