Home Appliances / Vacuum Cleaners
User Manual for Stirling 2-in-1 Steam & Iron Station 2IN1GSIS
Comprehensive user guide for the Stirling 2-in-1 Steam & Iron Station (2IN1GSIS). Includes assembly instructions, operating tips for vertical and horizontal ironing, maintenance, descaling, and troubleshooting.
Quick answers from the manual
Quick answer
- The Stirling 2-in-1 Steam & Iron Station (2IN1GSIS) is a garment care appliance featuring an adjustable ironing board for vertical and horizontal use, a 1.6L water tank, and a self-cleaning function. p. 1, 9, 25
Key actions
- Assemble the unit by inserting poles into the base and attaching the iron rest and ironing board. p. 11, 12
- Perform self-cleaning by setting the dial to 'Clean' and pressing the steam switch. p. 15, 23
First start
- Unpack, assemble, fill the water tank with cold water, and run the self-clean cycle before first use. p. 10, 14, 15
Problems and fixes
Steam head ejects no or very little steam
Fill the water tank, set the steam switch to steam, or use the self-clean function.
p. 22Maintenance and reset
- Perform self-cleaning every 2-3 weeks and deep cleaning/descaling at least once a month. p. 23, 24
Technical specifications
| Parameter | Value | Meaning | Pages |
|---|---|---|---|
| Water tank capacity | 1.6 L | Capacity of the water reservoir. | p. 25 |
Where to find it in the PDF
- Assembly p. 11, 12
- Operation p. 16, 17, 18
Table of contents
Manual images
Click an image to enlargeQuick Guide
The Stirling 2-in-1 Steam & Iron Station is designed for both vertical steaming and horizontal ironing. Before first use, ensure the unit is fully assembled, the water tank is filled with cold water, and the self-clean function is run to remove manufacturing residues. Always use the iron rest when the steam head is not in use and allow the unit to cool for at least 60 minutes before storage.
Safety Instructions
- Electrical Safety: Ensure your local outlet voltage matches the appliance rating. Do not use extension cords. Do not immerse the appliance in water.
- Usage Restrictions: For indoor domestic use only. Do not use on leather, velvet, or heat-sensitive materials.
- Hot Surfaces: The steam head and soleplate become very hot. Avoid contact to prevent burns.
- Water Usage: Use cold, preferably boiled water. Do not add additives like vinegar or descaling agents to the tank.
Assembly

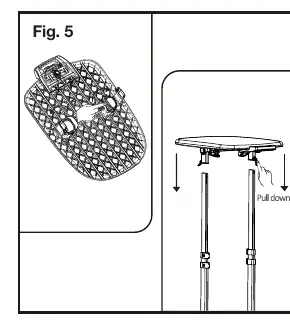
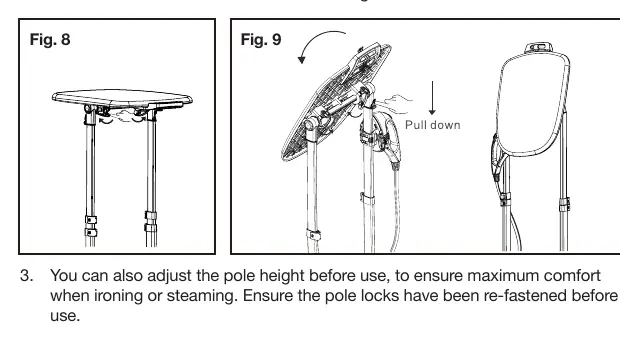
- Support Poles: Insert the aluminium support poles into the main unit slots and extend to the desired height, securing them with the locks.
- Iron Rest: Attach the iron rest to the pole at a comfortable height.
- Ironing Board: Insert the support bar into the top of the aluminium rods. The board can be rotated 90 degrees for vertical or horizontal use by releasing the rotary lock.
Operation
- Filling the Tank: Ensure the unit is unplugged. Remove the tank, unscrew the cap, fill with cold water, and replace.
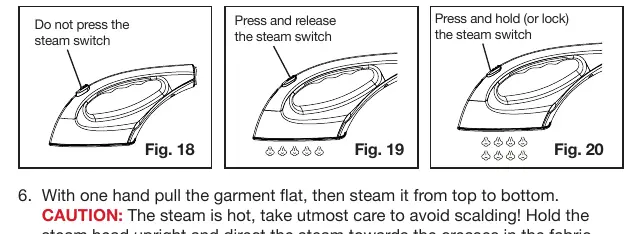
- Vertical Steaming: Rotate the ironing board to the vertical position. Hang the garment, select the steam level (I, II, or III) on the dial, and use the steam switch on the head.
- Horizontal Ironing: Rotate the board to the horizontal position. Follow the same steam settings as vertical steaming.
- Steam Head Accessories: The fabric brush can be attached to the soleplate for thicker fabrics. Ensure the unit is off and cool before attaching or removing.
Cleaning and Maintenance
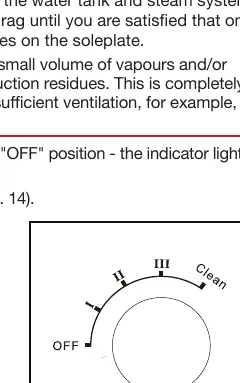
- Self-Cleaning: Perform this every 2-3 weeks. Fill the tank, set the dial to 'Clean', and press the steam switch while aiming the head into a sink to flush out scale.
- Descaling: In hard water areas, mix water and white vinegar (1:1 ratio) in the reservoir and run the cleaning cycle. Rinse thoroughly afterwards.
- Storage: Empty the water tank completely, collapse the poles, and store in a cool, dry place.
Practical help
Common problems
Steam head ejects no or very little steam
Check if the water tank is empty, ensure the steam switch is set to steam, or perform the self-clean function to remove limescale.
Steam head does not heat up
Ensure the appliance is properly connected to a power outlet and the steam switch is activated.
Nozzle or device is leaking
Tighten the water tank cap or reduce the steam volume setting.
Low water alarm is sounding
The water tank has less than 200 mL of water; refill the tank.
Before use
- Unpack the appliance and remove all promotional materials and protective films.
- Ensure the unit is fully assembled before connecting to power.
- Fill the water tank with cold, preferably boiled water.
- Perform the self-clean function before the first use to clear the system.
- Check the garment care label to ensure it is suitable for ironing/steaming.
Specs in practice
- Rated voltage/frequency
- 220-240 V 50-60 Hz
- Water tank capacity
- 1.6 L
- Steam generation time
- Approximately 30 seconds
Images and diagrams
- Assembly: Shows inserting poles into the base and extending them.
- Ironing Board: Illustrates rotating the board 90 degrees for vertical or horizontal use.
- Cleaning: Demonstrates aiming the steam head into a sink while using the 'Clean' setting.
Model compatibility
- Do not use on leather, velvet, or impregnated furniture.
- Check garment care labels; do not use if ironing is forbidden.

Manual page author
Emily Carter
User documentation editor
Prepares concise manual descriptions and highlights the most useful setup, operation, and maintenance information for readers.