Furniture / Bathroom Furniture
User Manual for Style Selections 37-in Vanity with Top
Quick guide for the Style Selections 37-in Vanity with Top. Includes assembly instructions, installation steps, door adjustment, care, and maintenance tips.
Quick answers from the manual
Quick answer
- This manual provides assembly and installation instructions for the Style Selections 37-in Vanity with Top. It covers leveling, wall mounting, top installation, door adjustments, and maintenance. p. 1, 4, 5, 6
Key actions
- Secure to wall p. 4
- Adjust doors p. 6
First start
- Level the vanity using leg levelers, secure to wall studs, and apply silicone caulk to attach the top. p. 4, 5
Problems and fixes
Door alignment
Use hinge screws (a) for up/down, (b) for left/right, and (c) for in/out.
p. 6Maintenance and reset
- Clean with non-abrasive cleaners; avoid acetone, lemon, vinegar, or acids. p. 7
Technical specifications
| Parameter | Value | Meaning | Pages |
|---|---|---|---|
| Installation Time | 20-30 minutes | Estimated time to assemble. | p. 4 |
Where to find it in the PDF
- Package Contents p. 3
- Installation Instructions p. 4, 5, 6
- Care and Maintenance p. 7
Table of contents
Manual images
Click an image to enlargeQuick guide from the manual
This document provides essential instructions for the assembly and installation of the Style Selections 37-in Vanity with Top. Key requirements include having two adults for assembly and ensuring the vanity is securely mounted to wall studs for safety. The installation process involves leveling the base, securing it to the wall, attaching the top with silicone caulk, and installing the shelf and handles.
Preparation and Tools
Before beginning, verify all parts are present against the package contents list. If any parts are missing or damaged, do not attempt assembly. Estimated installation time is 20-30 minutes, plus 24 hours for silicone caulk to dry.
Required Tools (not included):
- Phillips screwdriver
- Utility knife or scissors
- Silicone caulk
- Power drill with drill bit
Helpful Tools (not included):
- Measuring tape
- Level
Installation Instructions
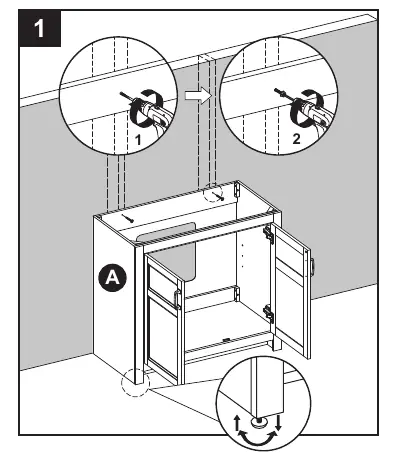
1. Leveling and Securing to Wall: Place the vanity in its final location. Use the pre-assembled levelers on the bottom of each leg to level the unit. Twist counterclockwise to raise and clockwise to lower. Once level, drill a hole through the vanity mounting area into the wall studs and secure using appropriate mounting hardware (not included). The vanity MUST be secured to the wall.
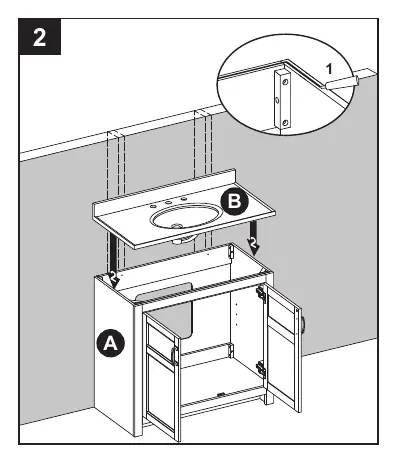
2. Attaching the Top: Apply stain-free silicone caulk to the top edge of the vanity base. With the help of another adult, gently lower the top onto the vanity. Wipe away excess caulk and allow 24 hours to dry. It is recommended to install the faucet and drain kit to the top before attaching it to the vanity.
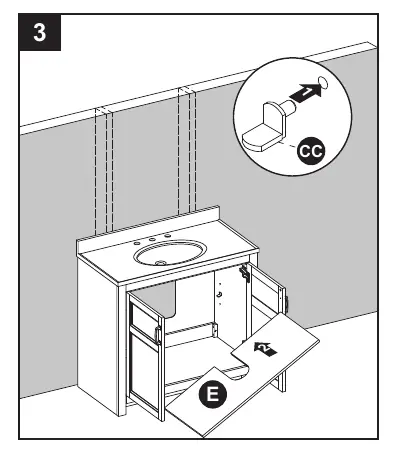
3. Shelf Installation: Insert the shelf pins at the desired height, ensuring they are level. Place the shelf on top of the pins.
Door Adjustment
If doors require adjustment, use the hinges:
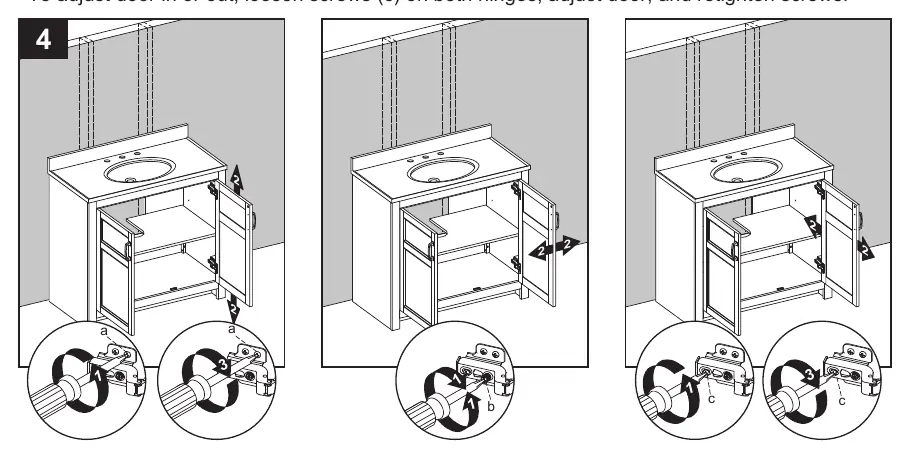
- Up or Down: Loosen screws (a) on both hinges, adjust, and retighten.
- Left or Right: Turn screws (b) on both hinges.
- In or Out: Loosen screws (c) on both hinges, adjust, and retighten.
Care and Maintenance
Important: Do not use cleaning products containing acetone, lemon, vinegar, or other acids on the top surface, as these may cause damage.
- Dust the vanity regularly with a soft, non-lint cloth.
- Use a gentle, non-abrasive household cleaner for the vanity.
- Dry wood surfaces immediately with a soft cloth or towel.
- The gel coat cultured marble top can be cleaned with a standard non-abrasive all-surface cleaner.
- For scratches or worn areas, use the included touch-up pen, stroking in the direction of the scratch or wood grain.
Warranty
The manufacturer warrants this item against defects in materials and workmanship for one (1) year from the date of original retail purchase. This warranty applies only to the original purchaser and does not cover damage from accident, misuse, improper installation, or unauthorized accessories.
Practical help
Common problems
Vanity is not level
Use the pre-assembled levelers on the bottom of each leg. Twist counterclockwise to raise the height or clockwise to lower it.
Doors are misaligned
Use the three adjustment screws on the hinges: (a) for up/down, (b) for left/right, and (c) for in/out.
Before use
- Verify all parts are present against the package contents list.
- Ensure you have a second adult to assist with assembly.
- Gather required tools: Phillips screwdriver, utility knife, silicone caulk, and power drill.
- Clean the area where the vanity will be permanently located.
- Ensure the vanity will not interfere with water supply or drain lines.
Specs in practice
- Installation Time
- 20-30 minutes, plus 24 hours for silicone caulk to dry.
Images and diagrams
- Diagram 1: Leveling the vanity and securing it to wall studs.
- Diagram 2: Applying silicone caulk and lowering the top onto the vanity base.
- Diagram 3: Inserting shelf pins and placing the shelf.
- Diagram 4: Adjusting door hinges for alignment.
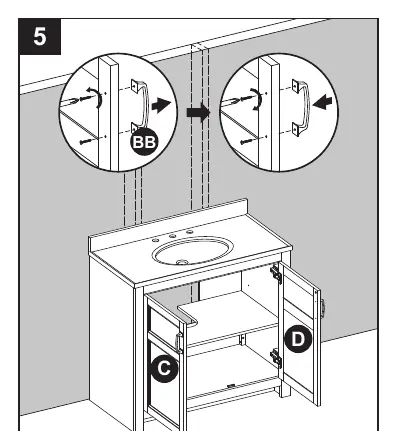
- Diagram 5: Installing handles.
Model compatibility
- Requires wall studs for secure mounting.
- Faucet and drain kit are not included.
- Mounting hardware for wall attachment is not included.

Manual page author
David Miller
Documentation analyst
Organizes user manual content into clear summaries, with attention to model details, product context, and everyday usability.