Furniture / Bathroom Furniture
User Manual for 60-Inch Vanity with Undermount Sink
A comprehensive installation and maintenance guide for the 60-inch vanity with undermount sink. Includes step-by-step assembly instructions, hardware lists, drawer adjustment procedures, and care guidelines for stone tops.
Quick answers from the manual
Quick answer
- This manual provides assembly and installation instructions for the 60-inch vanity with an undermount sink, including drawer removal, wall mounting, sink attachment, and stone top care. p. 1, 4, 5, 8
Key actions
- Secure vanity to wall studs p. 4
- Adjust drawer height p. 8
First start
- Ensure the area is clean, level the vanity, and secure it to wall studs before installing the top and sink. p. 4
Problems and fixes
Drawer alignment
Adjust the wheel on the glide to raise or lower the drawer box independently.
p. 8Maintenance and reset
- Periodically reseal the stone top using an appropriate stone sealer. p. 9
Where to find it in the PDF
- Package Contents p. 3
- Installation Instructions p. 4, 5, 6, 7
- Care and Maintenance p. 9
Table of contents
Manual images
Click an image to enlargeQuick guide from the manual
This vanity requires two adults for assembly. The estimated installation time is 45 minutes, plus 24 hours for the silicone caulk to dry. The vanity must be secured to the wall for safety. Ensure you have a Phillips screwdriver, utility knife, silicone caulk, power drill, measuring tape, and a level before starting.
Package contents
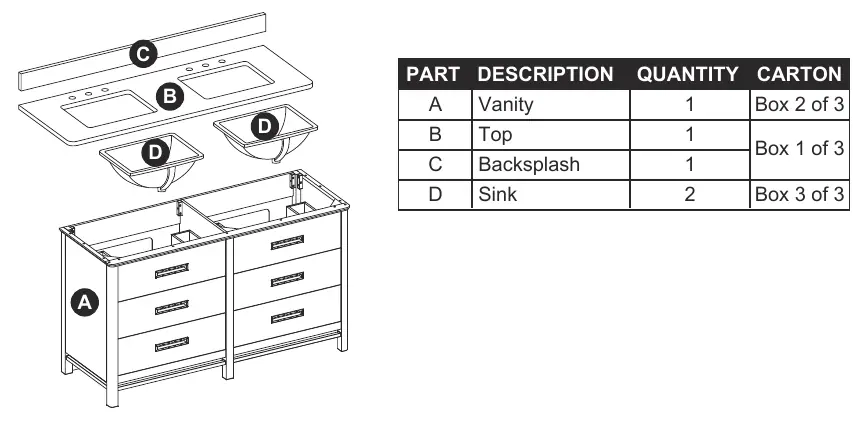
- Vanity (A)
- Top (B)
- Backsplash (C)
- Sink (D)
- Hardware: Touch-up pen, bolts, sink brackets, nuts, lock washers, and a wrench.
Installation instructions
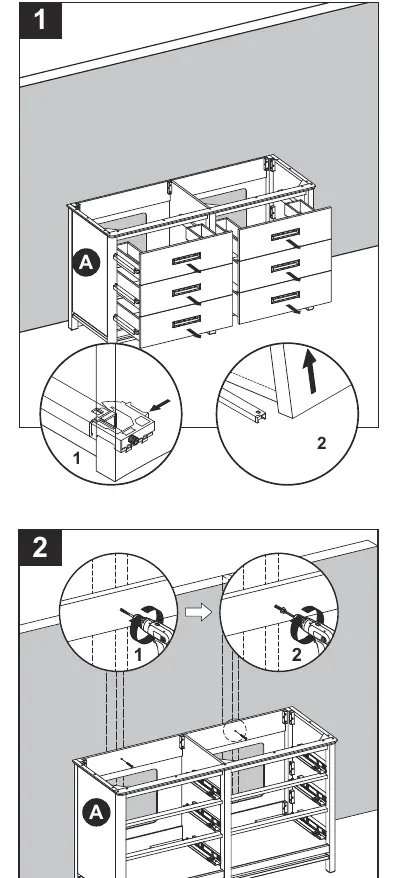

- Remove drawers: Fully extend the drawers, locate the plastic levers on the metal glide tracks, push them to disengage, and lift the drawer out.
- Position and level: Place the vanity against the wall. Use the pre-assembled levelers on the bottom of the legs to level the unit. Twist counterclockwise to raise, clockwise to lower.
- Secure to wall: Drill a hole through the vanity mounting area into the wall studs. Secure the vanity to the wall studs using appropriate mounting hardware (not included).
- Prepare top and sink: Place the top (B) and backsplash (C) face down on a scratch-free surface. Apply silicone caulk to the top edge of the sink (D) and lower it onto the back side of the stone top. Ensure the overflow hole faces the front.
- Attach sink: Lower the sink brackets (FF) over the bolts (EE) and secure them with lock washers (HH) and nuts (GG). Hand-tighten with the included wrench (II). Do not overtighten.
- Install top: Apply silicone caulk to the top edge of the vanity (A). With the help of another adult, lower the top (B) onto the vanity. Wipe away excess caulk and allow 24 hours to dry.
- Attach backsplash: Apply silicone caulk to the unpolished side and bottom of the backsplash (C) and position it on the top (B) against the wall.
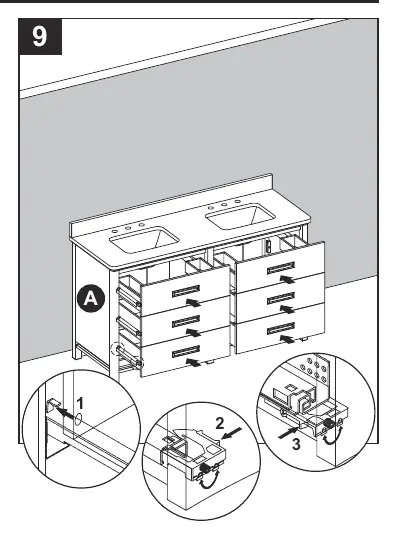
- Reinstall drawers: Slide the drawer box into the rear glide catch, lower it onto the extended glides, and push the plastic levers to lock it in place.
Care and maintenance
- Cleaning: Dust regularly with a soft, non-lint cloth. Use a gentle, non-abrasive household cleaner. Dry the wood immediately after cleaning.
- Stone top care: Use standard marble cleaning agents. Do not use products containing acetone, lemon, vinegar, or other acids, as these can damage the stone surface.
- Protection: Use a soap dish or coaster for fragranced items or soap to prevent surface damage. Periodically reseal the stone top with an appropriate stone sealer.
- Touch-up: Use the included touch-up pen (AA) for scratches or worn areas, stroking in the direction of the wood grain.
Practical help
Common problems
Drawer does not slide smoothly or is misaligned
Remove the drawer and try again. Use the adjustment wheel on the glide to raise or lower the drawer box independently for better alignment.
Sink is not centered
Unscrew the sink clamps, re-adjust the sink position on the stone top, and re-tighten the brackets.
Stone top damage
Avoid using cleaners with acetone, lemon, vinegar, or acids. Use only stone-safe cleaners.
Before use
- Ensure two adults are available for assembly.
- Verify all parts (Vanity, Top, Backsplash, Sinks) are present.
- Locate wall studs for secure mounting.
- Prepare tools: Phillips screwdriver, utility knife, silicone caulk, power drill, level.
- Clean the installation area.
Specs in practice
- Estimated Installation Time
- 45 minutes, plus 24 hours for silicone caulk to dry.
Images and diagrams
- The manual provides detailed diagrams for drawer removal (Page 4), leveling and wall mounting (Page 4), sink attachment (Page 5-6), and drawer re-installation (Page 8).
Model compatibility
- Faucet and drain kit are not included.
- Vanity must be secured to wall studs for stability.

Manual page author
David Miller
Documentation analyst
Organizes user manual content into clear summaries, with attention to model details, product context, and everyday usability.