Garden / Lawn Mowers
Operator's Manual for Sun Joe 14-Inch Reel Mower MJ503M
Quick guide for the Sun Joe 14-Inch Reel Mower MJ503M. Includes assembly instructions, height adjustment, blade maintenance, and safety tips for optimal lawn care.
Table of contents
Manual images
Click an image to enlargeQuick guide from the manual
The Sun Joe 14-Inch Reel Mower (Model MJ503M) is a manual push mower designed for residential lawn maintenance. Key operational requirements include keeping the mowing area clear of debris, following the 1/3 rule for grass height, and ensuring proper blade alignment for a clean cut. The mower features a 9-position manual height adjustment and requires minimal maintenance, primarily consisting of blade sharpening and lubrication.
Safety Information
General Operation:
- Always clear the mowing area of foreign objects like rocks, wires, and toys before starting.
- Keep hands and feet away from the rotating blades and discharge opening.
- Do not operate on wet grass or excessively steep slopes.
- Always wear eye protection.
- Children should never be allowed access to the mower.
- Walk, never run, while using the mower.
Assembly
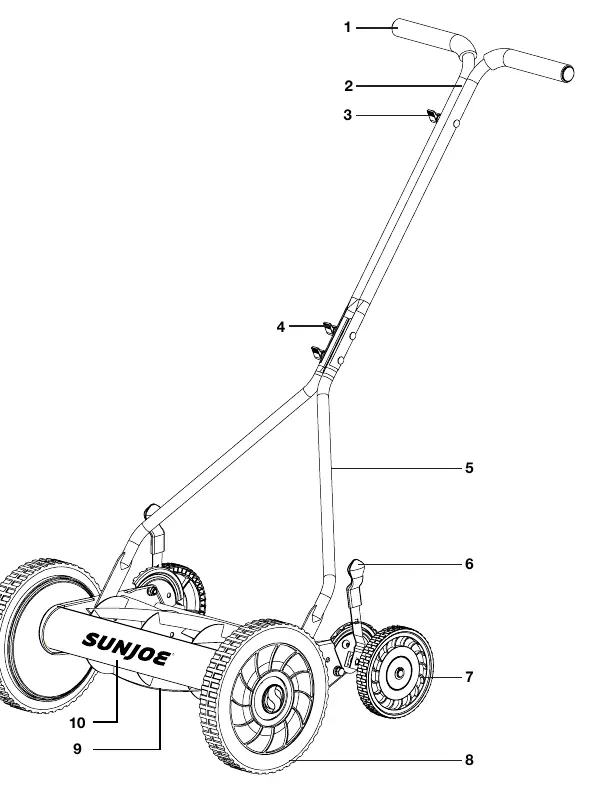
Fitting the Handle:

- Secure the two lower handle bars to the upper handle bars using the two knobs and bolts provided. Do not tighten completely until assembly is finished.
- Attach the two upper handle bars to each other using one bolt and knob.
- Line up the holes at the lower end of the handle arms with the short posts on the mower base.
- Pull both sides of the lower handle bars over the posts and press inward to ensure a secure fit.
Operation
Cutting Height Adjustment:
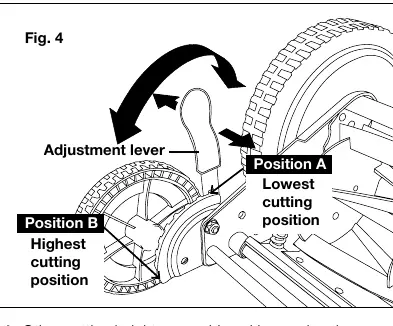
- The mower features a 9-position manual height adjustment (1.1 in. to 2.9 in.).
- To set the lowest position, pull the adjustment levers on both sides and set them to position A.
- To set the highest position, set the levers to position B.
- Note: Both levers must be set to the same position.
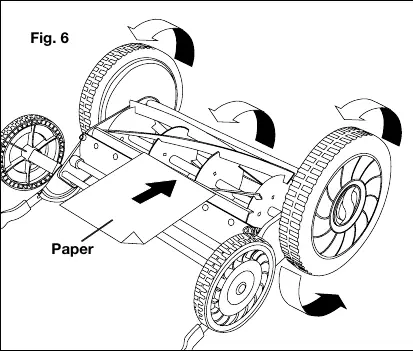
Ensuring a Clean Cut:
- Verify blade alignment by placing the mower on a flat surface and turning it upside down.
- Insert a sheet of paper between the blade reel and the cutting bar.
- Slowly turn the wheel by hand; the blades should slice the paper evenly along the entire length.
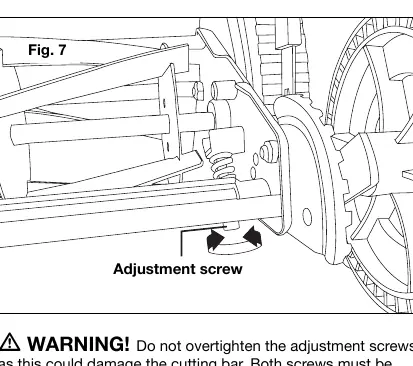
- If the cut is intermittent, adjust the cutting bar using the adjustment nuts at the back of the mower.
Maintenance
Sharpening and Care:
- Regularly apply lubricant to the cutting surfaces, reel axle shaft, and wheels.
- To sharpen, apply a thin layer of lapping compound to the front edge of the reel blades and adjust the cutting bar for light contact. Turn the reel until the edge is polished.
- Clean the exterior with a soft brush and cloth. Do not use water, solvents, or polishes.
- Store in a dry place.
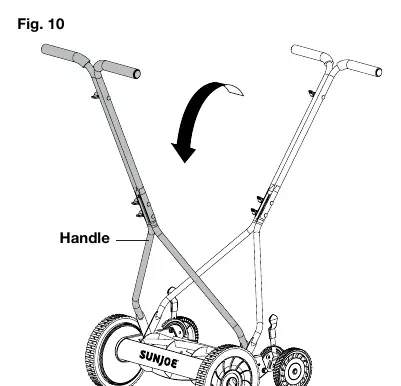
Transporting the Mower
To move the mower without the blade reel turning, pivot the handle over the reel and push the mower from the opposite side. This places the mower in transport mode, preventing the reel from rotating.
Practical help
Common problems
Mower is difficult to push or produces an uneven cut
Check blade alignment. Vibrations during shipping or use can cause blades to become too loose or too tight.
Mower bends weeds instead of cutting them
Reel mowers struggle with tall weeds like dandelions. Cut more frequently to prevent weeds from growing too tall.
Mower cuts paper intermittently during alignment test
Adjust the cutting bar on the appropriate side of the blades to achieve optimal contact.
Before use
- Clear the mowing area of rocks, wires, toys, and other debris.
- Ensure all nuts and bolts are tight.
- Verify blade alignment using the paper test.
- Check that the mowing area is clear of bystanders.
- Wear eye protection.
- Ensure the mower is in proper working order.
Specs in practice
- Cutting Width
- 14 inches (35.6 cm)
- Cutting Heights
- 9-position manual adjustment (1.1 in. to 2.9 in. / 27 mm to 73 mm)
Images and diagrams
- Fig 1-3: Handle assembly steps showing bolt and knob placement.
- Fig 4: Height adjustment lever positions (A for lowest, B for highest).
- Fig 6: Blade alignment test using a sheet of paper.
- Fig 7: Cutting bar adjustment screws located at the back of the mower.
- Fig 10: Transport mode configuration by pivoting the handle.
Model compatibility
- Not suitable for extremely tall weeds (over 4 inches) without prior trimming using a brush cutter.
- Do not use on wet grass as it can be slippery and cause poor cutting performance.

Manual page author
David Miller
Documentation analyst
Organizes user manual content into clear summaries, with attention to model details, product context, and everyday usability.