Home Appliances / Small Kitchen Appliances
User Manual for Sunbeam Mixmaster Hand Mixer 2524, 2526, 2545
Quick guide for the Sunbeam Mixmaster Hand Mixer (models 2524, 2526, 2545). Learn how to install attachments, use speed settings, clean the device, and operate the Burst of Power feature.
Quick answers from the manual
Quick answer
- The Sunbeam Mixmaster Hand Mixer is designed for household mixing tasks. Always ensure the speed control is set to 'OFF' before plugging in, unplugging, or changing attachments. p. 2, 3
Key actions
- Installing attachments p. 2, 3
- Ejecting beaters p. 2, 3
First start
- Wash all attachments in hot, soapy water before first use. p. 2, 3
Show 3 more answers Show less
Problems and fixes
Attachments not clicking
Reverse the dough hooks or attachments and try again.
p. 2, 3Technical specifications
| Parameter | Value | Meaning | Pages |
|---|---|---|---|
| Voltage | 120V / 127V | For use in US and Canada only. | p. 2, 3 |
Where to find it in the PDF
- Warranty and Contact p. 1
- Operating Instructions p. 2, 3
Table of contents
Quick guide from the manual
The Sunbeam Mixmaster Hand Mixer is designed for household mixing tasks. Before using the mixer for the first time, wash all attachments in hot, soapy water. Always ensure the speed control is set to OFF before plugging in, unplugging, or changing attachments. Never immerse the mixer in water or other liquids.
Product Overview
The mixer features a speed control dial that doubles as an eject button, an ergonomic handle, and a heel rest for stability. Models 2526 and 2545 include a Burst of Power button for heavy mixing tasks.
Installation
To install attachments:
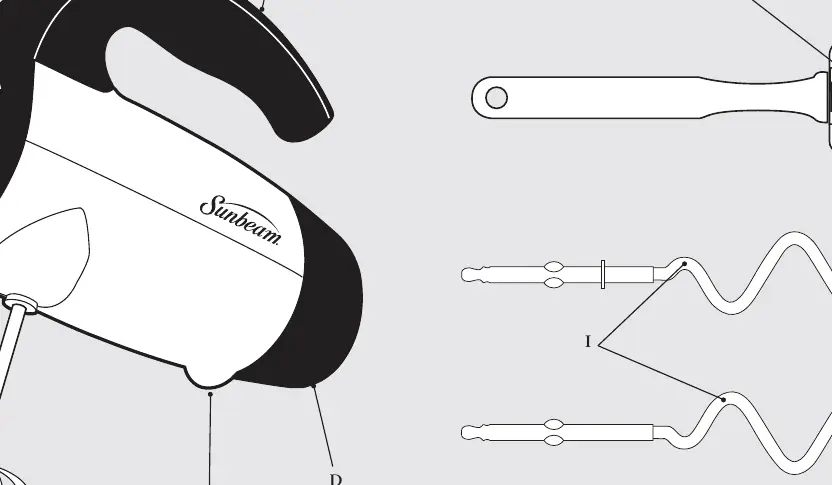
- Ensure the mixer is unplugged and the speed control is set to OFF.
- Insert attachments one at a time by placing the stem end into the opening on the bottom of the mixer.
- Turn the attachment slightly and push in until it clicks into position.
- Note: The whisk and drink rod can be inserted into either opening.
- Dough Hooks: The dough hook with the collar must be placed in the left drive hole. If they do not click, reverse them and try again.
Operation
To operate the mixer:
- Plug the unit into an appropriate outlet.
- Adjust the speed using the control on the top of the unit.
- When adding dry ingredients like flour, use a lower speed to avoid a 'snowstorm' effect.
- For heavy mixing tasks (models 2526 and 2545), press the Burst of Power button for an added boost.
Mixing Guide
Use the following speed settings as a general guide:
- Speed 1 (Stir): Liquid ingredients or mixing dry and liquid together.
- Speed 2 (Mix): Combining ingredients for quick breads or muffins.
- Speed 3 (Blend): Cake mixes or creaming butter and sugar.
- Speed 4 (Beat): Frosting or whipping cream.
- Speed 5-6 (Whip): Mashed potatoes or whipping egg whites.
Care and Cleaning
To clean the mixer:
- Set the speed control to OFF, unplug the cord, and eject the beaters.
- Attachments are dishwasher safe or can be washed in hot, soapy water.
- Wipe the mixer body and cord with a damp cloth, then dry with a clean cloth.
- Do not use abrasive cleaners on any part of the mixer.
- Store the mixer on its heel rest in a clean, dry location.
Manufacturer information
Sunbeam
Practical help
Common problems
Attachments do not click into place
Ensure you are inserting them into the correct holes. For dough hooks, the one with the collar must go in the left hole. If they don't click, reverse them and try again.
Attachments are difficult to eject
Ensure the speed control is in the 'OFF' position and the unit is unplugged before pressing the eject button.
Before use
- Wash all attachments in hot, soapy water before first use.
- Ensure the speed control is set to 'OFF'.
- Unplug the unit before inserting or removing attachments.
- Check that the power cord is not damaged.
- Ensure the mixer is used only for household purposes.
Show more Show less
Specs in practice
- Burst of Power
- Provides an extra boost of speed for heavy mixing tasks (available on models 2526 and 2545).
Images and diagrams
- Figure A: Shows how to insert attachments into the bottom of the mixer.
- Figure B: Shows the correct placement of dough hooks (the one with the collar goes in the left hole).
Model compatibility
- For 120V and 127V markets only.
- Intended for household use only.

Manual page author
Michael Turner
Technical manual editor