Electronics / Speakers & Soundbars
User Guide for Tannoy VMS 1 / VMS 1-WH Compact Monitor
Quick start guide for the Tannoy VMS 1 / VMS 1-WH 5" 2-Way Compact Monitor. Includes installation, wiring, positioning, and technical specifications.
Table of contents
Manual images
Click an image to enlargeQuick guide from the manual
The Tannoy VMS 1 / VMS 1-WH is a 5" versatile 2-way compact monitor designed for installation applications. This guide provides essential information for setting up, connecting, and maintaining your speakers to ensure optimal performance and longevity.

Amplifier Considerations
To achieve the best sound quality and protect your speakers, use high-quality power amplifiers designed for professional use. The amplifier should be capable of delivering long-term broadband power equal to half the loudspeaker's peak power rating at its stated nominal impedance. Avoid using underpowered amplifiers, as heavily clipped signals can cause permanent damage to the loudspeaker.
Connections
The VMS 1 connects to your amplifier using spring clips that accept bare speaker wire. Ensure that you observe correct polarity when connecting:
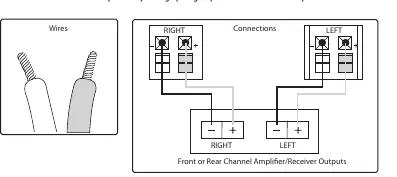
- Connect the (+) terminal on the speaker to the (+) terminal on the amplifier.
- Connect the (-) terminal on the speaker to the (-) terminal on the amplifier.
If terminals are not connected properly, the resulting sound will be "out of phase," characterized by a thin sound, weak bass response, and poor stereo imaging.
Connecting speaker wire to spring clips
- Cut your speaker wire to the desired length, leaving a little extra.
- If using conjoined wire, separate the two wires for approximately two inches.
- Strip about 1/2 inch of jacket and insulation from the end of each wire.
- Twist the bare wire strands tightly between your thumb and forefinger.
- Press downward on the spring clips' plastic tabs to open them.
- Insert the wire directly into the opened holes.
- Release the plastic tabs to secure the wire.
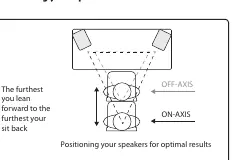
Positioning your speakers
These monitors are designed as near-field monitors, typically positioned 0.75 to 3 meters from the listener. They are often placed on a mixer metering bridge, on a table on either side of a mixing desk, or mounted on appropriate loudspeaker stands or brackets for better stability. In all cases, angle the speakers towards the listener, with the tweeter approximately at ear height.
Cabinet care
Clean the cabinet using a soft, lint-free cloth. Avoid the use of solvents or abrasive cleaners.
Important information
For product registration, warranty claims, or troubleshooting, visit musictribe.com. Before connecting the unit to a power socket, ensure you are using the correct mains voltage for your specific model. If a fuse needs replacement, it must be replaced with a fuse of the same type and rating.
Official resources from the manual
Practical help
Common problems
Out of phase sound (thin, weak bass, poor stereo)
Check that (+) and (-) terminals on both the speaker and amplifier are connected identically.
Permanent loudspeaker damage
Avoid using underpowered amplifiers that produce heavily clipped signals.
Before use
- Ensure amplifier is high quality and capable of delivering required power.
- Cut speaker wire to desired length.
- Strip approximately 1/2 inch of insulation from wire ends.
- Twist bare wire strands tightly.
- Verify correct polarity (+ to +, - to -).
Specs in practice
- Frequency response
- 70 Hz to 20 kHz (-10 dB)
- Power handling (Continuous)
- 25 W
- Power handling (Peak)
- 100 W
- Nominal Impedance
- 4 Ohm
Images and diagrams
- Wiring diagram shows correct connection of (+) and (-) terminals from amplifier to speaker.
- Positioning diagram illustrates on-axis and off-axis placement relative to the listener.
Model compatibility
- Designed for near-field monitoring (0.75 to 3 meters from listener).
- Suitable for tropical and moderate climates up to 45°C.

Manual page author
Michael Turner
Technical manual editor
Reviews PDF manuals for structure, safety notes, and practical product details so readers can find the right information quickly.