Electronics / Speakers & Soundbars
User Manual for Tannoy VMS 1 / VMS 1-WH Compact Monitor
Quick start guide and user manual for the Tannoy VMS 1 / VMS 1-WH 5-inch 2-way compact monitor. Includes connection instructions, amplifier requirements, positioning tips, and technical specifications.
Table of contents
Manual images
Click an image to enlargeQuick Start Guide
The Tannoy VMS 1 and VMS 1-WH are 5-inch, 2-way compact monitors designed for installation applications. This guide provides essential information for setup, connection, and maintenance.
Safety Instructions
Important: Read and follow all safety instructions provided in the manual. Key safety points include:
- Do not use the apparatus near water.
- Clean only with a dry cloth.
- Do not block ventilation openings.
- Do not install near heat sources such as radiators or amplifiers.
- Use only attachments and accessories specified by the manufacturer.
- Ensure the apparatus is connected to a mains socket with a protective earthing connection.
- Refer all servicing to qualified personnel.
Amplifier Considerations
To ensure optimum sound quality and long-term reliability, the VMS 1 should be driven by high-quality professional power amplifiers. The amplifier should be capable of delivering long-term broadband power equal to half the loudspeaker’s peak power rating at its nominal impedance. Avoid using underpowered amplifiers, as heavily clipped signals can cause permanent damage to the loudspeaker.
Connections
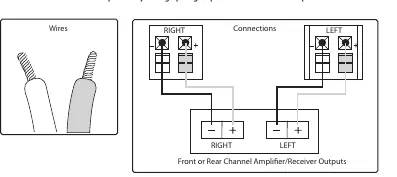
The VMS 1 connects to an amplifier using spring clips for bare speaker wire. Ensure correct polarity is maintained: the (+) terminal on the speaker must connect to the (+) terminal on the amplifier, and the (-) terminal on the speaker must connect to the (-) terminal on the amplifier. Incorrect connection results in "out of phase" sound, characterized by thin audio, weak bass, and poor stereo imaging.
Connecting speaker wire to spring clips
- Cut the speaker wire to the desired length, leaving a little extra.
- If using conjoined wire, separate the two wires for approximately two inches.
- Use a wire stripper to remove about 1/2 inch of insulation from the end of each wire.
- Twist the bare wire strands tightly between your thumb and forefinger.
- Press downward on the spring clips' plastic tabs to open them.
- Insert the wire directly into the opened holes, ensuring correct polarity.
- Release the plastic tabs to secure the wires.
Positioning
These monitors are designed as near-field monitors, typically positioned 0.75 to 3 meters from the listener. They are commonly placed on a mixer metering bridge or on a table on either side of a mixing desk. For best results, mount them on appropriate loudspeaker stands or brackets to improve stability and reduce vibration. Always angle the speakers towards the listener, with the tweeter at ear height.

Cabinet Care
Clean the cabinet using a soft, lint-free cloth. Avoid the use of solvents or abrasive cleaners.
Specifications
Performance:
- Frequency response: 70 Hz to 20 kHz (-10 dB)
- Sensitivity: 86 dB (1 W @ 1 m)
- Power handling (IEC): 25 W continuous, 100 W peak
- Recommended amplifier power: 50 W
- Nominal Impedance: 4 Ohm
- Maximum SPL: 100 dB
- Crossover point: 5.2 kHz
Physical:
- Dimensions (H x W x D): 235 x 159 x 142 mm
- Net weight: 1.8 kg
- Enclosure material: ABS 757
- Grille material: Steel
Practical help
Common problems
Thin sound, weak bass, or poor stereo imaging
The speakers are likely connected 'out of phase'. Ensure the (+) and (-) terminals on the speaker match the (+) and (-) terminals on the amplifier exactly.
Permanent loudspeaker damage
Avoid using underpowered amplifiers that may produce heavily clipped signals.
Before use
- Ensure your amplifier is capable of delivering half the loudspeaker's peak power (50 W recommended).
- Use high-quality professional speaker cables.
- Ensure the installation location is stable and allows for angling towards the listener.
- Verify that the tweeter will be at ear height when positioned.
Specs in practice
- Frequency response
- 70 Hz to 20 kHz (-10 dB); the range of frequencies the speaker can reproduce.
- Nominal Impedance
- 4 Ohm; the electrical resistance the amplifier must be compatible with.
- Power handling
- 25 W continuous / 100 W peak; the amount of power the speaker can safely handle.
Images and diagrams
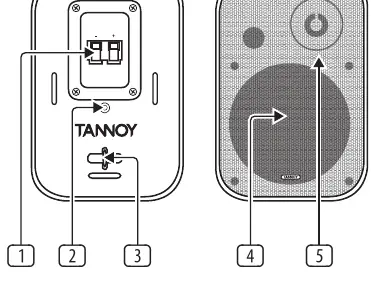
- The rear panel features spring clips for wire connection, a threaded insert for mounting brackets, and a safety bar for an additional safety cable.
- The wiring diagram illustrates the correct polarity connection from the amplifier outputs to the speaker terminals.
Model compatibility
- Designed for near-field monitoring (0.75 to 3 meters distance).
- Suitable for use in tropical and moderate climates up to 45°C.

Manual page author
David Miller
Documentation analyst
Organizes user manual content into clear summaries, with attention to model details, product context, and everyday usability.