Music / Guitar Effects
User Manual for TC Electronic Ditto Jam X2 Looper Pedal
Quick start guide for the TC Electronic Ditto Jam X2 Looper pedal. Learn how to record, play, overdub, and manage loops, plus tips for optimal microphone placement.
Table of contents
Manual images
Click an image to enlargeQuick guide from the manual
This guide provides essential instructions for operating the Ditto Jam X2 Looper. It covers basic loop control, mode selection, and microphone placement strategies to ensure optimal performance.
Loop Operations
The pedal uses two main footswitches to manage your loops:
- Record/Play/Overdub: Press once to Record, press once to Overdub, and press once to Play.
- Undo/Redo: Press and hold to Undo, press and hold to Redo.
- Stop/Clear: Press once to Stop, press and hold to Clear.
Note: When the loop is cleared, the device returns to true bypass.
Mode Selection
To change the operating mode, press and hold the Stop switch twice. You can cycle through the following modes:
- BeatSense (Green LED): Uses the onboard or external microphone to detect the band's tempo.
- Practice (Red LED): A mode for practicing.
- Classic Looper: Standard looping functionality.
Important: Ensure the BeatSense LED flashes at the band tempo before recording your loop.
Microphone Placement
The Ditto Jam X2 Looper relies on microphone input to detect tempo. Proper placement is critical:

Onboard Microphone
If using the built-in microphones, place the pedal closer to the percussion source and away from the direct sound of your amplifier. If this is not possible, use an external microphone.
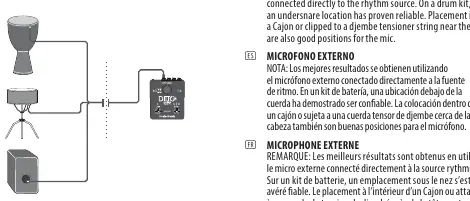
External Microphone
For best results, connect an external microphone directly to the rhythm source. Reliable locations include:
- Drum Kit: Under the snare drum.
- Cajon: Inside the Cajon.
- Djembe: Clipped to a tensioner string near the head.
Manufacturer information
TC Electronic
Practical help
Common problems
Loop not recording or syncing correctly
Ensure the BeatSense LED is flashing at the band's tempo before you begin recording.
Feedback or poor tempo detection
If using onboard mics, move the pedal closer to the percussion source and further away from your amplifier.
Before use
- Ensure the BeatSense LED is flashing at the band tempo.
- Choose between onboard or external microphone based on your setup.
- Verify the selected mode (BeatSense, Practice, or Classic Looper).
- Check that the pedal is positioned away from direct amplifier sound if using onboard mics.
Images and diagrams
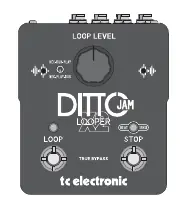
- The pedal layout shows the Loop Level knob, Loop footswitch, and Stop footswitch.
- The microphone placement diagram illustrates the ideal distance between the pedal, the percussion source, and the amplifier.
Model compatibility
- Supports external microphones for improved rhythm source isolation.

Manual page author
Michael Turner
Technical manual editor
Reviews PDF manuals for structure, safety notes, and practical product details so readers can find the right information quickly.