Lighting / Fixtures
Installation Guide for Tecnolite 21PTLLED1035V LED Ceiling Light
Quick installation and setup guide for the Tecnolite 21PTLLED1035V LED ceiling light. Includes wiring instructions, CCT color temperature selection, and safety precautions.
Quick answers from the manual
Quick answer
- The Tecnolite 21PTLLED1035V is an indoor LED ceiling light. Installation requires mounting the bracket to a junction box, connecting the wires (Line, Ground, Neutral), and selecting the desired color temperature (3000K, 4000K, or 6500K) via the CCT switch. p. 1
Key actions
- Turn off power supply before installation p. 1
- Select CCT color temperature p. 1
Maintenance and reset
- Clean with a dry rag and periodically check connections p. 1
Show 2 more answers Show less
Technical specifications
| Parameter | Value | Meaning | Pages |
|---|---|---|---|
| Power | 21 W | Power consumption | p. 1 |
| Voltage | 127 V | Operating voltage | p. 1 |
Where to find it in the PDF
- Installation and Technical Specifications p. 1
- Warranty Information p. 2
Table of contents
Quick guide from the manual
This document provides the necessary steps to install and configure the Tecnolite 21PTLLED1035V LED ceiling light. It covers mounting procedures, electrical wiring, and color temperature (CCT) selection.
Safety precautions
- Power off: Always disconnect the power supply before starting any installation or maintenance work.
- Distance: The luminaire must be installed at a minimum distance of 0.50 m from any combustible material to avoid fire hazards.
- Handling: The lamp and its parts can become hot during operation. Use a clean cloth or gloves when handling the fixture.
- Grounding: Ensure the ground connection is physical and secure.
Installation steps
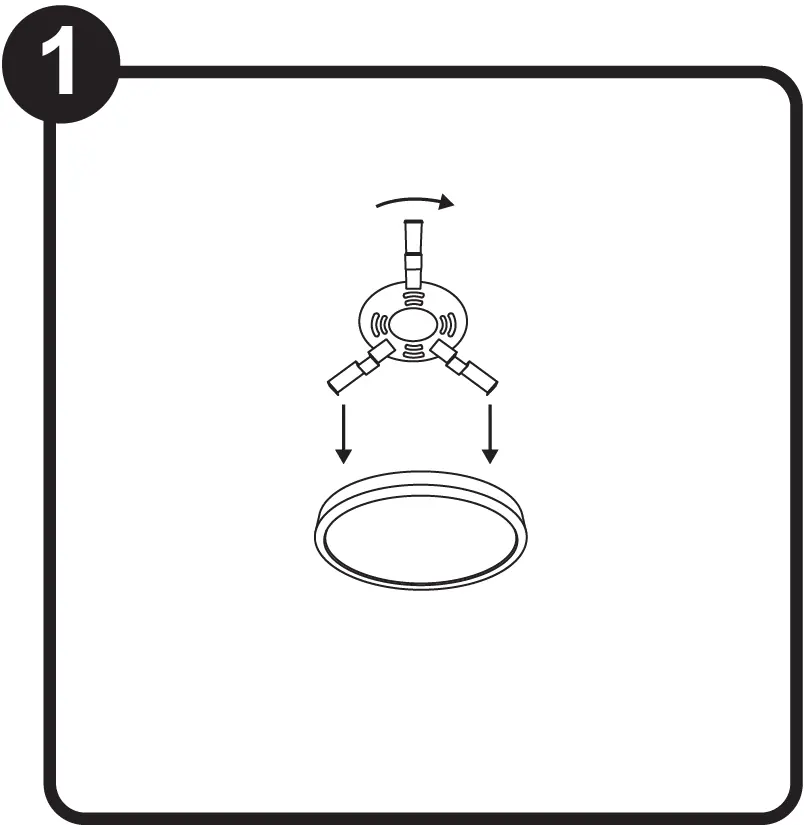
- Prepare the bracket: Attach the mounting bracket to the junction box using the provided screws (A-01) and washers (A-02).
- Mounting: Secure the bracket firmly to the ceiling junction box. Ensure the junction box is compatible and capable of supporting the fixture.
- Wiring: Connect the fixture wires to the power supply lines (Line, Ground, Neutral) using the provided quick connectors (A-03). Ensure all connections are tight.
- Final assembly: Align the fixture with the mounting bracket and rotate it to lock it into place.
Wiring and CCT settings
The fixture features a CCT selector switch that allows you to choose between three color temperatures:
- WW (Warm White): 3000 K
- NW (Neutral White): 4000 K
- CW (Cool White): 6500 K
Ensure the switch is set to your desired temperature before finalizing the installation.
Maintenance
Disconnect the power source before cleaning. Clean the luminaire and its internal parts with a dry rag. Periodically check all connections to ensure they remain secure.
Manufacturer information
Tecnolite
Practical help
Common problems
Fixture gets hot during operation
This is normal for LED fixtures, but ensure proper installation and ventilation. Use gloves if handling the fixture while it is warm.
Wiring connection issues
Ensure the ground connection is physical and secure. Use the provided quick connectors (A-03) to ensure a tight connection.
Before use
- Turn off the main power supply at the circuit breaker.
- Verify that the junction box is compatible and secure.
- Ensure you have the necessary tools: drill, screwdriver, and safety gloves.
- Check that the installation area is at least 0.50 m away from combustible materials.
- Select the desired CCT (3000K, 4000K, or 6500K) using the selector switch.
Show more Show less
Images and diagrams
- Step 1: Shows the assembly of the mounting bracket.
- Step 2: Illustrates mounting the bracket to the junction box.
- Step 3: Details the wiring connections (Line, Ground, Neutral) and the CCT selector switch.
- Step 4: Shows the final step of attaching the fixture to the bracket.
Model compatibility
- Not suitable for use with voltages higher than those specified on the product label.
- Must be installed at least 0.50 m away from combustible materials.

Manual page author
Emily Carter
User documentation editor