Lighting / Fixtures
Assembly Instructions for River of Goods 21644 Stained Glass Table Lamp
Quick assembly and maintenance guide for the River of Goods 21644 stained glass table lamp. Includes bulb installation steps, safety warnings, and care instructions.
Quick answers from the manual
Quick answer
- The River of Goods 21644 is a stained glass table lamp that requires assembly of the base and shade. It uses specific bulbs for the base (C7 or E12 LED) and the main shade (A19 or E26 CFL). Always unplug the lamp before changing bulbs. p. 1
Key actions
- Assemble the lamp base p. 1
- Install main bulbs p. 1
First start
- Install base bulb, assemble base, install main bulbs, and attach shade. p. 1
Show 4 more answers Show less
Problems and fixes
Replacing the base bulb
Unplug the lamp, let it cool, remove the finial and shade, unscrew the wing nut, and carefully separate the base bottom and shade.
p. 1Maintenance and reset
- Clean excess mineral oil with a soft dry cloth. p. 1
Technical specifications
| Parameter | Value | Meaning | Pages |
|---|---|---|---|
| Base Bulb | Type C7 or E12 0.5W LED | Required bulb for the base light | p. 1 |
| Main Bulb | Type A19 60W or E26 CFL 13W | Required bulb for the main shade | p. 1 |
Where to find it in the PDF
- Assembly and Maintenance Instructions p. 1
Table of contents
Quick Guide from the Manual
This document provides assembly and maintenance instructions for the River of Goods 21644 stained glass table lamp. The lamp features a dual-light design requiring specific bulbs for the base and the main shade. Always ensure the lamp is unplugged before performing any maintenance or bulb replacement.
Assembly Instructions
Before beginning, lay out all parts on a smooth surface. Ensure you have the required bulbs (not included) as specified in the steps below.
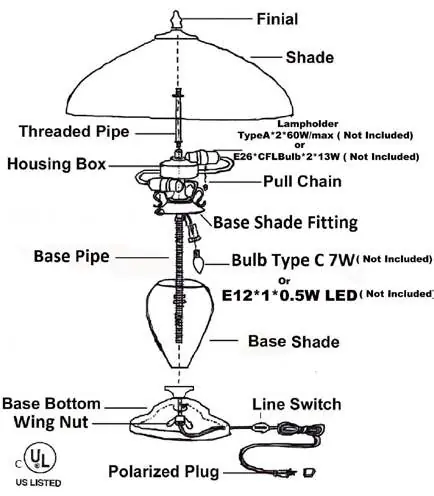
- Base Bulb Installation: Install the base light bulb (Type C7 or E12 0.5W LED) into the base assembly.
- Base Assembly: With parts laying down, slide the Base Shade towards the Housing Box, ensuring the bulb and shade do not collide. Guide the Base Shade through the Base Pipe.
- Securing the Base: Gently pull the cord from the Base Bottom until the Base Pipe emerges. With two people recommended, thread the Wing Nut from underneath the Base Bottom. Ensure the Base Shade sits flush inside the Base Shade Fitting before tightening the Wing Nut (do not over-tighten).
- Main Assembly: Place the base upright on a flat surface and install the Threaded Pipe onto the Housing Box.
- Main Bulb Installation: Install the main bulbs (Type A19 60W or E26 CFL 13W). Refer to the wattage caution label near the lamp holder to ensure you do not exceed the recommended wattage.
- Final Shade Installation: Unscrew the finial from the Threaded Pipe. Place the shade onto the pipe and secure it with the finial (do not over-tighten). Plug the lamp into a wall outlet.
Replacing the Bulb in the Base
If you need to replace the base bulb, follow these steps:
- Unplug the lamp and allow the bulbs to cool down completely.
- Remove the finial and the main shade.
- With the base laying on a smooth surface, unscrew the Wing Nut from the Base Bottom.
- Carefully pull the Base Bottom and Base Shade apart to access the base bulb.
- Replace the bulb (Type C7 or E12 0.5W LED) and reassemble the base.
Maintenance and Safety
Maintenance: This stained glass product is protected with mineral oil as part of the finishing process. Use a soft, dry cloth to remove any excess oil.
Safety Warnings:
- Do not attempt to replace any bulb while the lamp is plugged into a wall receptacle.
- Always refer to the wattage caution label located near the lamp holder; do not exceed the recommended wattage.
- This product contains chemicals, including lead, known to the State of California to cause cancer and birth defects or other reproductive harm.
Practical help
Common problems
Difficulty accessing the base bulb
The lamp must be disassembled by removing the finial, shade, and unscrewing the wing nut from the base bottom to reach the internal base bulb.
Before use
- Lay out all parts on a smooth surface to prevent damage.
- Verify you have the correct bulbs: Type C7 or E12 0.5W LED for the base, and Type A19 60W or E26 CFL 13W for the main shade.
- Check the wattage caution label near the lamp holder before installing bulbs.
- Ensure the Base Shade sits flush inside the Base Shade Fitting before securing the Wing Nut.
Show more Show less
Images and diagrams
- The assembly diagram shows the vertical alignment of the finial, shade, threaded pipe, housing box, base pipe, base shade, and base bottom.
Model compatibility
- Bulbs are not included with the product.
- The product is intended for indoor use.

Manual page author
Emily Carter
User documentation editor