HVAC / Heaters & Fireplaces
Installation guide for Terma Alex 1580x500mm - SX radiator
Comprehensive installation guide for the Terma Alex 1580x500mm - SX radiator. Includes step-by-step mounting instructions, parts list, valve connection requirements, and maintenance tips.
Table of contents
Manual images
Click an image to enlargeImportant information from the manual
Before starting the installation, please read the full instructions. Note that this radiator is designed for closed heating systems only. Valves are not provided with the product; you must ensure you have standard 1/2" radiator valves before beginning. The radiator should be installed at least 100 mm from the floor to maximize heat efficiency.
Fixing kit content
Ensure all parts are present before starting:
- Rawl plugs (1)
- Wall fixing screws and washers (2)
- Mounting bracket-1 (3)
- Bracket connecting screws (4)
- Bracket to collector fixing screws (5)
- Mounting bracket-2 (6)
- Air vent
- Allen key
Installation steps
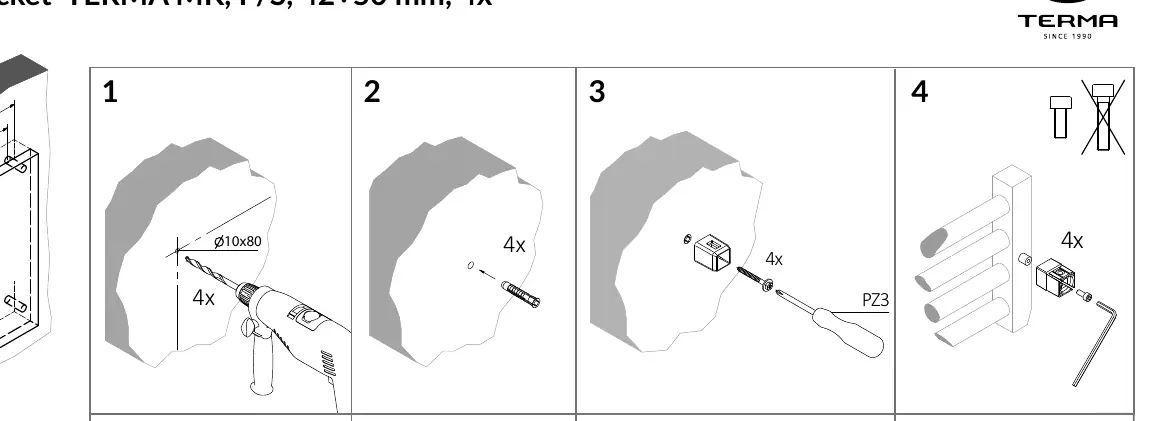
- Preparation: Check for hidden wires or pipes before drilling. The supplied plugs are for hard masonry walls only; use appropriate fixings for other wall types.
- Marking: Note the distances between bracket centers and mark the position on the wall.
- Drilling: Drill holes to approximately 80 mm depth using a 10 mm drill bit. Insert the rawl plugs (1).
- Mounting: Attach mounting bracket-1 (3) using the connecting screw and washer (2).
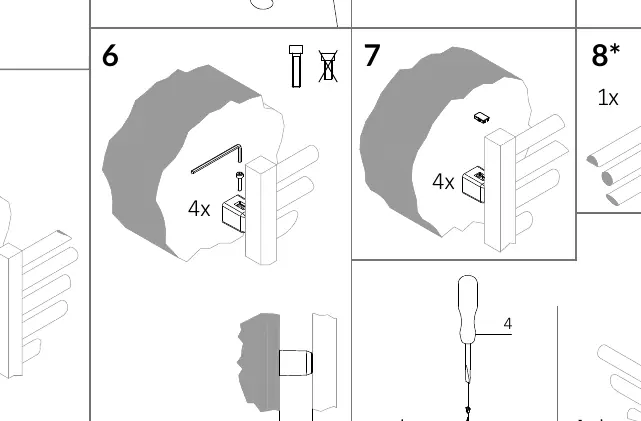
- Radiator preparation: Attach mounting bracket-2 (6) to the radiator using the bracket to collector fixing screw (5).
- Final assembly: Guide all mounting brackets-2 (6) into the mounting brackets-1 (3) on the wall and fix them securely using the connecting screws (4).
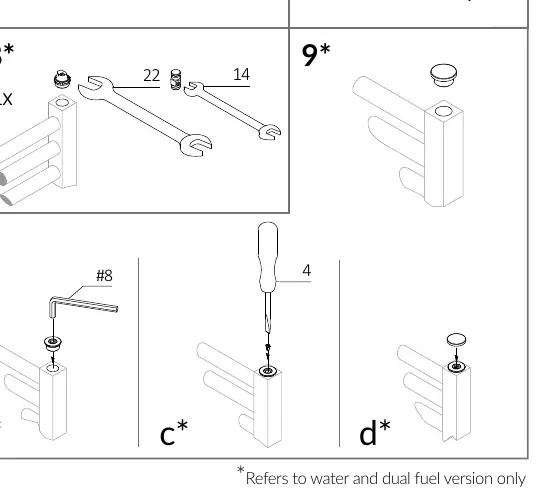
- Connection: Connect the water flow using appropriate 1/2" BSP valves, following the valve manufacturer's guidelines.
- Finishing: Fill the radiator and purge any trapped air via the bleed valve at the top.
Maintenance
Wipe your radiator down using a clean damp cloth. Never use scourers or abrasives, as these can damage the finish.
Support
For all installation and warranty enquiries, please contact Crimson Bear Customer Support on 01535 636256.
Practical help
Common problems
Valves missing from the box
Valves are not provided. You must purchase standard 1/2" radiator valves separately before installation.
Wall plugs not suitable
The supplied plugs are for hard masonry walls only. If your wall is made of a different material (e.g., plasterboard), use appropriate fixings.
Radiator not heating
Ensure the system is filled and all trapped air has been purged using the bleed valve at the top of the radiator.
Before use
- Check all parts listed in the fixing kit are present.
- Purchase standard 1/2" radiator valves.
- Check for hidden wires or pipes in the wall before drilling.
- Verify that the wall type is suitable for the supplied masonry plugs.
- Ensure the heating system is a closed system.
Specs in practice
- 10 mm drill bit
- Required size for drilling holes for the wall plugs.
- 100 mm floor clearance
- Minimum distance from the floor to maximize heat efficiency.
Images and diagrams
- Page 1 illustrates the fixing kit components and provides dimensions.
- Page 2 provides a 9-step visual guide for mounting the radiator to the wall.
Model compatibility
- Designed for closed heating systems only.
- Supplied plugs are for hard masonry walls only.

Manual page author
Emily Carter
User documentation editor
Prepares concise manual descriptions and highlights the most useful setup, operation, and maintenance information for readers.