Accessories / Mounts & Stands
Installation Guide for Terma MDP Mounting Bracket
Step-by-step installation guide for the Terma MDP mounting bracket. Learn how to drill, mount, and secure your towel rail radiator brackets correctly.
Table of contents
Manual images
Click an image to enlargeInstallation Guide for Terma MDP Mounting Bracket
This document provides instructions for the correct installation of the Terma MDP mounting bracket system. These brackets are designed for use with specific Terma towel rail radiators. Ensure you have all necessary components before beginning the installation process.
Tools Required
To complete the installation, you will need the following tools:
- PZ1 and PZ3 screwdrivers
- 4mm hex key
- 14mm and 22mm wrenches
- Drill with a 10mm drill bit
Installation Steps
Follow these steps to mount your radiator securely:

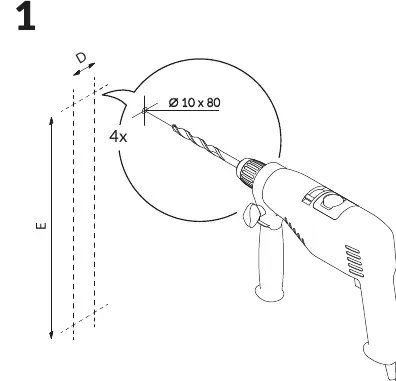
- Drilling: Mark the mounting points on the wall according to the radiator dimensions. Use a 10mm drill bit to drill holes for the wall plugs.
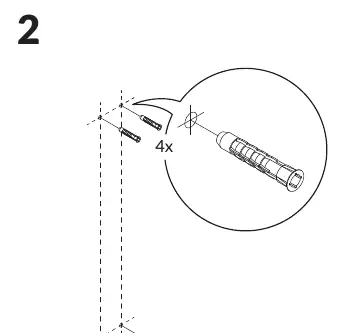
- Wall Preparation: Insert the wall plugs into the drilled holes.
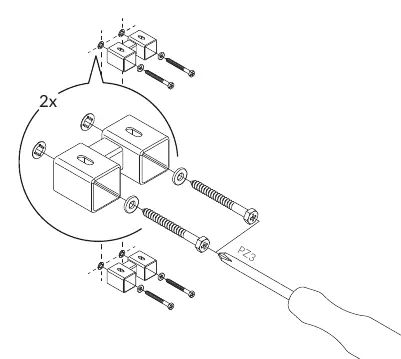
- Mounting Brackets: Secure the bracket bases to the wall using the provided screws and wall plugs.
- Bracket Assembly: Assemble the bracket components as shown in the diagrams, ensuring the 4mm hex key is used to tighten the locking screws.
- Radiator Attachment: Mount the radiator onto the installed brackets. Use the 14mm and 22mm wrenches to tighten the connections as specified in the assembly diagrams.
Important Notes
Please note that certain installation steps, specifically those involving the 14mm and 22mm wrenches, are applicable to water and dual-fuel radiator versions. Always verify the specific requirements for your radiator model before proceeding with the final tightening of connections.
Practical help
Common problems
Radiator not level
Ensure the drilling marks are perfectly aligned vertically and horizontally before drilling.
Loose bracket
Verify that the wall plug is fully inserted and the screw is tightened securely into the wall.
Before use
- Verify the wall material is suitable for the provided wall plugs.
- Ensure you have a 10mm drill bit.
- Check if your radiator is a water or dual-fuel version.
- Gather all required tools: PZ1, PZ3, 4mm hex key, 14mm/22mm wrenches.
Images and diagrams
- Step 1: Drilling layout and hole preparation.
- Step 2: Wall plug insertion.
- Step 3: Securing the bracket base to the wall.
- Step 4-6: Final assembly of the bracket and radiator connection.
Model compatibility
- The installation procedure applies to both water and dual-fuel radiator versions.

Manual page author
Emily Carter
User documentation editor
Prepares concise manual descriptions and highlights the most useful setup, operation, and maintenance information for readers.