HVAC / Heat Pumps
Operating and Installation Manual for TESY Indirectly Heated Storage Water Tank
Quick guide for installing and operating TESY Indirectly Heated Storage Water Tanks. Includes installation steps, connection diagrams, maintenance, and technical specifications.
Table of contents
Manual images
Click an image to enlargeQuick guide from the manual
This manual provides instructions for the installation, operation, and maintenance of TESY Indirectly Heated Storage Water Tanks. Installation must be performed by qualified technicians. Ensure the tank is filled with water before operation.
Important Safety Rules
- The appliance is intended for heating potable water in a liquid state.
- Installation must be performed by a professional technician.
- A safety valve must be installed on the cold water supply pipe.
- Do not use the storage tank if it is not filled with water.
- The premises must be protected from freezing (temperature above 4°C).
Installation and Connection
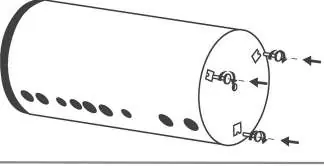
The tanks are delivered on transport pallets. If the floor is flat and humidity is low, the pallet may remain. Otherwise, follow the steps to install adjustable feet. Ensure the tank is leveled.

Connecting to Water Supply
Connection must be done according to a project created by an HVAC designer. Obligatory elements include an inlet pipe, main water tap, pressure regulator (if mains pressure > 6 bar), non-return valve, and safety valve. An expansion vessel is mandatory to accommodate water expansion during heating.
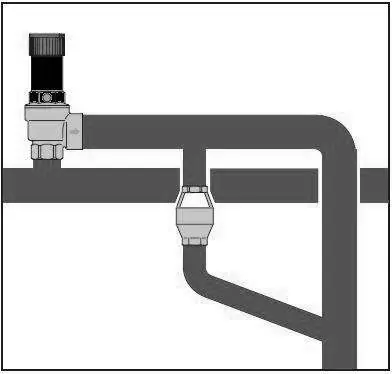
Connecting Heat Exchangers
Connect the heat exchangers to the heating installation using the marked inlets and outlets (IS1/OS1, IS2/OS2). Ensure the system is free of air before operation. A safety valve and expansion vessel are required in the heat exchanger circuit.
Periodic Maintenance
The manufacturer recommends preventive maintenance every two years by an authorized service center. This includes cleaning the tank, inspecting the magnesium anode, and replacing it if necessary. Use a damp cloth for cleaning; do not use abrasive detergents.
Manufacturer information
TESY
Practical help
Common problems
Water dripping from safety valve
Normal during heating mode; ensure drainage is open to atmosphere.
No water flow from drainage opening when valve is turned
Indicates malfunction; stop using the appliance and contact a technician.
Corrosion on connection fittings
Use intermediate dielectric connections when connecting copper pipes.
Before use
- Ensure tank is filled with water
- Check for correct installation by a qualified technician
- Verify pressure regulator is installed if mains pressure > 6 bar
- Ensure safety valve is installed on cold water inlet
Specs in practice
- Max. design pressure (water side)
- Maximum pressure the tank can withstand.
- Max. design pressure (heating side)
- Maximum pressure for the heat exchanger circuit.
- Max. temperature
- Maximum operating temperature for the tank/exchanger.
Images and diagrams
- Fig 21/22: Installation of adjustable feet
- Fig 23/24: Connection schemes for one or two heat exchangers
- Fig 29: Installation of soft PU insulation
Model compatibility
- Intended for heating potable water
- Heat exchangers compatible with water or propylene glycol mixture with anticorrosion additives

Manual page author
Emily Carter
User documentation editor
Prepares concise manual descriptions and highlights the most useful setup, operation, and maintenance information for readers.