Garden / Portable Garages
User Manual for Doherty Sofa 133A008OYS
Quick guide for assembling and maintaining your Doherty Sofa 133A008OYS. Includes step-by-step assembly instructions, care tips, and troubleshooting.
Table of contents
Manual images
Click an image to enlargeQuick guide from the manual
This manual provides instructions for the assembly and care of the Doherty Sofa. The assembly process requires two people and should be performed on a flat, level surface. Do not use power tools, as they may damage the product. The cushions are compressed and will require 3-4 days to fully expand.
Safety Information
- Adult assembly required: We recommend a team of 2 for handling and assembly.
- Small parts: Keep away from children; they present a choking hazard.
- Usage: Designed for home use only; not intended for commercial use.
- Capacity: Designed to hold three average adults. Exceeding this limit may cause injury or damage.
- Handling: Do not stand, step, or climb on the unit.
Pre-assembly
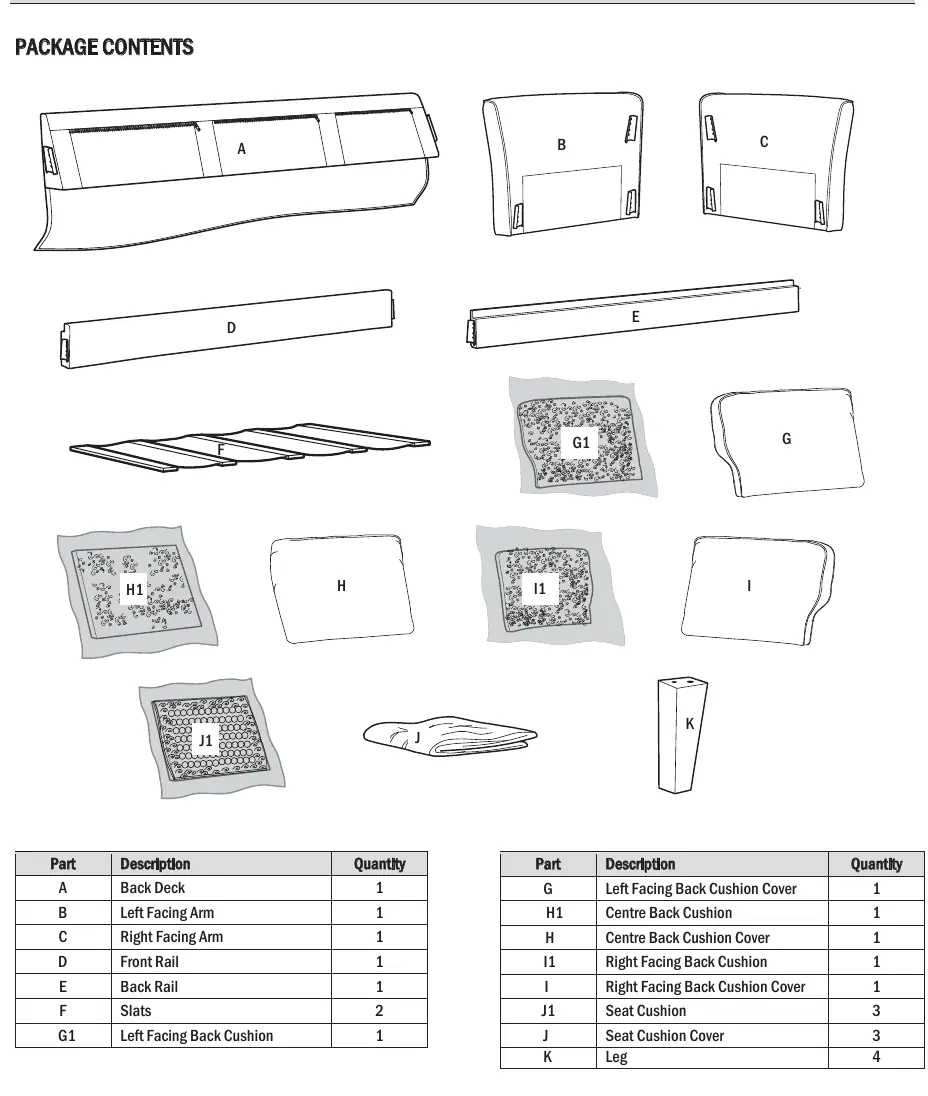
Ensure you have all parts and hardware before starting. It is recommended to place parts on a clean cloth to prevent damage. Required tools include safety goggles, gloves, scissors, and a level.
Assembly Instructions
Follow these steps to assemble your sofa:
- Opening cushions: Carefully cut the plastic bags for parts G1, H1, I1, and J1. Let them expand.
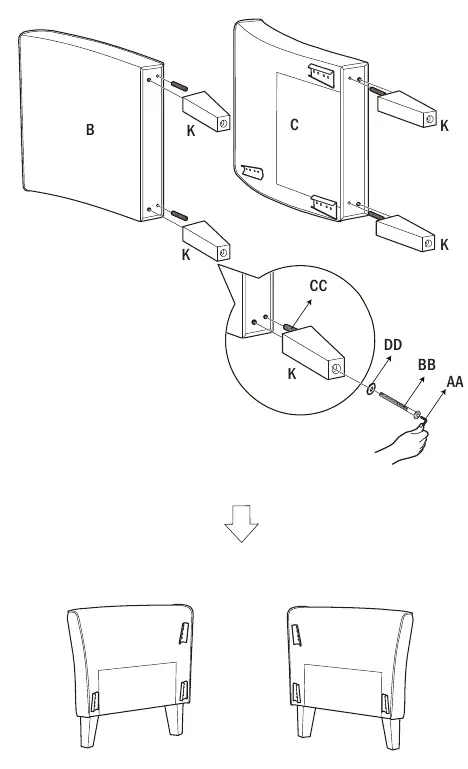
- Fixing the legs: Lay parts B and C on a clean surface and attach the legs (part K) using the provided hardware (BB, CC, DD, AA).
- Attaching rails: Align and lock the metal brackets of parts D and E onto the arms (B and C). Two people are required for simultaneous alignment.
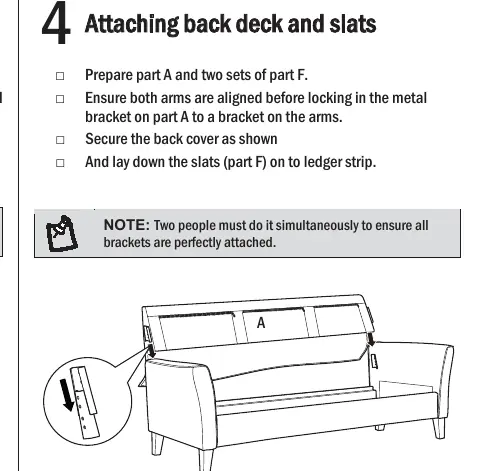
- Attaching back deck and slats: Align and lock the back deck (A) to the arms. Secure the back cover and lay down the slats (F).
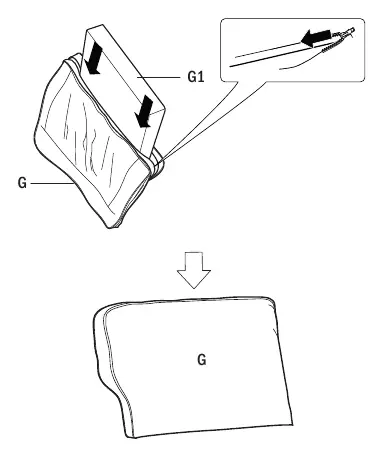
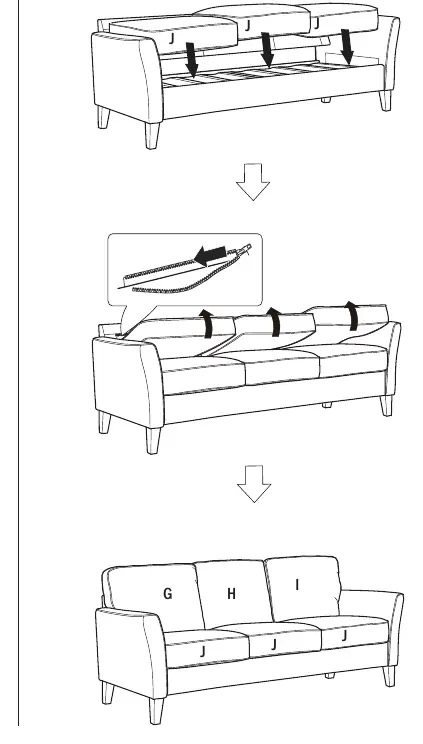
- Filling cushions: Unzip the covers (G, H, I, J), insert the expanded cushions (G1, H1, I1, J1), and zip them closed. Steam covers on low heat (110°F) to remove wrinkles if necessary.
- Final assembly: Place the seat cushions (J) onto the slats and secure the back cushions using the provided zippers.
Maintenance and Care
- Dusting: Dust frequently with a soft, non-abrasive cloth.
- Vacuuming: Regularly vacuum with low suction to remove debris.
- Spot cleaning: Treat spills immediately. Scrape off dirt or mop liquid. Apply cleaning agents to a cloth first, not directly to the fabric.
- Protection: Avoid placing the sofa near heating vents or in direct sunlight to prevent fading and damage.
Troubleshooting
If the non-woven fabric tears, it is likely due to accidental cutting during unpacking; contact customer service for replacement. If the back frame or rails are not aligned or keep falling, ensure the brackets are fully locked in by detaching and re-attaching while holding the arm securely.
Manufacturer information
The Home Depot
Practical help
Common problems
Non-woven fabric tearing
Usually caused by accidental cutting during unpacking. Contact customer service for replacement.
Back frame or rails falling/misaligned
The bracket is not fully locked in. Detach the frame/rail and re-attach, ensuring you hold the arm while moving items.
Before use
- Check all parts against the package contents list.
- Prepare a clean cloth to assemble on.
- Have a second person available for assembly.
- Do not use power tools.
- Prepare safety goggles and gloves.
- Ensure the assembly area is flat and level.
Images and diagrams
- Assembly steps 1-10 illustrate the sequence of attaching legs, rails, back deck, and inserting cushions.
Model compatibility
- For home use only, not intended for commercial use.
- Use only on a flat, level surface.

Manual page author
Michael Turner
Technical manual editor
Reviews PDF manuals for structure, safety notes, and practical product details so readers can find the right information quickly.