Lighting / Fixtures
Installation and Operating Instructions for Thorn JULIE FLEX LED Luminaire
Quick guide for installing and configuring the Thorn JULIE FLEX LED luminaire. Includes wiring diagrams for standard, DALI, and MWS versions, sensor settings, and mounting instructions.
Table of contents
Manual images
Click an image to enlargeImportant Information
The Thorn JULIE FLEX LED luminaire must be installed by a qualified electrician in accordance with national regulations. Ensure the power supply is disconnected before starting any installation or wiring work. Hot-plugging is not permitted and may damage the LED modules, voiding the warranty.
Product Overview
The JULIE FLEX series includes various models with different lengths (600mm, 1200mm, 1500mm) and configurations, including standard, DALI, and MWS (Microwave Sensor) versions. Refer to the product label and the table in the manual to identify your specific model and its dimensions.
Installation
Standard Installation:
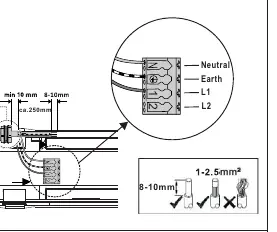


- Ensure the cable is stripped to 8-10mm.
- Use H05/H07 RN-F or NYM cables.
- Connect wires to the terminal block: Neutral, Earth, L1, L2.
- Tighten cable glands to a minimum of 5Nm.
Through Wiring:
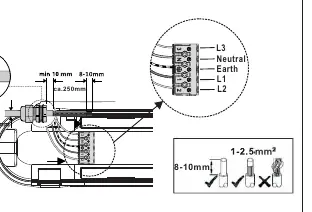
- Maximum of 25 pieces can be connected in a series for standard models.
- Follow the wiring diagram to connect L3, Neutral, Earth, L1, and L2.
DALI and MWS Installation:
- DALI models require connection to the DA/DA terminals.
- MWS models include a sensor and require specific wiring for the SYNC and GND lines if multiple units are synchronized.
- For MWS models, ensure a distance of more than 2 meters between units if required by the specific configuration.
Settings and Configuration
MWS Sensor Settings:
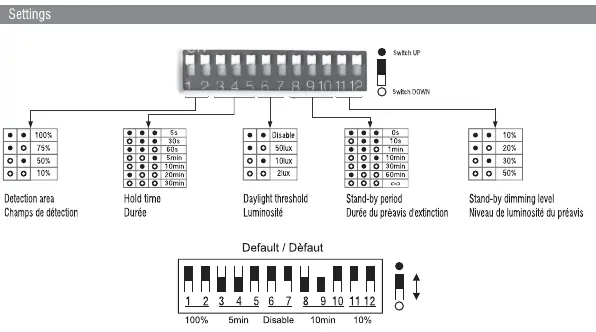
- Use the DIP switches on the sensor to configure:
- Detection area: 10%, 50%, 75%, 100%.
- Hold time: 5s, 30s, 1min, 5min, 10min, 20min, 30min.
- Daylight threshold: Disable, 50lux, 10lux, 2lux.
- Stand-by period: 0s, 10s, 1min, 10min, 30min, 60min, infinity.
- Stand-by dimming level: 10%, 20%, 30%, 50%.
Corridor Function:
- Available on COR MWS models only.
- Automatically dims the light to a standby level after the hold time expires.
Dismounting
To remove the luminaire, use a screwdriver to gently release the clips along the length of the fixture. Ensure the power is off before attempting to remove the unit.
Safety Instructions
- Installation must be performed by authorized personnel only.
- Do not modify the luminaire.
- The light source is not user-replaceable; it must be replaced by the manufacturer or a qualified service agent.
- Ensure the luminaire is used only for lighting purposes.
Practical help
Common problems
Luminaire does not turn on
Check if the power supply is connected correctly and the circuit breaker is ON. Ensure the wiring matches the diagram for your specific model.
Sensor not detecting motion
Verify the DIP switch settings for 'Detection area' and 'Hold time'. Ensure the sensor is not obstructed.
Through wiring limit exceeded
Do not exceed the maximum number of connected units (25 for standard, 20 for MWS) to prevent overloading the circuit.
Before use
- Ensure power is disconnected before installation.
- Verify the model matches the required length and configuration.
- Ensure installation is performed by a qualified electrician.
- Check cable stripping length (8-10mm).
- Tighten cable glands to at least 5Nm.
Images and diagrams
- Wiring diagrams show connections for L, N, Earth, and control lines (DA/SYNC).
- DIP switch settings control detection area, hold time, and daylight threshold.
Model compatibility
- Only for use with specified Thorn JULIE FLEX models.
- Not suitable for hot-plugging.

Manual page author
Michael Turner
Technical manual editor
Reviews PDF manuals for structure, safety notes, and practical product details so readers can find the right information quickly.