Lighting / Fixtures
Installation Guide for Thorn Raze Archi Large Luminaire
A comprehensive installation and maintenance guide for the Thorn Raze Archi Large luminaire. Includes detailed steps for wall and surface mounting, wiring diagrams, connector specifications, and safety requirements.
Quick answers from the manual
Quick answer
- The Thorn Raze Archi Large is a luminaire for wall or surface mounting. Installation requires H07RN-F cabling and specific TECHNO connectors. Ensure power is off before installation. p. 1, 2
Key actions
- Mounting the luminaire p. 1, 2
- Wiring the luminaire p. 1, 2
- Adjusting the tilt p. 2
Problems and fixes
Damaged external cable or shield
Replace immediately by the manufacturer or qualified service agent.
p. 1, 2Maintenance and reset
- Perform maintenance every 6 months. p. 2
Technical specifications
| Parameter | Value | Meaning | Pages |
|---|---|---|---|
| IP Rating | IP66 | Dust-tight and water-jet proof. | p. 1 |
| Impact Rating | IK10 | High impact protection. | p. 1 |
| Insulation Class | Class II | Double insulated. | p. 1 |
Where to find it in the PDF
- Wall Mounting (MWA) p. 1
- Surface Mounting (MSF) p. 2
Table of contents
Manual images
Click an image to enlargeQuick Guide
The Thorn Raze Archi Large is a professional lighting fixture designed for either wall mounting (MWA) or surface mounting (MSF). Installation must be performed by qualified personnel. Ensure the power supply is disconnected before any installation or maintenance work. The luminaire is rated IP66 and IK10, suitable for outdoor use.
Wall Mounting (MWA)
To install the luminaire using the Wall Mounting Interface (MWA):
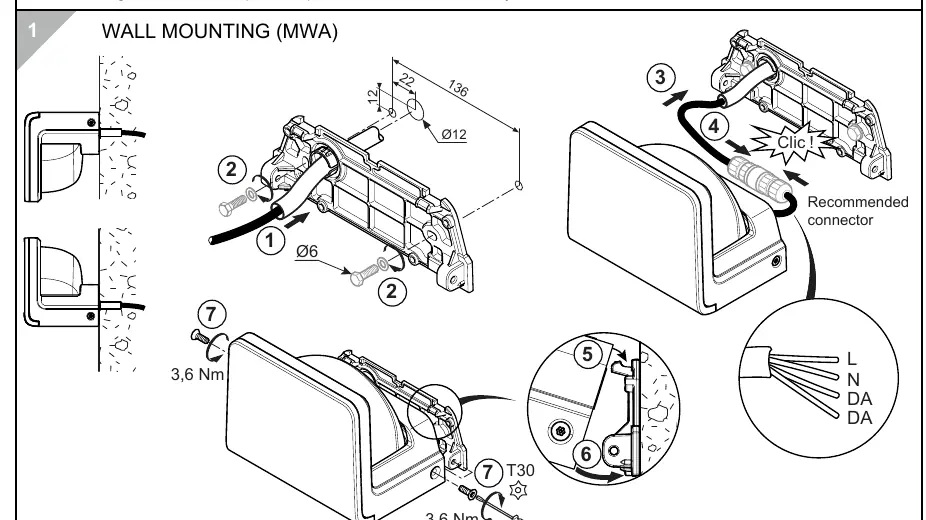
- Prepare the mounting surface according to the dimensions provided in the diagram.
- Secure the MWA bracket to the wall.
- Connect the wiring to the recommended connector.
- Attach the luminaire to the bracket and secure it using the T30 screws, tightening to 3.6 Nm.
Surface Mounting (MSF)
To install the luminaire using the Surface Mounting Interface (MSF):
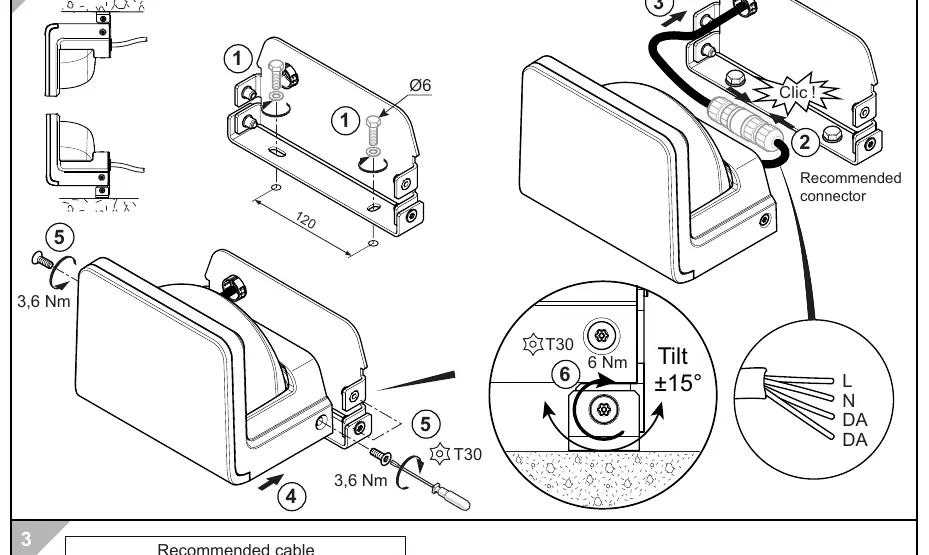
- Prepare the mounting surface.
- Secure the MSF bracket to the surface.
- Connect the wiring to the recommended connector.
- Attach the luminaire to the bracket and secure it using the T30 screws, tightening to 3.6 Nm.
Wiring and Connection
The luminaire requires a specific cable type for installation:
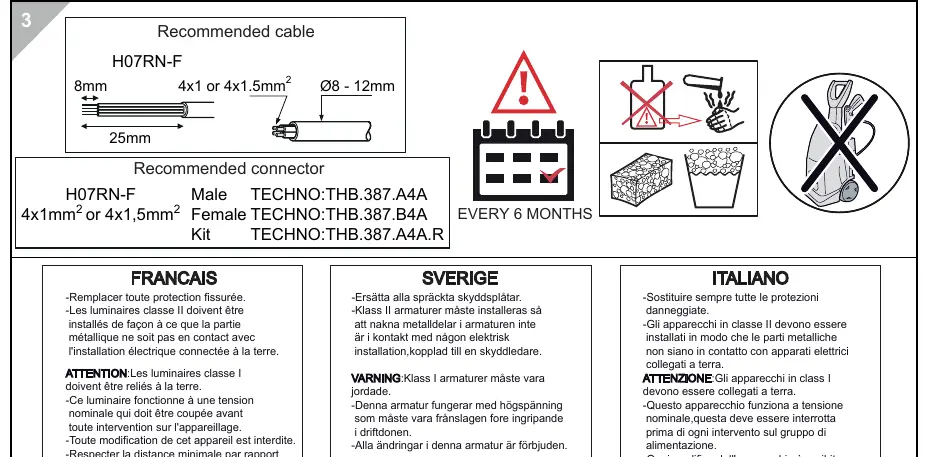
- Recommended Cable: H07RN-F (4x1mm² or 4x1.5mm²).
- Cable Diameter: 8-12mm.
- Connector Types:
- Male: TECHNO:THB.387.A4A
- Female: TECHNO:THB.387.B4A
- Kit: TECHNO:THB.387.A4A.R
- Wiring Configuration: L (Line), N (Neutral), DA, DA.
Adjustment and Maintenance
The luminaire features a tilt adjustment of ±15°. Use a T30 tool to adjust the tilt and tighten the screw to 6 Nm. Perform maintenance every 6 months. If the external flexible cable or the protective shield is damaged, it must be replaced immediately by the manufacturer or a qualified service agent.
Safety Warnings
- Class I Luminaires: Must be earthed.
- Class II Luminaires: Must be installed so that exposed metal parts are not in contact with any part of the electrical installation connected to a protective conductor.
- Modifications: Any modification to the luminaire is strictly forbidden.
- Distance: Respect the minimal distance from lighted objects.
Practical help
Common problems
Cracked protective shield
Replace the shield immediately with a new one.
Class I luminaire installation
Ensure the luminaire is properly earthed.
Class II luminaire installation
Ensure exposed metal parts do not contact any grounded electrical installation.
Before use
- Verify the power supply is switched off before starting installation.
- Ensure the cable used is H07RN-F type (4x1mm² or 4x1.5mm²).
- Check that the mounting surface is suitable for the chosen interface (MWA or MSF).
- Ensure the correct connector (TECHNO:THB.387 series) is used.
Images and diagrams
- The diagram shows the MWA (Wall) and MSF (Surface) mounting interfaces.
- Wiring diagram indicates L, N, DA, DA connections.
- Tilt adjustment mechanism allows ±15° movement.
Model compatibility
- Compatible with H07RN-F cables (8-12mm diameter).
- Compatible with TECHNO:THB.387.A4A/B4A/A4A.R connectors.

Manual page author
David Miller
Documentation analyst
Organizes user manual content into clear summaries, with attention to model details, product context, and everyday usability.