Automotive / RV Caravan Accessories
Installation Guide for Thule Omnistor 6300 Motor Kit 12V
Complete installation and wiring guide for the Thule Omnistor 6300 Motor Kit 12V. Includes step-by-step assembly, electrical connection diagrams, manual override procedures, and safety instructions.
Table of contents
Manual images
Click an image to enlargeQuick Guide
This document provides installation instructions for the Thule Omnistor 6300 Motor Kit 12V. The kit allows for motorized operation of the awning. Key requirements include a 12V DC power supply, a 20A fuse, and proper wiring to prevent voltage drop. The awning must be connected to a secondary battery to avoid interference with other vehicle systems. Safety is paramount: the awning must be closed before starting the vehicle, and operation is disabled when the vehicle ignition is on.
Package Contents
Ensure all parts are present before starting installation:
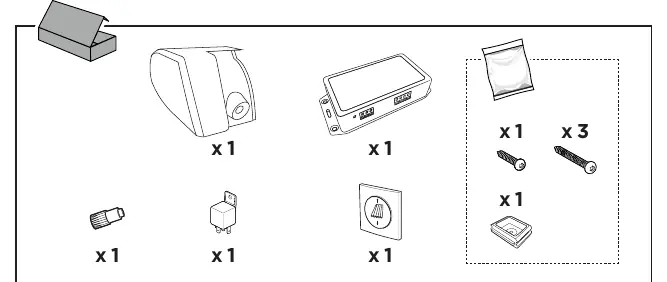
- Motor unit (x1)
- Control box (x1)
- Switch (x1)
- Relay (x1)
- Mounting hardware (screws, connectors)
- TX20 screwdriver (required tool)
Disassembly
If replacing an existing motor or preparing the awning:
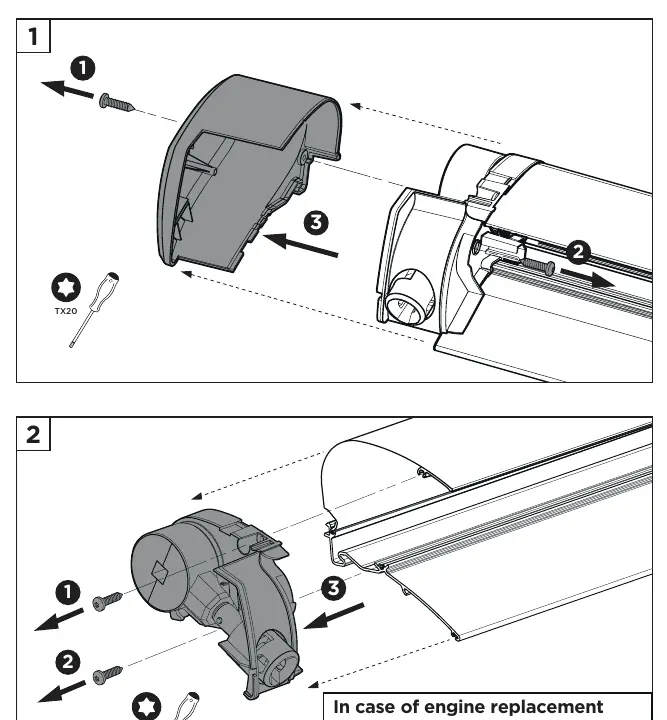
- Remove the end cap by unscrewing the fixing screw using a TX20 screwdriver.
- Remove the existing motor or end mechanism by unscrewing the fixing screws.
Assembly
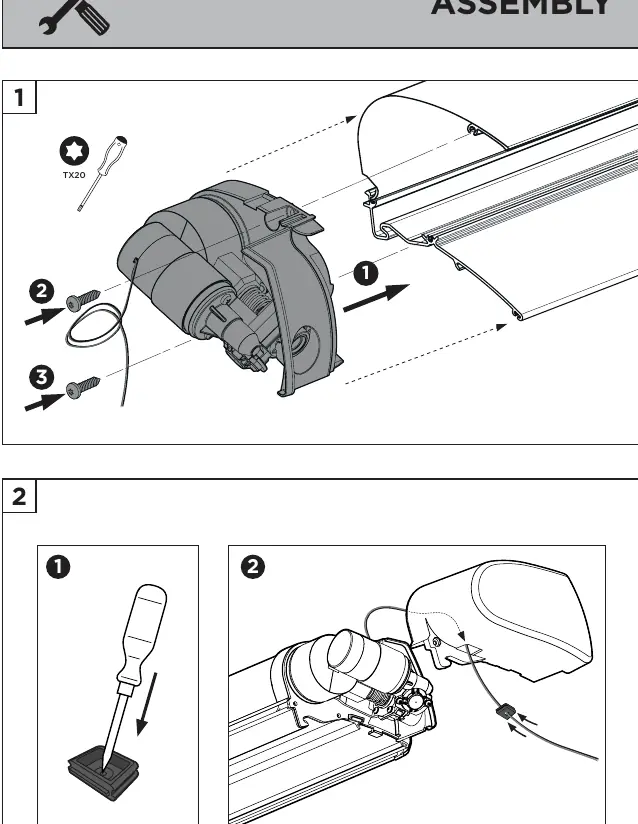
- Install the new motor unit into the awning housing.
- Secure the motor unit using the provided screws and a TX20 screwdriver.
- Install the end cap and secure it.
- Install the end cap cover.
Electrical Installation
Control Box Installation: Mount the control box inside the vehicle using screws. Extend the motor wires (+ red and - black) to the control unit.
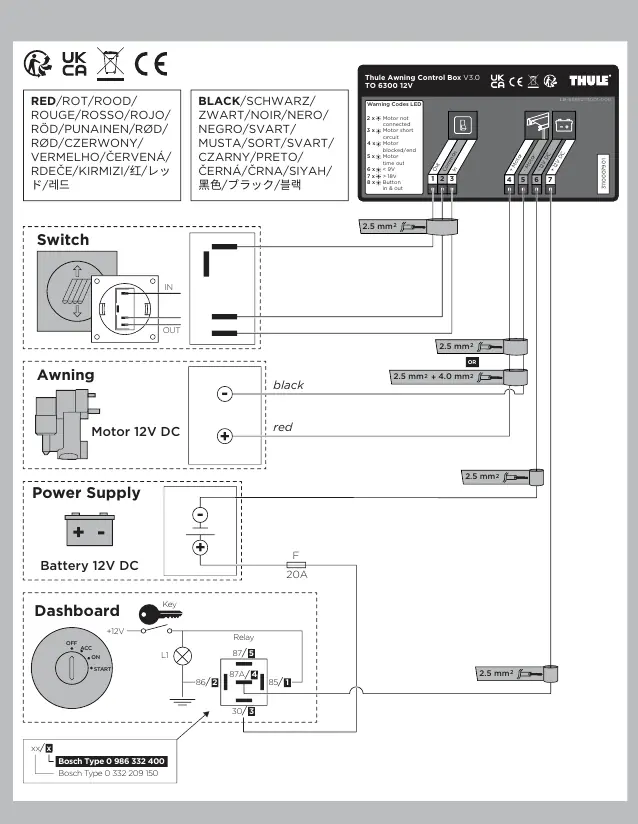
Wiring Requirements: Use 2.5mm² cables for connections to prevent voltage loss. If the distance between the PCB and the awning exceeds 10 meters, use 4mm² cables to maintain a minimum of 9V at peak usage (20A).
Switch Installation: Install the monostable switch (ON)-OFF-(ON) in a desired location. Connect the switch to inputs 1, 2, and 3 of the control box using 1.5mm² wires.
Battery Connection: Connect the control unit to the vehicle's secondary battery. Install a 20A fuse in the positive (+) line. Do not insert the fuse until all electrical connections are completed. Connect the battery to inputs 6 and 7 of the control box.
Ignition Connection: Connect the battery to the PCB via a relay so that the awning cannot be operated when the vehicle ignition is on. Connect the chosen clamp to input 7 of the control box.
Manual Override
In case of power failure or motor malfunction, the awning can be operated manually:
- Locate the manual override point on the awning end cap.
- Use the manual crank handle to open or close the awning.
- Ensure the motor is not engaged or powered during manual operation.
Safety and Warranty
Safety: The awning is a sun protection device, not an all-weather protection. It must be closed during storms, heavy rain, or snowfall to prevent damage. The awning must be closed before starting the vehicle.
Warranty: The warranty is valid for two years from the date of invoice for the original buyer. It covers defects in materials and workmanship. Warranty is void if the product is installed incorrectly, modified, repaired by unqualified persons, or if non-original accessories are used.
Manufacturer information
Thule
Practical help
Common problems
Awning does not open
Check if the vehicle ignition is on. The awning is designed not to operate when the ignition is active.
Motor stops or fails to operate
Check for voltage drop. If the cable length exceeds 10m, ensure you are using 4mm² cables to maintain at least 9V.
Control box not working
Verify all wiring connections, check the 20A fuse, and ensure the battery is connected to the correct inputs (6 & 7).
Before use
- Ensure the power source is 12V DC.
- Install a 20A fuse in the positive (+) line.
- Use a monostable (ON)-OFF-(ON) switch.
- Use minimum 2.5mm² wire for motor and control box connections.
- Verify that the awning is closed before starting the vehicle.
- Ensure the awning is connected to a secondary battery, not the starter battery.
Specs in practice
- Monostable Switch
- A switch that automatically returns to the center (OFF) position when released.
Images and diagrams
- Wiring Diagram: Illustrates the connections between the control box, motor, switch, battery, and ignition relay.
- Manual Override: Shows the physical steps to manually crank the awning if the motor fails.
Model compatibility
- Designed specifically for the Thule Omnistor 6300 awning.
- Requires a secondary battery for optimal performance and to avoid electrical interference.

Manual page author
David Miller
Documentation analyst
Organizes user manual content into clear summaries, with attention to model details, product context, and everyday usability.