Automotive / RV Caravan Accessories
Installation Manual for Thule Omnistor Motor Kit 12V
Installation and wiring guide for the Thule Omnistor Motor Kit 12V. Includes step-by-step mounting instructions, electrical connection diagrams, technical specifications, and manual override procedures.
Table of contents
Manual images
Click an image to enlargeQuick guide from the manual
The Thule Omnistor Motor Kit 12V is designed to motorize specific Thule awnings. Before beginning, verify that your awning length is compatible. The kit is suitable for awnings with lengths of 3m, 3.5m, 4m, 4.5m, and 5m. It is not compatible with lengths of 1.9m, 2.3m, or 2.6m.

Warnings and tools
Ensure you have the necessary tools before starting the installation. Required tools include a TX20 screwdriver, pliers, wire cutters, and a hammer. Always follow the safety instructions provided in the separate safety document included with your product.
Installation
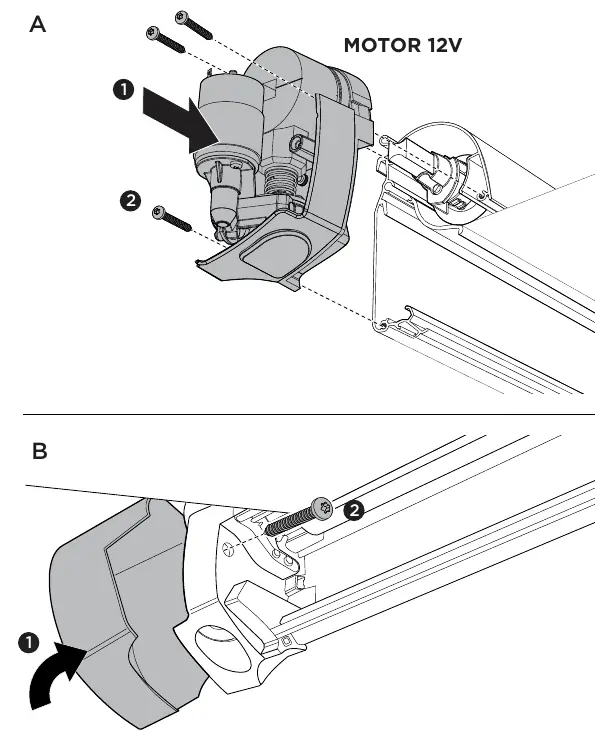
The installation process involves removing the existing end cap from the awning and replacing it with the motor unit. Follow these steps:
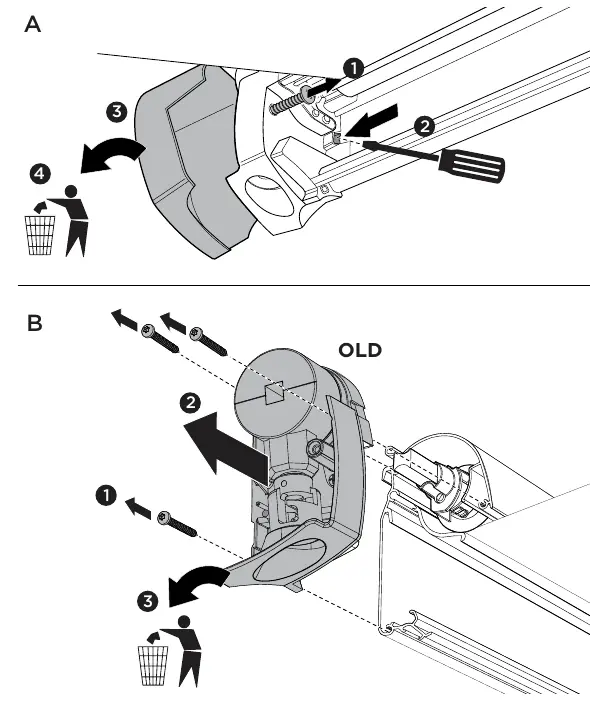
- Remove the screws securing the old end cap.
- Detach the old end cap and discard it.
- Position the new motor unit onto the awning housing.
- Secure the motor unit using the provided screws.
- Ensure the motor is properly aligned and seated before tightening.
Electrical installation
The electrical system requires a 12V DC power supply. The control box manages the motor operation. Ensure all wiring is connected according to the provided diagram, paying close attention to polarity (Red for positive, Black for negative). The system includes a 20A fuse. The control box features LED indicators to help diagnose issues such as motor disconnection, short circuits, or blocked motors.
Manual override
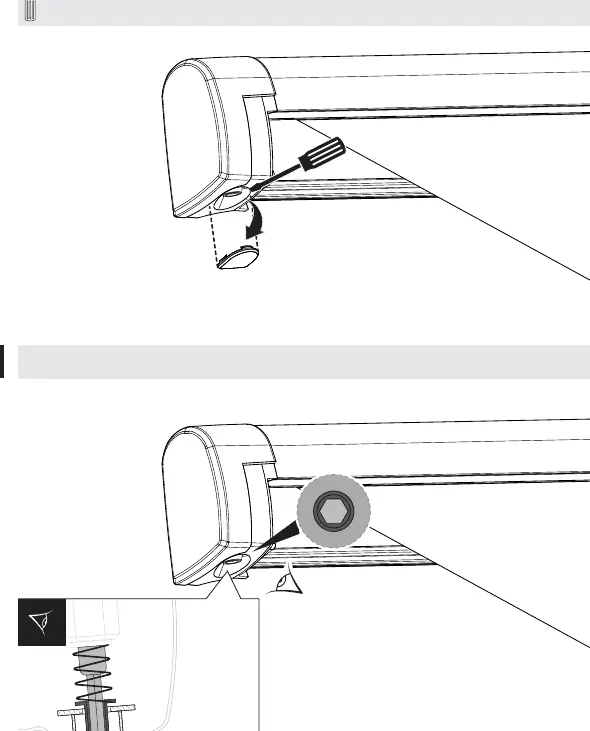
In the event of a power failure, the awning can be operated manually. To do this, remove the protective cap from the motor housing using a screwdriver. Insert the manual crank handle into the opening. Ensure the crank is fully engaged before turning to extend or retract the awning. After manual operation, ensure the protective cap is replaced.
Manufacturer information
Thule
Practical help
Common problems
Motor not connected
Check the wiring connections to the control box.
Motor short circuit
Inspect the wiring harness for damage or exposed wires.
Motor blocked
Check the awning for physical obstructions preventing movement.
Voltage out of range
Ensure the power supply is between 9V and 18V.
Before use
- Verify awning length is 3m, 3.5m, 4m, 4.5m, or 5m.
- Ensure a 12V DC power source is available.
- Have a TX20 screwdriver, pliers, and wire cutters ready.
- Confirm the 20A fuse is installed in the power line.
- Check that the control box is mounted in a dry location.
Specs in practice
- IP classification
- IP51, protected against dust and dripping water.
- Operation Temperature
- Functional between -25°C and +80°C.
Images and diagrams
- The wiring diagram illustrates the connection between the Motor, Control Box, Switch, Battery, and Dashboard key.
- The manual override section shows the removal of the end cap and insertion of the crank handle.
Model compatibility
- Compatible with Thule awnings: 3m, 3.5m, 4m, 4.5m, 5m.
- Not compatible with Thule awnings: 1.9m, 2.3m, 2.6m.

Manual page author
David Miller
Documentation analyst
Organizes user manual content into clear summaries, with attention to model details, product context, and everyday usability.