Garden / Snow Blowers
Operator's Manual for Toro 21in Power Clear Flex-Force 60V MAX Snowthrower
Comprehensive operator's guide for the Toro 21in Power Clear Flex-Force 60V MAX Snowthrower (Models 39921, 39921T). Includes setup, battery charging, operation, maintenance, and troubleshooting instructions.
Quick answers from the manual
Quick answer
- This manual covers the Toro 21in Power Clear Flex-Force 60V MAX Snowthrower (Models 39921 and 39921T). It provides instructions for assembly, battery charging, operation, maintenance, and troubleshooting. p. 1, 2
Key actions
- Start the machine p. 12
- Charge the battery p. 14
- Clear a clogged chute p. 15
First start
- Charge the battery pack fully before first use. p. 9, 14
Show 4 more answers Show less
Problems and fixes
Machine does not run
Check battery charge, installation, and temperature range.
p. 18Maintenance and reset
- Inspect rotor blades yearly or before each session. p. 16
Technical specifications
| Parameter | Value | Meaning | Pages |
|---|---|---|---|
| Battery Capacity | 10 Ah / 540 Wh | Capacity of the included battery pack | p. 11 |
Where to find it in the PDF
- Operation p. 12, 13
- Maintenance p. 16
Table of contents
Manual images
Click an image to enlargeQuick guide from the manual
This manual provides essential instructions for the safe and efficient operation of the Toro 21in Power Clear Flex-Force 60V MAX Snowthrower. Before first use, ensure the battery is fully charged. Always remove the battery and electric-start button when the machine is unattended, during maintenance, or when clearing clogs. The machine is designed for residential snow removal on patios, sidewalks, and small driveways; do not use on gravel surfaces.
Setup and Assembly
Mounting the Battery Charger: The charger can be mounted on a wall using the keyholes on the back. Mount it indoors in a dry, well-ventilated area near a power outlet.
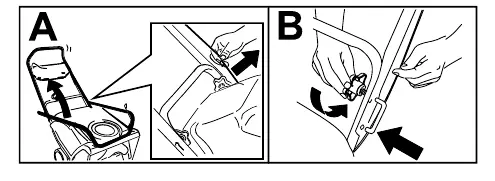
Unfolding the Handle: Secure the handle using the provided handle locks and knobs.
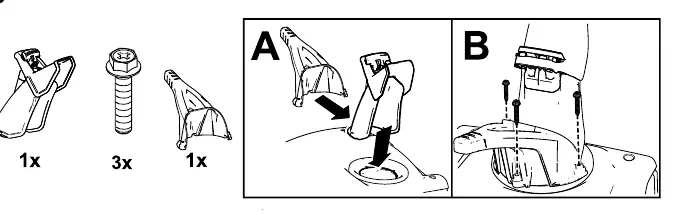
Installing the Discharge Chute: Attach the discharge chute assembly to the machine using the provided hex washer head screws and the chute handle.
Operation
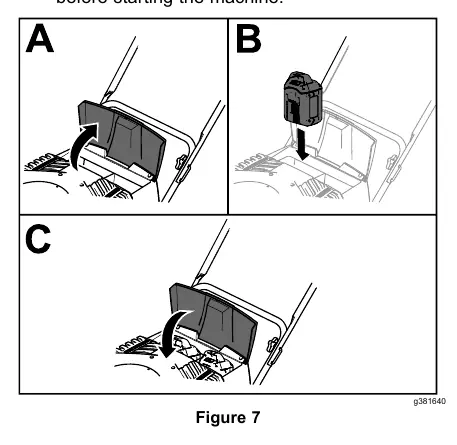
Installing the Battery: Lift the battery-compartment lid, align the battery cavity with the tongue on the machine, and slide it in until it locks. Ensure the lid is snapped shut.
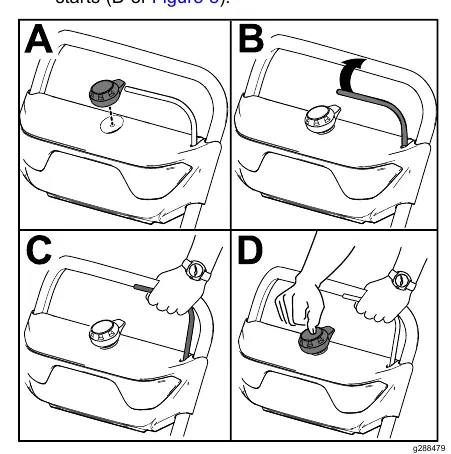
Starting the Machine: Insert the electric-start button into the starter. Squeeze the bail against the handle and press the electric-start button until the motor engages.
ECO Mode: Activate ECO mode using the switch on the control panel to extend battery life by reducing rotor speed, ideal for moving snow short distances.
Shutting Off: Release the bail to stop the motor. Remove the electric-start button and the battery pack when not in use.
Maintenance and Storage
Rotor Blade Inspection: Inspect rotor blades before each session. If the edge is worn down to the wear-indicator hole, have an Authorized Service Dealer replace the blades and scraper.
Preventing Freeze-up: After use, let the motor run for a few minutes to clear ice. Clean snow and ice from the base of the chute and rotate the chute to prevent it from freezing in place.
Storage: Store the machine, battery, and charger in a clean, dry, enclosed area. For off-season storage, charge the battery to 2 or 3 LED indicators (do not store fully charged or fully depleted).
Practical help
Common problems
Machine does not run or runs intermittently
Check if the battery is low, not fully installed, or if the battery pack is outside the appropriate temperature range (5°C to 40°C). Ensure leads are dry.
Machine does not reach full power
Check if the battery charge capacity is too low or if air vents are blocked.
Machine discharges snow poorly
Reduce the amount of snow removed per swath, ensure the discharge chute is not plugged, or check if the auger/impeller drive belt is loose/worn.
Battery charger LED blinking red
Indicates a communication error. Unplug the charger, wait 10 seconds, and retry. If it persists after 2 attempts, the battery may be faulty.
Before use
- Ensure battery is fully charged
- Check that battery is fully seated and latched
- Inspect rotor blades for wear
- Clear operating area of debris
- Check discharge chute for clogs
- Verify all guards are in place
Show more Show less
Specs in practice
- Battery Capacity
- 10 Ah / 540 Wh (Model 66810)
- Operating Temperature
- -30°C to 23°C (-22°F to 73°F)
- Charging Temperature
- 5°C to 40°C (41°F to 104°F)
Images and diagrams
- Figure 5: Product overview and control locations
- Figure 7: Battery installation procedure
- Figure 8: Starting the machine
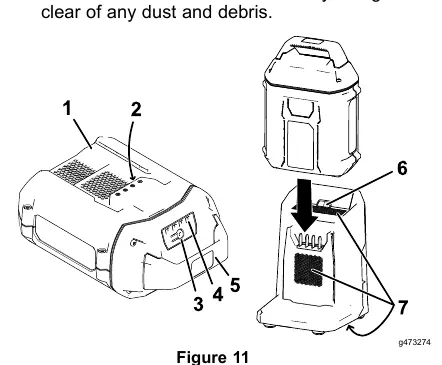
- Figure 11: Battery charging and LED indicators
- Figure 13: Rotor blade wear indicator
Model compatibility
- Use only Toro 60V lithium-ion battery packs
- Model 39921T does not include a battery or charger
- Do not use on gravel surfaces

Manual page author
David Miller
Documentation analyst