HVAC / Towel Warmers
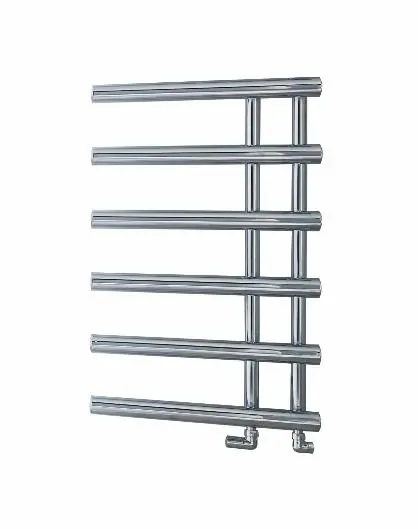
Installation Guide for Towelrads Mayfair Towel Rail
Quick installation guide for the Towelrads Mayfair Towel Rail. Includes tools required, safety precautions, step-by-step mounting instructions, and maintenance tips.
Table of contents
Manual images
Click an image to enlargeQuick guide from the manual
This document provides installation instructions for the Towelrads Mayfair Towel Rail. Installation should be performed by a qualified professional. Ensure all components are present and you are satisfied with the product's size, design, and finish before beginning. The supplied fixings are intended for masonry walls; alternative fixings may be required for other wall types.
Safety and Preparation
When drilling, always check for hidden pipes and cables. Wear appropriate personal protective equipment, including safety eyewear. Keep small parts away from children. If working near a basin or bath, insert a plug into the waste to prevent losing small parts. Use a Residual Current Device (RCD) when using power tools near water.
Tools Required
- Drill and drill bit
- Residual Current Device (recommended)
- Pozi Drive or Flathead screwdriver
- PTFE tape
- Measuring tape
- Spirit level
- Pencil
Parts Supplied
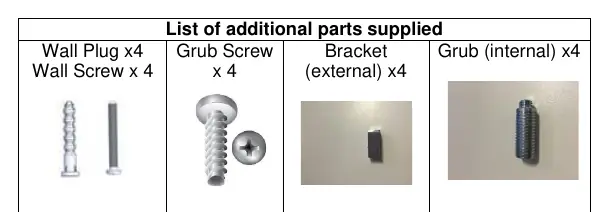
- Wall plugs (x4)
- Wall screws (x4)
- Grub screws (x4)
- External brackets (x4)
- Internal brackets (x4)
- Air vent (x1)
Installation Steps
- Gently remove the radiator from packaging. Apply sufficient PTFE tape to valve-tail threads. Apply silicone thread sealant to all threaded components with O-rings.
- Screw the air vent into the top hole of the radiator.
- Ensure the wall is strong enough to support the weight of the towel warmer when filled with water.
- Using the radiator and a spirit level, mark the bracket positions on the wall.
- Mark the centers of the brackets, drill four holes, and insert the wall plugs.
- Screw the external brackets into the wall plugs using the wall screws.
- Screw the internal bracket to the front cover plate. These parts connect through the radiator horizontal bar.
- Mount the radiator by sliding the internal brackets into the external brackets on the wall.
- Secure the radiator by tightening the grub screws into the side of the external brackets using a hexagonal key.
- Make connections to the heating circuit and remove trapped air using the air vent.
Care and Maintenance
Regularly clean the surface with a soft cloth. Soapy water may be used for stubborn stains, followed by buffing dry with a soft cloth. Do not use abrasive or chemical cleaners, as these will damage the surface finish over time.
Practical help
Common problems
Drill wandering on tiled surfaces
Apply a piece of insulating tape or a couple of layers of masking tape to the wall before drilling.
Small parts lost during installation
When working near a basin or bath, insert the plug into the waste.
Radiator not heating properly
Ensure all trapped air is removed from the radiator using the air vent; this step may need to be repeated.
Before use
- Check that all components are present.
- Verify the size, design, and finish of the product.
- Ensure the wall is strong enough to hold the weight of the towel warmer filled with water.
- Check for hidden pipes or wires in the wall before drilling.
- Verify the wall type (supplied fixings are for masonry only).
Specs in practice
- Silicone thread sealant
- Should be applied to all threaded components manufactured with O-rings.
Images and diagrams
- The manual provides a table listing all supplied parts, including wall plugs, wall screws, grub screws, external brackets, internal brackets, and the air vent.
Model compatibility
- Supplied wall plugs and screws are intended for masonry walls only.
- Alternative fixings are required if installing on non-masonry wall types.

Manual page author
David Miller
Documentation analyst
Organizes user manual content into clear summaries, with attention to model details, product context, and everyday usability.