Industrial / Electrical
Ustellar 100W LED Security Light User Guide
Comprehensive user guide for the Ustellar 100W LED Security Light, covering installation, technical specifications, safety precautions, and maintenance instructions.
Table of contents
Manual images
Jump to the sectionProduct Overview
The Ustellar 100W LED Security Light is a high-performance, hardwired lighting solution designed for outdoor security applications. This unit is controlled directly via a standard wall switch, providing reliable illumination without the complexity of motion or dusk-to-dawn sensors. Please note that this model is not dimmable and does not support brightness adjustments.
Safety Information
Before beginning installation, ensure that the power supply is completely disconnected at the circuit breaker. Inspect the light fixture and all included components for any signs of damage. Do not attempt to install the light in corrosive environments, as this may compromise the integrity of the housing. If the power cord appears damaged, discontinue use immediately. This product is designed for use in wet locations and must be installed in accordance with local electrical codes by a qualified individual familiar with the hazards of electrical work.
Technical Specifications
The unit operates on a standard AC120V input at 50/60Hz. It delivers a maximum luminous flux of 10000lm with a color temperature of 5000K. The fixture is rated for a lifespan of 50,000 hours and is designed to function within an ambient temperature range of -20°C to 40°C.
Installation Instructions
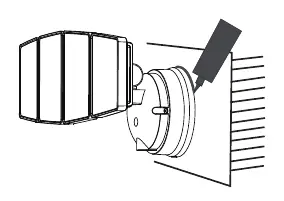
For optimal performance, mount the light at a height of approximately 6.5 to 8 feet above the ground. Begin by installing the mounting strap to your junction box using the provided screws. Connect the wires using the included wire connectors: the black wire (L) connects to the black supply wire, the white wire (N) connects to the white supply wire, and the green/yellow wire connects to the junction box ground wire. Once the electrical connections are secure, mount the light fixture using the mounting bolt and rubber plug. After installation, it is critical to apply silicone sealant around the entire perimeter of the cover plate where it meets the mounting surface to prevent water ingress into the junction box.

Maintenance and Disposal
The light source within this luminaire is non-replaceable. When the unit reaches the end of its service life, the entire fixture must be replaced. Ensure the unit is kept clean and free of debris to maintain optimal light output. Dispose of the product in accordance with local regulations for electronic waste.
Practical help
Common problems
Light does not turn on
Check if the wall switch is in the ON position and verify that the power supply is active at the circuit breaker.
Water ingress into junction box
Ensure silicone sealant was applied completely around the perimeter of the cover plate during installation.
Before use
- Verify the power is turned off at the breaker
- Inspect the light and all parts for damage
- Ensure the junction box is rated for wet locations
- Confirm the supply voltage matches the product requirements
- Have silicone sealant ready for weatherproofing
Images and diagrams
- Wiring diagram showing L (Black), N (White), and Ground (Green/Yellow) connections.
- Exploded view of the mounting process including the strap, bolts, and wire connectors.
- Illustration showing the application of silicone sealant around the base plate.
Model compatibility
- Not compatible with dimmer switches.
- Not compatible with motion or dusk-to-dawn sensors.
- Suitable for wet locations.
- Ambient operating temperature must not exceed 40°C.

Manual page author
Michael Turner
Technical manual editor
Reviews PDF manuals for structure, safety notes, and practical product details so readers can find the right information quickly.