Health / Laboratory Equipment
User Manual for VanGuard 1300SL Series Stereo Microscope
Quick guide for the VanGuard 1300SL Series Stereo Microscope. Includes assembly instructions, focusing, diopter adjustment, maintenance, and specifications for models 1353SL, 1354SL, 1363SL, and 1364SL.
Table of contents
Manual images
Click an image to enlargeQuick Guide
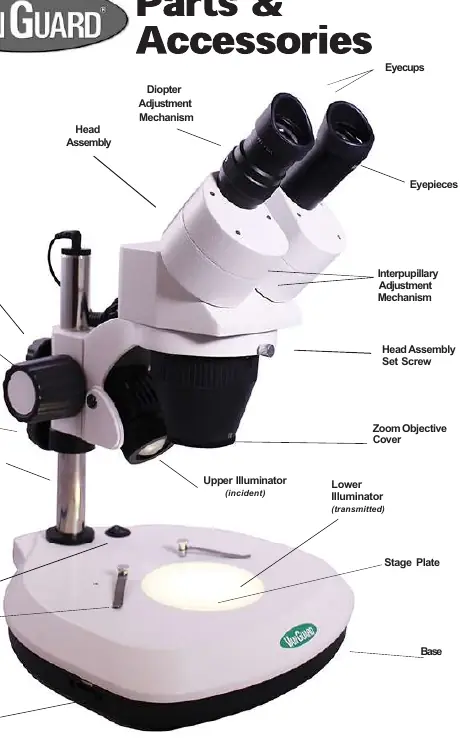
The VanGuard 1300SL Series is a stereo microscope designed for high-resolution, three-dimensional imaging. This manual covers models 1353SL, 1354SL, 1363SL, and 1364SL. The system features dual-magnification configurations and variable LED illumination.
Assembly
- Place the stand on a stable, level surface.
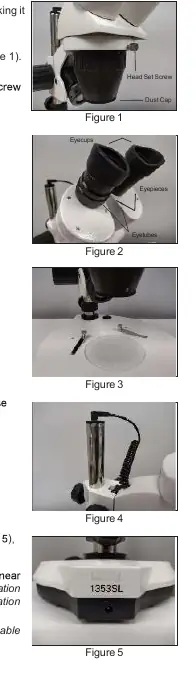
- Loosen the head assembly set screw, insert the head assembly into the stand, and retighten the screw.
- Remove the dust cap from the bottom of the zoom objective cover.
- Install the eyepieces into the eyetubes and attach the eyecups.
- Place the frosted stage plate into the stage recess.
- Connect the power cord to the jack on the rear of the base and plug into a suitable power supply.
Using the Microscope

Focusing
Use the large, knurled focus control knobs located on both sides of the microscope. The mechanism includes travel stops to prevent the pinion from disengaging from the rack gear.
Interpupillary Adjustment
Grasp the eyepieces and look through them. If you see two separate fields, move the eyepieces closer together. If you see overlapping fields, move the eyepieces apart.
Diopter Adjustment
- Place a sample on the stage plate.
- Turn the diopter adjustment mechanism on the eyetube clockwise as far as it will go.
- Set the objective to the highest magnification.
- Look through the eyepieces with one eye closed and focus using the focus knobs.
- Close the other eye and use the diopter adjustment mechanism to focus the image for the second eye.
- Open both eyes to verify the image is focused.
Maintenance
LED Illumination: The LEDs are long-life and not user-replaceable. If the lights do not function, contact your dealer or VanGuard microscopes directly.
Cleaning: Never wipe coated lenses while dry, as this will scratch the coating. Use an air canister or an air-bulb with a camel-hair brush to remove dust. For stubborn dirt, use a lens cleaner with a cotton swab, then wipe with a quality lens tissue. Do not use Xylene as it breaks down the lens bonding material.
Specifications
- Viewing Head: Binocular or Trinocular, 45° inclination.
- Working Distance: 102mm.
- Voltage: 110V (Standard), 220V (Switchable).
- Weight: 4.5kg.
- Stage Plate: Frosted, with locked-on stainless steel stage clips.
Practical help
Common problems
Image is not clear
Repeat the diopter adjustment process to ensure proper optical correction.
Lights do not turn on
Check that both the upper and lower illumination variable controls are set to their highest settings.
Two separate fields of view are visible
Move the eyepieces closer together.
Two overlapping fields of view are visible
Move the eyepieces apart.
Before use
- Ensure the stand is placed on a stable counter top.
- Remove the dust cap from the zoom objective cover.
- Verify all components from the included parts list are present.
- Connect the power cord to the rear jack.
- Ensure the diopter adjustment is performed prior to use.
Specs in practice
- Working Distance
- 102mm distance between the objective and the sample.
- Head Inclination
- 45° angle for ergonomic viewing.
Images and diagrams
- Focus control knobs are located on both sides of the microscope.
- Diopter adjustment mechanism is located on the eyetube.
- Illumination controls are located on the base (upper on right, lower on left).
Model compatibility
- Manual covers models 1353SL, 1354SL, 1363SL, and 1364SL.

Manual page author
Emily Carter
User documentation editor
Prepares concise manual descriptions and highlights the most useful setup, operation, and maintenance information for readers.