Garden / Pool Equipment
User Manual for Vevor HAP and HBP Series Pool Pumps
Quick guide for Vevor HAP and HBP series pool pumps. Includes installation, electrical wiring, priming, maintenance, troubleshooting, and parts diagrams.
Table of contents
Manual images
Click an image to enlargeQuick guide from the manual
This manual covers the installation, operation, and maintenance of Vevor HAP and HBP series pool pumps. These pumps are designed for permanently installed swimming pools. Always ensure the pump is installed by a qualified professional and connected to a GFCI-protected outlet to prevent electrical shock. Never operate the pump without water, as this can damage the seals and void the warranty.
Safety Instructions
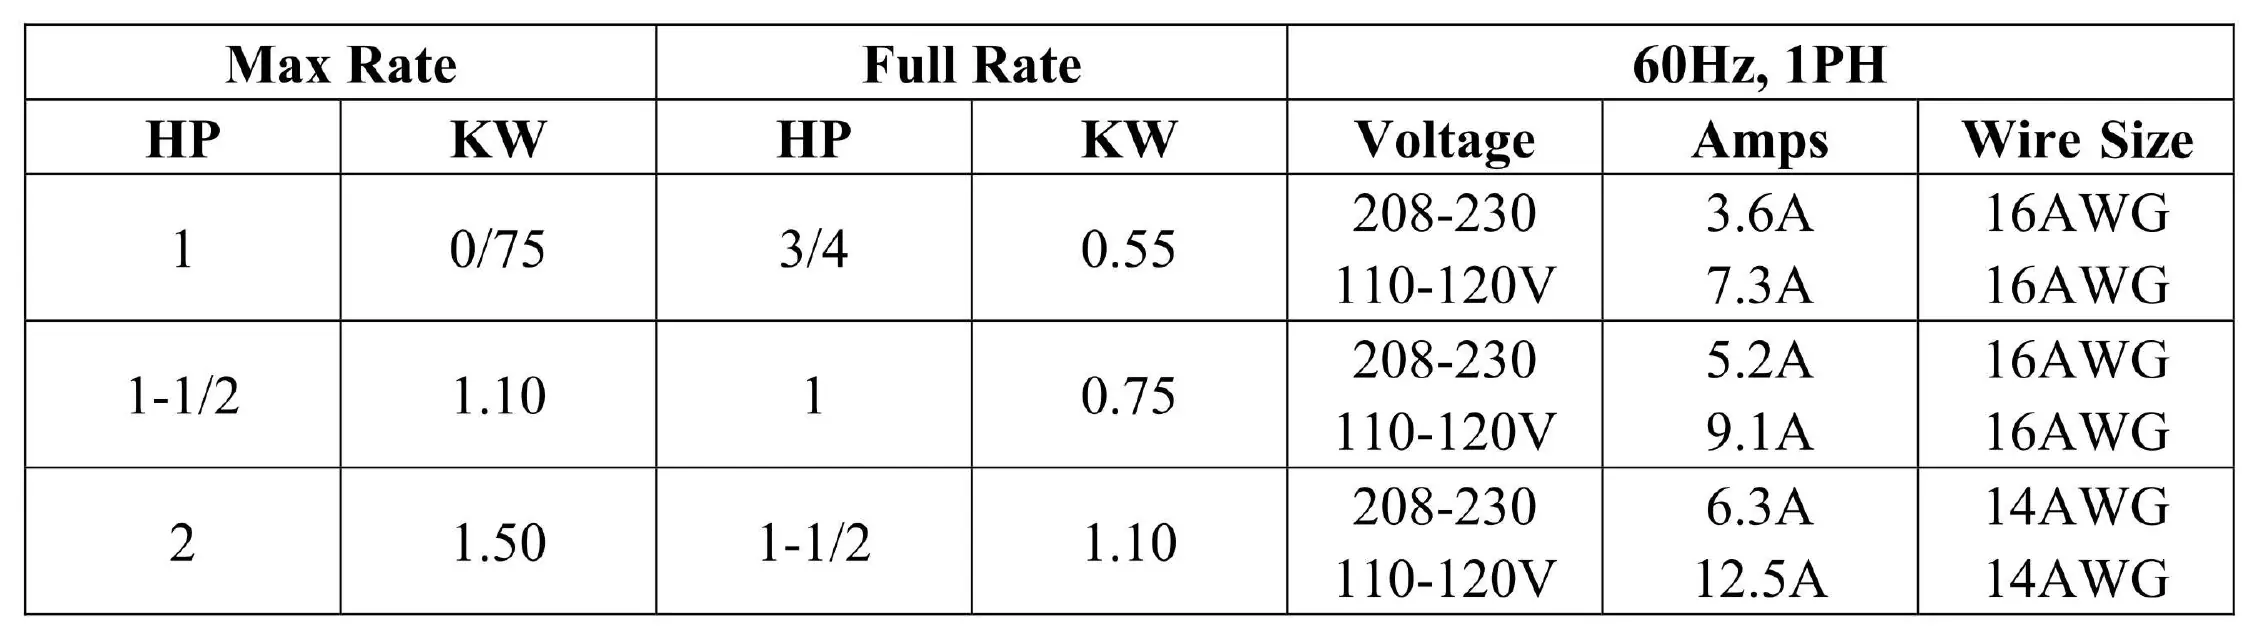
Electrical Safety: All electrical wiring must be performed by a licensed electrician in accordance with local codes and the National Electrical Code (NEC). The pump must be connected to a grounding-type receptacle protected by a Ground Fault Circuit Interrupter (GFCI).
Suction Entrapment: To reduce the risk of entrapment, ensure suction outlets are not blocked. A minimum of two functioning suction outlets per pump must be installed, spaced at least three feet apart.
Hazardous Pressure: Never operate the circulation system at more than 40 PSI. Always release pressure using the filter manual air relief valve before servicing the pump.
Installation
Pump Location: Install the pump as close to the pool as possible to reduce friction loss. Select a well-drained area that will not flood. Ensure the area has adequate ventilation for motor cooling.
Pump Mounting: Install the pump on a firm, level base or pad. Fasten the pump to the base with screws or bolts to reduce vibration.
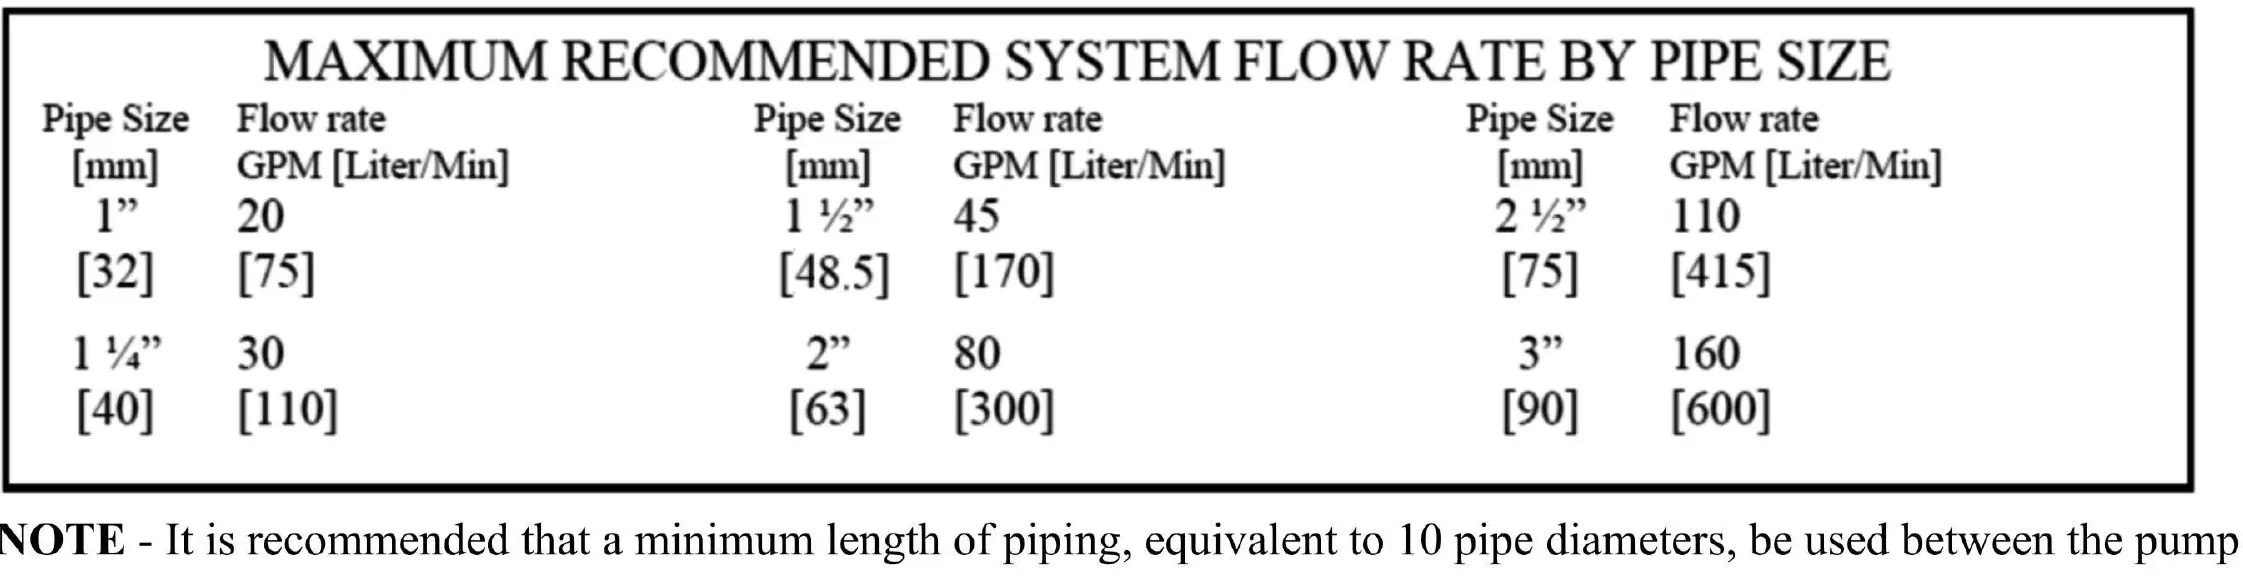
Plumbing: Use Teflon tape to seal threaded connections on molded plastic components. Do not use Plumbers Pipe Dope, as it may crack the plastic. Tighten fittings by hand and then use a tool to engage an additional 1.5 turns. Do not over-tighten.
Start-Up and Operation
Priming the Pump: Before starting, fill the strainer housing with water to the suction pipe level. Ensure all suction and discharge valves are open. Turn on the power and wait for the pump to prime, which may take up to five minutes. If it does not prime, stop the motor and check for air leaks or obstructions.
Maintenance and Winterization
Maintenance: Clean the strainer basket regularly. Do not strike the basket to clean it. Keep the motor clean and ensure air vents are free from obstruction.
Winterization: To prevent freezing damage, drain all water from the pump and piping. Disconnect the pump from the mounting pad and piping system. Store the pump in a dry area. Do not purge the system with compressed air.
Troubleshooting
Motor Will Not Start: Check wiring connections, switches, circuit breakers, and fuses. Ensure the motor is wired for the correct voltage.
Pump Won't Prime: Ensure the strainer housing is filled with water and the cover O-ring is clean, seated properly, and lubricated. Check for air leaks on the suction side.
Noisy Pump: Check for air leaks in the suction piping, vibration due to improper mounting, or foreign matter in the pump housing.
Manufacturer information
VEVOR
Practical help
Common problems
Motor will not start
Check wiring connections, switches, circuit breakers, and fuses. Ensure the motor is wired for the correct voltage.
Pump won't prime
Ensure strainer housing is filled with water, O-ring is clean and lubricated, and suction connections are tight.
Noisy pump
Check for air leaks in suction piping, ensure pump is mounted securely on a level surface, and clean out any foreign matter from the housing.
Motor shuts off
Check for low voltage or power drop. The motor has an automatic thermal overload protector that will restart once cooled.
Before use
- Ensure pump is installed on a firm, level base.
- Verify electrical supply matches motor nameplate voltage.
- Ensure all suction and discharge valves are open.
- Fill strainer housing with water before starting.
- Check that all plumbing connections are tight and sealed with Teflon tape.
- Verify GFCI protection is installed.
Images and diagrams
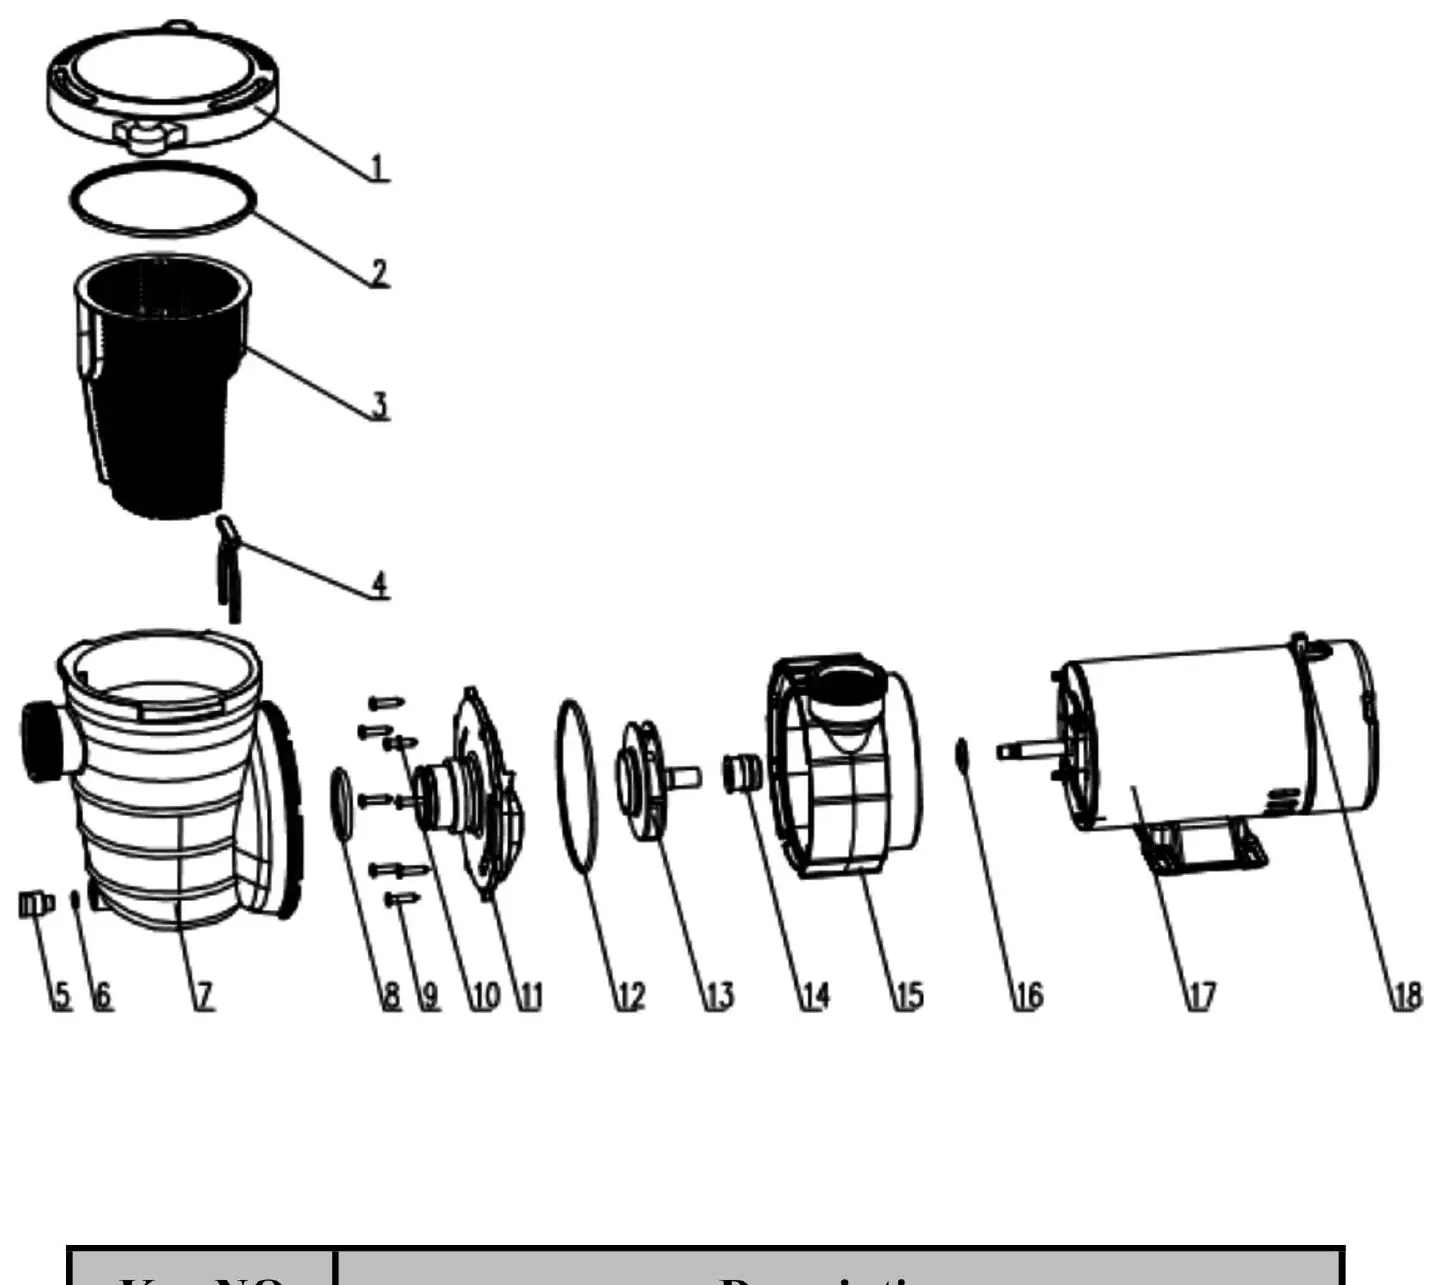
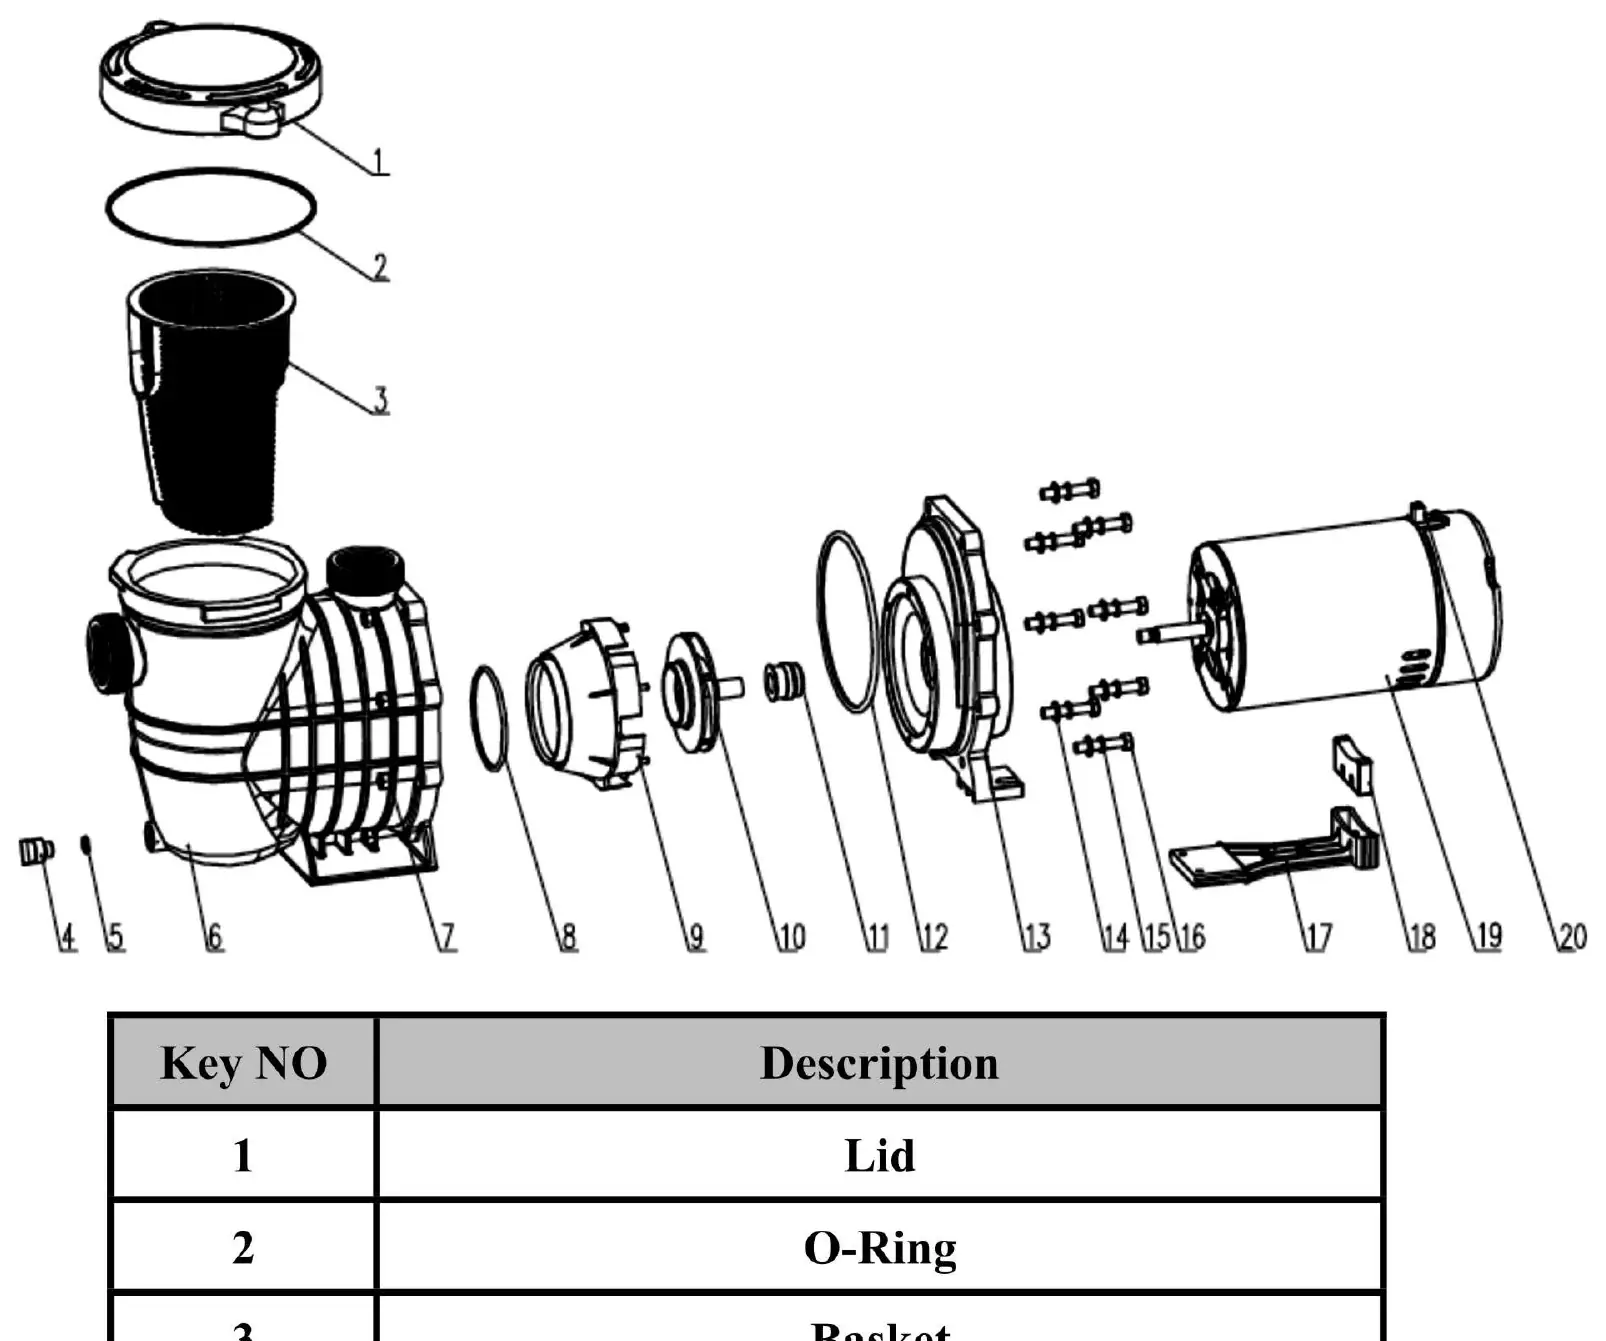
- Exploded view diagrams show the assembly order of the lid, O-ring, basket, strainer, impeller, and motor components.
- Parts lists provide key numbers corresponding to the diagrams for identifying replacement parts.
Model compatibility
- Designed for permanently installed swimming pools.
- Do not use with storable pools.
- Requires GFCI-protected electrical supply.
- Use only propylene glycol as antifreeze for winterization.

Manual page author
Michael Turner
Technical manual editor
Reviews PDF manuals for structure, safety notes, and practical product details so readers can find the right information quickly.