Garden / Camping Equipment
Wanderer Savannah 12P Tent Assembly Instructions
Quick assembly guide for the Wanderer Savannah 12P Tent. Includes parts list, step-by-step setup instructions, and important safety warnings for recreational use.
Table of contents
Manual images
Click an image to enlargeQuick guide from the manual
This document provides assembly instructions for the Wanderer Savannah 12P Tent. Before beginning, ensure you have a level surface free of rocks and twigs. The tent is designed for recreational use only.
Parts List
- Tent
- Fly
- 3 x Fibreglass Poles
- 8 x Steel Poles (4x type 1, 2x type 2, 2x type 3)
- 2 x Awning Poles
- 36 x Steel Pegs
- Carry Bag
- 2 x Guy Ropes
Assembly Instructions
Step 1: Select a level site. Unpack the tent and spread it on the ground. Ensure all doors and windows are zipped closed. Peg down the floor using the provided pegs.
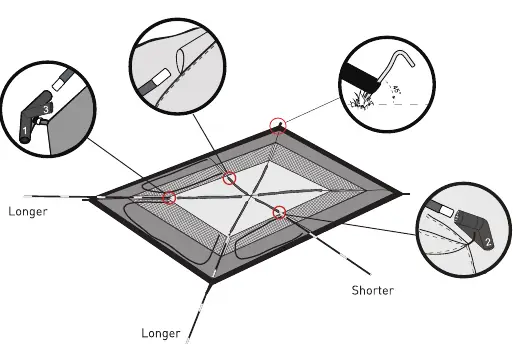
Step 2: Assemble the 3 fibreglass poles. Thread the 2 longer poles through the sleeves and insert both ends into the three-way hubs. Thread the shorter pole through the sleeve and insert both ends into the two-way hubs.
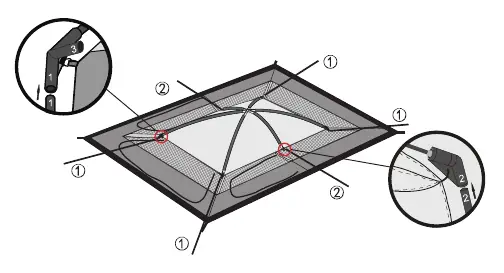
Step 3: Locate the 4 steel poles (type 1) and 2 steel poles (type 2). Insert the end without the plastic tip into the three-way hubs (indicator 1) and two-way hubs (indicator 2). Insert the other end onto the pin and ring assembly at the bottom. Attach the tent to the poles using the clips.
Step 4: Insert the 2 steel poles (type 3) into the three-way hubs (indicator 3) and attach all clips.
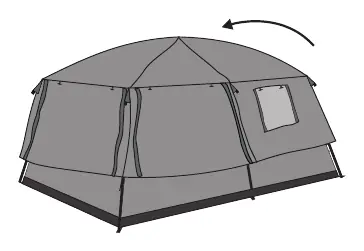
Step 5: Drape the flysheet over the inner tent, ensuring the door faces the correct direction.
Step 6: Attach the flysheet to the poles using the velcro loops. Fix all peg points at the bottom and use the provided guy ropes to peg out away from the tent for stability.
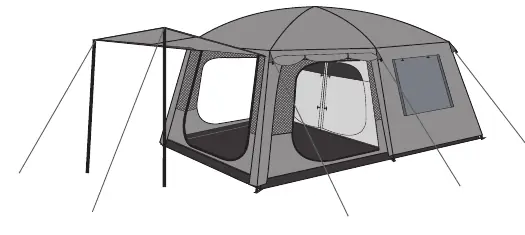
Step 7: If using the front awning, install the 2 awning poles and secure with the extra 2 guy ropes.
Safety Warnings
- Do not use any form of flame or fuel-burning appliances, heaters, candles, or matches inside the tent.
- Do not set up near open flames.
- Do not use soap or detergent for cleaning; use only cold water and a brush.
- Do not spray insecticides onto the tent.
- Do not use this tent as a dwelling; it is for recreational use only.
- Do not climb or hang on the structure.
- The maximum weight capacity of the clothes hanger is 5kg.
Practical help
Common problems
Tent instability
Ensure all guy ropes are pegged out away from the tent to maximize stability.
Cleaning the tent
Use only cold water and a brush. Do not use soap, detergents, or solvents.
Before use
- Clear the ground of rocks and twigs.
- Ensure all doors and windows are zipped closed before pegging.
- Verify all poles and pegs are present according to the parts list.
- Check that the site is level.
Specs in practice
- Clothes hanger capacity
- Maximum 5kg; do not exceed this weight.
Images and diagrams
- Steps 1-4 detail the pole assembly and hub insertion process.
- Steps 5-6 cover flysheet attachment and pegging.
- Step 7 illustrates the awning setup.
Model compatibility
- Recreational use only; not for use as a permanent dwelling.

Manual page author
David Miller
Documentation analyst
Organizes user manual content into clear summaries, with attention to model details, product context, and everyday usability.